Difference between revisions of "VT3000 Indicators"
Jump to navigation
Jump to search
SupportAdmin (talk | contribs) |
SupportAdmin (talk | contribs) |
||
| Line 1: | Line 1: | ||
== | {|style="margin:auto; width: 800px; background:#eaf3ff; padding:5px; border:2px solid #000000;" | ||
Indicators are colored shapes that can be added to the top of a PSM touch screen. These are generally used in Custom Configurations. This article offers a brief overview of the functionality. Please contact VersaCall Support if you have a need to add Indicators to your devices. | |- | ||
|<big>'''Overview'''</big> | |||
{|style="margin:left; width: 800px; background:#F0F0F0; padding:5px; border:2px solid #000000;" | |||
|valign="top" | | |||
|- | |||
|Indicators are colored shapes that can be added to the top of a PSM touch screen. These are generally used in Custom Configurations. This article offers a brief overview of the functionality. Please contact VersaCall Support if you have a need to add Indicators to your devices. | |||
|} | |||
|} | |||
<br> | |||
< | |||
---- | ---- | ||
<br> | |||
{|style="margin:left; width: 800px; background:#eaf3ff; padding:5px; border:2px solid #000000;" | |||
== | |- | ||
After selecting | |<big>'''Basic Functionality'''</big> | ||
{|style="margin:left; width: 800px; background:#F0F0F0; padding:5px; border:2px solid #000000;" | |||
[[File: | |valign="top" | | ||
|- | |||
|After selecting the Indicators tab, there will be Indicators setup or for a new module no Indicators will show. The toolbox of icons will have the same functionality. | |||
{|style="margin:left;" | |||
''' | |valign="top" | | ||
{|class="wikitable" style="background:white; align:center; width:775px;" | |||
|- | |||
|[[File:Add2.png|center|100px]] || [[File:Delete2.png|center|100px]] || [[File:Copy2.png|center|100px]] || [[File:CopyClip2.png|center|100px]] | |||
|- | |||
|style="text-align:center" | '''Add an Indicator''' || style="text-align:center" | '''Delete an Indicator''' || style="text-align:center" | '''Duplicate an Indicator''' || style="text-align:center" | '''Copy an Indicator''' | |||
|} | |||
{|class="wikitable" style="background:white; align:center; width:775px;" | |||
|- | |||
|[[File:PasteClip2.png|center|100px]] || [[File:MoveUp2.png|center|100px]] || [[File:MoveDown2.png|center|100px]] | |||
|- | |||
|style="text-align:center" | '''Paste an Indicator''' || style="text-align:center" | '''Move an Indicator Up''' || style="text-align:center" | '''Move an Indicator Down''' | |||
|} | |||
|} | |||
|} | |||
|} | |||
<br> | |||
---- | ---- | ||
<br> | |||
{|style="margin:left; width: 800px; background:#eaf3ff; padding:5px; border:2px solid #000000;" | |||
|- | |||
===Step | |<big>'''Indicator Properties'''</big> | ||
{|style="margin:left; width: 800px; background:#F0F0F0; padding:5px; border:2px solid #000000;" | |||
[[ | |valign="top" | | ||
|- | |||
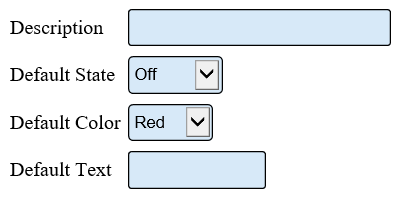
|After selecting to Add, Edit, Duplicate or Paste an Indicator - the Properties section will load. | |||
{|style="margin:left;" | |||
|valign="top" | | |||
{|class="wikitable" style="background:white; align:center; width:775px;" | |||
|- | |||
|[[File:IndiProp.png|center|397px]] | |||
|- | |||
|'''Description''' - enter a name for the indicator. | |||
|- | |||
|'''Default State - Off''' - the Indicator will be off until activated. | |||
|- | |||
|'''Default State - On''' - the Indicator will be on until activated. | |||
|- | |||
|'''Default Stat - Blinking''' - the Indicator will be blinking until activated. | |||
|- | |||
|'''Default State - Hidden''' - the Indicator will be hidden from view until activated. | |||
|- | |||
|'''Color''' - select a color for the Indicator to be by default (Red, Yellow, Blue, White, Green). | |||
|- | |||
|'''Default Text''' - enter the text to show below the indicator until activated. | |||
|} | |||
|} | |||
|} | |||
|} | |||
<br> | |||
---- | |||
---- | |||
<br> | |||
{|style="margin:auto;" | |||
|valign="top" | | |||
{|class="wikitable" style="text-align:center; background:#eaf3ff; width: 200px;" | |||
|- | |||
|[[Special:Categories|<big>'''Help by Category'''</big>]] | |||
|} | |||
|valign="top" | | |||
{|class="wikitable" style="text-align:center; background:#eaf3ff; width: 200px;" | |||
|- | |||
|[[VT3000_How To Guides|<big>'''Step by Step Guides'''</big>]] | |||
|} | |||
|valign="top" | | |||
{|class="wikitable" style="text-align:center; background:#eaf3ff; width: 200px;" | |||
|- | |||
|[[https://www.versacall.com/customer-support/service-ticket|<big>'''Submit a Ticket'''</big>]] | |||
|} | |||
|valign="top" | | |||
{|class="wikitable" style="text-align:center; background:#eaf3ff; width: 200px;" | |||
|- | |||
|[[https://www.versacall.com/training|<big>'''Training Videos'''</big>]] | |||
|} | |||
|} | |||
{|style="margin:auto;" | |||
|valign="top" | | |||
{|class="wikitable" style="text-align:center; background:#eaf3ff; width: 800px;" | |||
|- | |||
|colspan="2"|<inputbox> | |||
type=search | |||
default=Search VersaCall Support | |||
</inputbox> | |||
|} | |||
|} | |||
Revision as of 21:48, 15 March 2022
Overview
|
Basic Functionality
|
Indicator Properties
|
|
|
|
|
|
| ||


