Difference between revisions of "VPIV Widgets"

From Versacall Support
Jump to navigation Jump to search
Line 1: Line 1:
<div style="text-align: center; color:#00719d; font-size:150%;">'''<big>Call Support at 858-677-6766 ext. 210</big>'''</div>
{|style="background:transparent; color:black" border="0" height="230" align="center" valign="bottom"
{|style="background:transparent; color:black" border="0" height="230" align="center" valign="bottom" cellpadding=10px cellspacing=10px
|+style="background:transparent|
|+style="background:transparent|
|-align="center"
|-align="center"
|
|[[Image:CallUsBtn.png|Call Now 858-677-6766]]
|
|
|[[Image:SubmitTckBtn.png|link=https://www.versacall.com/customer-support/service-ticket]]
|[[Image:SubmitTckBtn.png|link=https://www.versacall.com/customer-support/service-ticket]]
Line 8: Line 9:
|[[Image:EmailUsBtn.png|link=mailto:[email protected]?Subject=Help%20Needed%20Wiki&body=Type%20Message%20Here]]
|[[Image:EmailUsBtn.png|link=mailto:[email protected]?Subject=Help%20Needed%20Wiki&body=Type%20Message%20Here]]
|}
|}
<br>
----
----
----
<br>
<br>
{|style="margin:auto; width: 800px; background:#eaf3ff; padding:5px; border:2px solid #000000;"
{|style="margin:left; width: 800px; background:#eaf3ff; padding:5px; border:2px solid #000000;"
|-
|-
|<big>'''Overview'''</big>
|<big>'''Overview'''</big>

Revision as of 14:42, 19 September 2022

Call Now 858-677-6766 SubmitTckBtn.png EmailUsBtn.png


Overview
A Widget is a Panel/Display that is made to fit inside of a cell on a Panel. The construction/configuration of a Widget is exactly the same as constructing/configuring a Panel. A Widget is used to provide the user the ability to mix and match what is seen on a single Panel or multiple Panels.


Basic Functionality - Main Screen
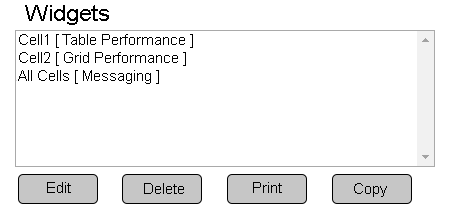
Overview of how to Edit, Remove, Print & Copy an a Widget.
Widget1.png
List - all created widgets will appear in the list.
Edit - select a widget so that it is highlighted - select the Edit button to access the editing pages.
Delete - select a widget so that it is highlighted - select the Delete button to remove it permanently.
Print - select a widget so that it is highlighted - select the Print button to create a print out of all the widget information.
Copy - select a widget so that it is highlighted - select the Copy button to duplicate the widget and access the editing pages.
Add a Widget
There are 7 different types of Widgets that can be created. Each of these is available under the Add New heading.
Widget2.png
Widget Type
VPIVGridIcon.png
VPIVTableIcon.png
Grid - freeform type of Widget - cells can be placed anywhere on the screen in any size. Table - cells are arranged in columns and rows very similar to an Excel spreadsheet.
Widgets Andon
AndonGrid.png
AndonTable.png
Andon Grid Andon Table
Ability to access & setup Constant Tags, System Property Tags, State Tags & Duration Tags.
Widgets Performance
PerformGrid.png
PerformTable.png
Performance Grid Performance Table
Ability to access & setup ALL Tag types.
Widgets Other - Informative
InformGrid.png
InformTable.png
Informative Grid Informative Table
No access to Tags. Used for displaying Text or Images only.
Widgets Other - Messaging
Messaging.png
No access to Tags. Used to display Text Messages related to open calls/alarms.
Widgets Other - Dynamic
VPIVDynamic.png
No access to Tags. Customized solution for specific configurations.


Table Widget Properties
After selecting to Add or Edit a Table Widget, a window will open with the following Properties.
Tabs
At the top of the page there will be 3 tabs to select from.
VPTabs.png
Properties - this tab allows the user to name the widget and to enter the refresh interval.
Layout - this tab provides access to the rows, columns and cells of the table. Also provides access to cells on a grid widget.
Tags - this tab provides access to tag creation that monitors device data.
Properties
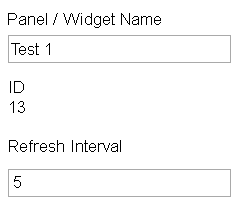
VPProperties2.png
Widget Name - enter a name for the widget.
ID - assigned by the VP IV software.
Refresh Interval - enter number of seconds - how often the widget information should be refreshed.
Layout - Buttons
VPButtons.png
Rows - use the Plus (+) & Minus (-) buttons to add and remove Rows from the table.
Columns - use the Plus (+) & Minus (-) buttons to add and remove Columns from the table.
Merge Horz. - use the Plus (+) & Minus (-) buttons to merge cells Horizontally in the table.
Merge Vert. - use the Plus (+) & Minus (-) buttons to merge cells Vertically in the table.
Clipboard - select a cell in the table - use the Copy or Paste button to either copy the selected cell or paste to the selected cell.
Move Horz. use the Left & Right buttons to move cells Horizontally in the table.
Move Vert. - use the Up & Down buttons to move cells Vertically in the table.
Layout - Table
VPTable.png
Table - select first cell in the table (blue cell) to select the entire table and the properties.
Row - select the first cell of any row (blue cell) to select the entire row and its properties.
Column - select the first cell of any column (blue cell) to select the entire column and its properties.
Cell - select any individual cell to access its properties/setup.
Layout - Cell Properties
VPFont.png
Type - select what type of cell you want to create - Text, Tag or Image.
Content - depending on the type of cell you will have different options. Select/Enter the information that you want to show in the cell.
Alignment - select how you want the content to be aligned in the cell - Right, Left, Center & Top, Bottom, Center.
Font Style - with a Text or Tag cell, you can select the font be Bold, Italics or Underlined.
Font - with a Text of Tag Cell, you can select the type of font you want to show in the cell.
Size - with a Text or Tag Cell, you can select the font size for the cell.
Back - select the color that you want the background of the cell to be.
Fore - select the color that you want the font/text to be in the cell.
Blink - select if you want to blink information in the cell.
Tags
VPPropButtons.png
Add a Tag - select the Plus Icon to add a new tag.
Delete a Tag - select a tag from the list so that it is highlighted - select the Trash Can Icon to remove the tag.
Duplicate - select a tag from the list so that it is highlighted - select the Dual File Icon to duplicate the tag.
Copy - select a tag from the list so that it is highlighted - select the Right Arrow Clip Board Icon to copy the tag.
Paste - select the Left Arrow Clip Board icon to paste the copied tag to the list.
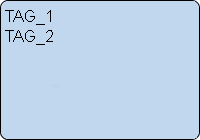
VPTagList.png
List - all tags that have been added to the widget will appear alphabetically in the list area.
Save & Exit
VPSaveButton1.png
Save - once you have made a change to the widget you can select the Save button to save your changes.
Save & Exit - once you have mad a change to the widget you can select the Save & Exit button to save your changes and exit the Widget editing page.
Discard - once you have made a change to the widget you can select the Discard button to NOT Save any of your changes and exit the Widget editing page.
Exit - if you have not made any changes to the Widget, your only option will be an Exit button.


Grid Widget Properties
After selecting to Add or Edit a Grid Widget, a window will open with the following Properties.
Tabs
At the top of the page there will be 3 tabs to select from.
VPTabs.png
Properties - this tab allows the user to name the widget and to enter the refresh interval.
Layout - this tab provides access to the rows, columns and cells of the table. Also provides access to cells on a grid widget.
Tags - this tab provides access to tag creation that monitors device data.
Properties
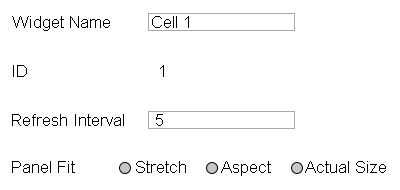
VPProperties.png
Widget Name - enter a name for the widget.
ID - assigned by the VP IV software.
Refresh Interval - enter number of seconds - how often the widget information should be refreshed.
Panel Fit - Stretch - the panel will stretch to the full size of the cell provided.
Panel Fit - Aspect - setup the aspect ratio to use in the cell and select the alignment.
Panel Fit - Actual Size - enter a size in pixels the widget will be and select the alignment.
Layout - Icons
At the top of the layout, all of the cell movement and sizing options are available.
VPPropButtons.png
Plus - select to add a new cell to the layout.
Trash Can - after selecting a cell, select this icon to remove that cell.
Document - after selecting a cell, select this icon to duplicate that cell.
Clipboard Left - after selecting a cell, select this icon to copy that cell.
Clipboard Right - after copying a cell, select this icon to paste the copied cell to the layout.
VPMoveButtons.png
Double Left Arrow - after selecting a cell, select this icon to move the cell 5 points left.
Single Left Arrow - after selecting a cell, select this icon to move the cell 1 point left.
Double Up Arrow - after selecting a cell, select this icon to move the cell 5 points up.
Single Up Arrow - after selecting a cell, select this icon to move the cell 1 point up.
Single Down Arrow - after selecting a cell, select this icon to move the cell 1 point down.
Double Down Arrow - after selecting a cell, select this icon to move the cell 5 points down.
Single Right Arrow - after selecting a cell, select this icon to move the cell 1 point right.
Double Right Arrow - after selecting a cell, select this icon to move the cell 5 points right.
VPLayers.png
VPLayers2.png
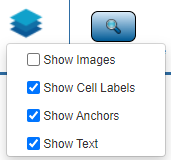
Layers Icon - select this icon to view a checklist of items to be shown on the layout.
Checklist - click on the box of the layer/item you want to see on the layout. Examples does not have Show Images marked. This means no images will be shown on the layout.
Layout - Cell Content
At the bottom of the layout, all of the cell content options are available.
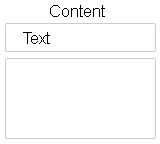
CPContent.png
Content - select Text, Tag or Image from the drop down. Each option will provide a different selection/entry option.
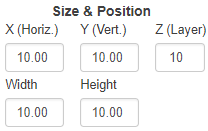
Click in one of the fields to adjust the specific Size or Position.
VPPosition.png
X (Horiz.) - set this to adjust the amount of points the cell is left/right.
Y (Vert.) - set this to adjust the amount of points the cell is up/down.
Z (Layer) - set this to adjust the depth level for the cell.
Width - set this to adjust how many points wide the cell is (maximum of 100).
Height set this to adjust how many points tall the cell is (maximum of 100).
Click in one of the fields to adjust the color(s) of the cell.
VPGridColor.png
Back - select this swatch to change the background color of the cell.
Fore - select this swatch to change the foreground (text) color of the cell.
Blink - select this option to setup cell blinking.
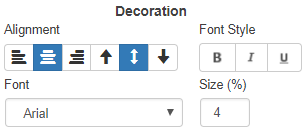
Select an icon or field to adjust the Text Font, Alignment, Style or Size in the cell.
VPDecoration.png
Alignment - select one of the icons to adjust the horizontal or vertical alignment of the text in the cell.
Font Style - select one or more of the icons to make the text Bold, Italics and/or Underlined.
Font - select the down arrow to select the font used in the cell.
Size - use this field to enter the percentage of the cell to fill with your Text.
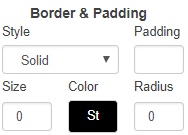
Select a field to adjust the Border of the cell.
VPBorder.png
Style - select the down arrow to select the type of border to be used on the cell.
Padding - enter the number of points to pad the edges of the cell from Text or Images.
Size - enter the number of points for the thickness of the line.
Color - select the swatch to choose the color of the border.
Radius - enter the angle/radius of the corners of the cell. Entering a Zero makes the cell a Square.
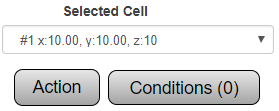
Use this area to select specific cells or setup actions and conditions for the cell.
VPSelected.png
Selected Cell - select the down arrow to select the cell by position.
Action - select this button to setup specific actions.
Conditions - select this button to setup Content, Color & Visibility conditions.
Tags
VPPropButtons.png
Add a Tag - select the Plus Icon to add a new tag.
Delete a Tag - select a tag from the list so that it is highlighted - select the Trash Can Icon to remove the tag.
Duplicate - select a tag from the list so that it is highlighted - select the Dual File Icon to duplicate the tag.
Copy - select a tag from the list so that it is highlighted - select the Right Arrow Clip Board Icon to copy the tag.
Paste - select the Left Arrow Clip Board icon to paste the copied tag to the list.
VPTagList.png
List - all tags that have been added to the widget will appear alphabetically in the list area.
Save & Exit
VPSaveButton1.png
Save - once you have made a change to the widget you can select the Save button to save your changes.
Save & Exit - once you have mad a change to the widget you can select the Save & Exit button to save your changes and exit the Widget editing page.
Discard - once you have made a change to the widget you can select the Discard button to NOT Save any of your changes and exit the Widget editing page.
Exit - if you have not made any changes to the Widget, your only option will be an Exit button.


SearchHeader.png


VC Footer.png
Follow Us On LinkedIn View our Blog