Difference between revisions of "VT3000 System Settings"
Jump to navigation
Jump to search

SupportAdmin (talk | contribs) |
SupportAdmin (talk | contribs) |
||
| (9 intermediate revisions by the same user not shown) | |||
| Line 1: | Line 1: | ||
== | {|style="background:transparent; color:black" border="0" height="230" align="center" valign="bottom" | ||
This section of the software allows the user to change Global Admin Settings, Service Settings and Web Interface Settings. | |+style="background:transparent| | ||
|-align="center" | |||
== | | | ||
Use this section to access the System Name, License, Debug Mode, Database Locations and Email Settings. | |[[Image:CallUsBtn.png|Call Now 858-677-6766]] | ||
| | |||
< | |[[Image:SubmitTckBtn.png|link=https://www.versacall.com/customer-support/service-ticket]] | ||
| | |||
|[[Image:EmailUsBtn.png|link=mailto:[email protected]?Subject=Help%20Needed%20Wiki&body=Type%20Message%20Here]] | |||
|} | |||
<BR> | |||
<div style="box-shadow: 0 0 10px 0 #b1d5ee inset; border-radius:5px; padding:10px; padding-left:20px; background:#ebf4fa;"> | |||
<span style="color:#00719e; font-family: Helvetica; font-size:150%; font-variant: small-caps; padding-left:20px;">'''General Information'''</span> | |||
:*This section of the software allows the user to change Global Admin Settings, Service Settings and Web Interface Settings. | |||
</div> | |||
<BR> | |||
<div style="box-shadow: 0 0 10px 0 #b1d5ee inset; border-radius:5px; padding:10px; padding-left:20px; background:#ebf4fa;"> | |||
<span style="color:#00719e; font-family: Helvetica; font-size:150%; font-variant: small-caps; padding-left:20px;">'''Global Settings'''</span> | |||
:*Use this section to access the System Name, License, Debug Mode, Database Locations and Email Settings. | |||
<BR> | |||
:<span style="color:#90A4AE; font-size:130%">'''General Information/Settings'''</span> | |||
:*'''System Name''' - enter a name for the VT3000 system. | |||
:*'''System Key''' - this key is generated when the software is installed. | |||
:*'''Product Key''' - this is provided by VersaCall - contact support if this field is blank. | |||
:*'''Debug Mode''' - select this when instructed by a VersaCall Technician - this feature should not be selected by default. | |||
<gallery widths=412px heights=126px> | |||
Image:Global1.png|link=VT3000 System Settings | |||
</gallery> | </gallery> | ||
<BR> | |||
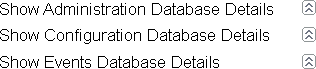
:<span style="color:#90A4AE; font-size:130%">'''Database Location'''</span> | |||
:<span style="color:#90A4AE; font-size:120%">There are 3 database detail options - Administration, Configuration and Events. Use the arrow expansion icons to view all details for each database.</span> | |||
= | <gallery widths=316px heights=69px> | ||
Image:Global2.png|link=VT3000 System Settings | |||
</gallery> | |||
<BR> | |||
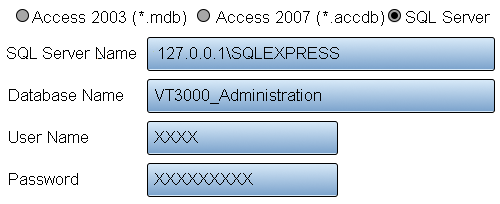
:<span style="color:#90A4AE; font-size:130%">'''Database Details'''</span> | |||
:*'''Database Type''' - currently the only option available for selection is SQL Server. | |||
:*'''SQL Server Name''' - enter the name of the SQL Server where the databases are being stored. By default, the address will read 127.0.0.1\SQLEXPRESS. | |||
:*'''Database Name''' - by default the database names will be VT3000_Administration, VT3000_Configuration and VT3000_Events. | |||
''' | :*'''User Name''' - enter the username for the account setup on SQL Server. | ||
:*'''Password''' - enter the password assigned to the username. | |||
<gallery widths=500px heights=204px> | |||
Image:Global3.png|link=VT3000 System Settings | |||
</gallery> | |||
<BR> | |||
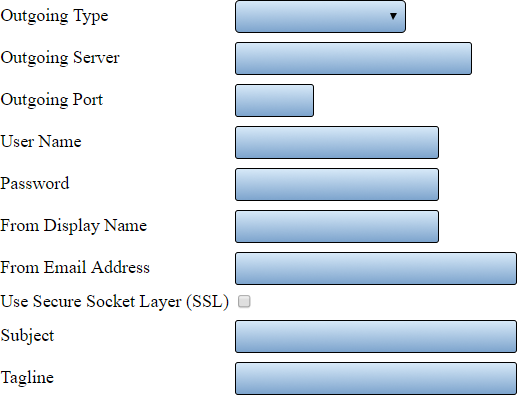
:<span style="color:#90A4AE; font-size:130%">'''Email Settings'''</span> | |||
:<span style="color:#90A4AE; font-size:120%">There are 3 types available - Disabled, Anonymous SMTP and Authenticated SMTP. Each selection will have the same fields shown but certain fields will not be available on Disabled and Anonymous SMTP.</span> | |||
:*'''Outgoing Type''' - select Disabled, Anonymous SMTP or Authenticated SMTP. | |||
There are 3 database detail options - Administration, Configuration and Events. | :*'''Outgoing Server''' - enter the name of the outgoing email server. | ||
:*'''Outgoing Port''' - enter the outgoing email server port. | |||
:*'''User Name''' - when using authenticated SMTP - enter the user name of the email account. | |||
:*'''Password''' - when using authenticated SMTP - enter the password for the email account. | |||
:*'''From Display Name''' - enter the name to be shown when using text messages. | |||
:*'''From Email Address''' - enter the email address to be shown when using email. | |||
:*'''Use Secure Socked Layer (SSL)''' - if your system requires SSL select this option. | |||
:*'''Subject''' - enter what will show on the subject line. | |||
:*'''Tagline''' - enter what will show at the bottom of all texts and emails. By default, this is set to date and time. | |||
''' | <gallery widths=517px heights=395px> | ||
Image:Global4.png|link=VT3000 System Settings | |||
''' | </gallery> | ||
<BR> | |||
''' | :<span style="color:#90A4AE; font-size:130%">'''System Monitoring'''</span> | ||
:<span style="color:#90A4AE; font-size:120%">This section is used to setup the monitoring of devices communicating with the system. You can monitor for errors or when communications have stopped.</span> | |||
''' | :*'''Option - Do Not Monitor''' - select this option if you do not want to monitor your devices. | ||
:*'''Option - Errors Only''' - select this option to monitor devices for SD Card Errors, Low Battery or Communications Not Received. | |||
''' | :*'''Option - Everything''' - select this option to monitor for Errors & if the device has stopped communicating with the coordinator. | ||
:*'''Output''' - select the Output or Group that you want to send a communication to when there is an issue. | |||
<gallery widths=173px heights=93px> | |||
Image:Global7.png|link=VT3000 System Settings | |||
</gallery> | |||
= | </div> | ||
There are 3 types available - Disabled, Anonymous SMTP and Authenticated SMTP. Each selection will have the same fields shown but certain fields will not be available on Disabled and Anonymous SMTP. | <BR> | ||
<div style="box-shadow: 0 0 10px 0 #b1d5ee inset; border-radius:5px; padding:10px; padding-left:20px; background:#ebf4fa;"> | |||
<span style="color:#00719e; font-family: Helvetica; font-size:150%; font-variant: small-caps; padding-left:20px;">'''Service Settings'''</span> | |||
:*The Service Settings page has 4 tabs available. Each tab will allow the user to edit a specific function in the software. | |||
<gallery widths=528px heights=37px> | |||
Image:ServiceTab1.png|link=VT3000 System Settings | |||
''' | </gallery> | ||
<BR> | |||
''' | :<span style="color:#90A4AE; font-size:130%">'''General - Control Center'''</span> | ||
:<span style="color:#90A4AE; font-size:120%"> Do Not alter any of the Control Center Settings unless instructed to by a VersaCall Technician.</span> | |||
''' | :*'''Control Center Address''' - the control center is software the communicates with all VersaCall software components - this is the server location. | ||
:*'''Control Center Port''' - this is the port that the control center uses to communicate. | |||
''' | :*'''IACP Port''' - this is a specific port designated by the software - do not alter. | ||
:*'''Text-to-Speech''' - when using a phone modem or 2 way radio to communicate without audio files, select the Windows voice to be used when reading the communication messages. | |||
''' | <gallery widths=306px heights=220px> | ||
Image:Global5.png|link=VT3000 System Settings | |||
''' | </gallery> | ||
<BR> | |||
''' | :<span style="color:#90A4AE; font-size:130%">'''Coordinator'''</span> | ||
:<span style="color:#90A4AE; font-size:120%">Use this tab to add or edit coordinators.</span> | |||
''' | ::<span style="font-size:120%; line-height: 3.5em; background:white; border:thin solid #90A4AE; border-radius:5px; padding:5px">[[Home - Coordinator|'''Coordinator Home Page''']]</span> | ||
<gallery widths=528px heights=37px> | |||
''' | Image:ServiceTab2.png|link=VT3000 System Settings | ||
</gallery> | |||
''' | :<span style="color:#90A4AE; font-size:120%">List will show all Coordinators installed on the system.</span> | ||
---- | <gallery widths=271px heights=210px> | ||
Image:3121 12.png|link=VT3000 System Settings | |||
</gallery> | |||
=== | :<span style="color:#90A4AE; font-size:120%">Selecting a USB Coordinator from the list will open a Properties interface similar to the image below.</span> | ||
The Service Settings page has 4 tabs available. Each tab will allow the user to edit a specific function in the software. | <gallery widths=505px heights=269px> | ||
Image:USB-Coord-Settings.png|link=VT3000 System Settings | |||
</gallery> | |||
====General= | :<span style="color:#90A4AE; font-size:120%">Selecting a Remote (RS-232) Coordinator from the list will open a Properties interface similar to the image below.</span> | ||
Do | <gallery widths=505px heights=269px> | ||
Image:Remote-232-Coord-Settings.png|link=VT3000 System Settings | |||
</gallery> | |||
:<span style="color:#90A4AE; font-size:120%">Selecting a Remote X2 - RealPort Coordinator from the list will open a Properties interface similar to the image below.</span> | |||
<gallery widths=505px heights=269px> | |||
Image:X2-Coord-Settings.png|link=VT3000 System Settings | |||
''' | </gallery> | ||
<BR> | |||
''' | :<span style="color:#90A4AE; font-size:130%">'''Paging Transmitter'''</span> | ||
:<span style="color:#90A4AE; font-size:120%">Use this tab to add or edit paging transmitters.</span> | |||
''' | ::<span style="font-size:120%; line-height: 3.5em; background:white; border:thin solid #90A4AE; border-radius:5px; padding:5px">[[Home - Paging Transmitter|'''Paging Transmitter Home Page''']]</span> | ||
<gallery widths=528px heights=37px> | |||
''' | Image:ServiceTab3.png|link=VT3000 System Settings | ||
</gallery> | |||
:<span style="color:#90A4AE; font-size:120%">List will show all Paging Transmitters installed on the system.</span> | |||
<gallery widths=260px heights=206px> | |||
= | Image:SysSetPage.png|link=VT3000 System Settings | ||
Use this tab to add or edit | </gallery> | ||
:<span style="color:#90A4AE; font-size:120%">Selecting a USB 12-62 Paging Transmitter from the list will open a Properties interface similar to the image below.</span> | |||
[[ | <gallery widths=514px heights=221px> | ||
Image:3122 15.png|link=VT3000 System Settings | |||
</gallery> | |||
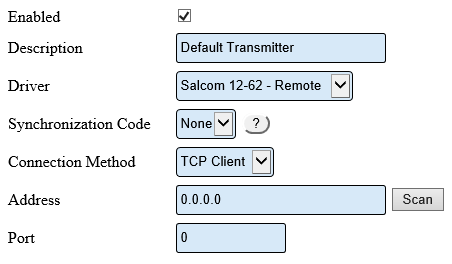
:<span style="color:#90A4AE; font-size:120%">Selecting a Remote 12-62 Paging Transmitter from the list will open a Properties interface similar to the image below.</span> | |||
<gallery widths=505px heights=269px> | |||
-- | Image:3102 9.png|link=VT3000 System Settings | ||
</gallery> | |||
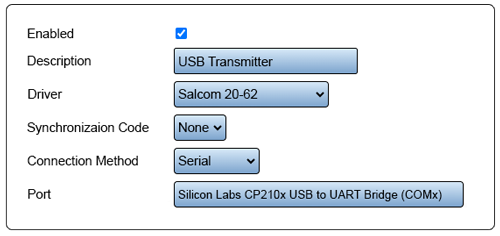
:<span style="color:#90A4AE; font-size:120%">Selecting a USB 20-62 Paging Transmitter from the list will open a Properties interface similar to the image below.</span> | |||
= | <gallery widths=500px heights=236px> | ||
Use this tab to add or edit | Image:2062-USB-Driver.png|link=VT3000 System Settings | ||
</gallery> | |||
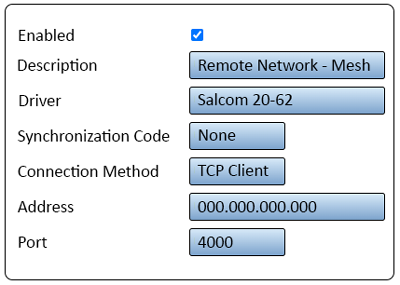
[[ | :<span style="color:#90A4AE; font-size:120%">Selecting a Remote 20-62 Paging Transmitter from the list will open a Properties interface similar to the image below.</span> | ||
<gallery widths=400px heights=285px> | |||
Image:2062-Driver.png|link=VT3000 System Settings | |||
</gallery> | |||
<BR> | |||
---- | :<span style="color:#90A4AE; font-size:130%">'''Audio Out'''</span> | ||
:<span style="color:#90A4AE; font-size:120%">Use this tab to add or edit phone modems and/or 2-way radios.</span> | |||
::<span style="font-size:120%; line-height: 3.5em; background:white; border:thin solid #90A4AE; border-radius:5px; padding:5px">[[Home - Phone Modem|'''Phone Modem Home Page''']]</span> | |||
==== | ::<span style="font-size:120%; line-height: 3.5em; background:white; border:thin solid #90A4AE; border-radius:5px; padding:5px">[[Home - 2 Way Radio|'''2-Way Radio Home Page''']]</span> | ||
<gallery widths=528px heights=37px> | |||
Image:ServiceTab4.png|link=VT3000 System Settings | |||
</gallery> | |||
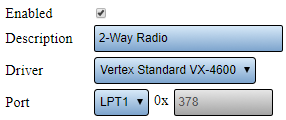
:<span style="color:#90A4AE; font-size:120%">Image below shows a 2-Way Radio Setup.</span> | |||
<gallery widths=286px heights=120px> | |||
Image:Global6.png|link=VT3000 System Settings | |||
</gallery> | |||
''' | </div> | ||
<BR> | |||
<div style="box-shadow: 0 0 10px 0 #b1d5ee inset; border-radius:5px; padding:10px; padding-left:20px; background:#ebf4fa;"> | |||
<span style="color:#00719e; font-family: Helvetica; font-size:150%; font-variant: small-caps; padding-left:10px;">'''Keyword Search'''</span> | |||
{|style="margin:auto;" | |||
{|class="wikitable" style="align:center; width:600px;" | |||
|- | |||
!<span style="color:#0054a6; font-size:120%"><big>Type Subject or Key Word to Query Archives</big></span> | |||
|- | |||
|<inputbox>type=search</inputbox> | |||
|} | |||
|} | |||
</div> | |||
<br> | |||
[[File:VC Footer.png|center|link=Main Page]] | |||
{|style="background:transparent; color:black" border="0" height="200" align="center" valign="bottom" cellpadding=10px cellspacing=10px | |||
|+style="background:transparent| | |||
|-align="center" | |||
| | |||
|[[File:LinkedIn.png|Follow Us On LinkedIn|link=https://www.linkedin.com/company/versacall/]] | |||
| | |||
|[[File:BlogIcon.png|View our Blog|link=https://www.versacall.com/blog/]] | |||
|} | |||
Latest revision as of 14:59, 21 November 2023

|

|

|
General Information
- This section of the software allows the user to change Global Admin Settings, Service Settings and Web Interface Settings.
Global Settings
- Use this section to access the System Name, License, Debug Mode, Database Locations and Email Settings.
- General Information/Settings
- System Name - enter a name for the VT3000 system.
- System Key - this key is generated when the software is installed.
- Product Key - this is provided by VersaCall - contact support if this field is blank.
- Debug Mode - select this when instructed by a VersaCall Technician - this feature should not be selected by default.

- Database Location
- There are 3 database detail options - Administration, Configuration and Events. Use the arrow expansion icons to view all details for each database.
- Database Details
- Database Type - currently the only option available for selection is SQL Server.
- SQL Server Name - enter the name of the SQL Server where the databases are being stored. By default, the address will read 127.0.0.1\SQLEXPRESS.
- Database Name - by default the database names will be VT3000_Administration, VT3000_Configuration and VT3000_Events.
- User Name - enter the username for the account setup on SQL Server.
- Password - enter the password assigned to the username.
- Email Settings
- There are 3 types available - Disabled, Anonymous SMTP and Authenticated SMTP. Each selection will have the same fields shown but certain fields will not be available on Disabled and Anonymous SMTP.
- Outgoing Type - select Disabled, Anonymous SMTP or Authenticated SMTP.
- Outgoing Server - enter the name of the outgoing email server.
- Outgoing Port - enter the outgoing email server port.
- User Name - when using authenticated SMTP - enter the user name of the email account.
- Password - when using authenticated SMTP - enter the password for the email account.
- From Display Name - enter the name to be shown when using text messages.
- From Email Address - enter the email address to be shown when using email.
- Use Secure Socked Layer (SSL) - if your system requires SSL select this option.
- Subject - enter what will show on the subject line.
- Tagline - enter what will show at the bottom of all texts and emails. By default, this is set to date and time.
- System Monitoring
- This section is used to setup the monitoring of devices communicating with the system. You can monitor for errors or when communications have stopped.
- Option - Do Not Monitor - select this option if you do not want to monitor your devices.
- Option - Errors Only - select this option to monitor devices for SD Card Errors, Low Battery or Communications Not Received.
- Option - Everything - select this option to monitor for Errors & if the device has stopped communicating with the coordinator.
- Output - select the Output or Group that you want to send a communication to when there is an issue.

Service Settings
- The Service Settings page has 4 tabs available. Each tab will allow the user to edit a specific function in the software.
- General - Control Center
- Do Not alter any of the Control Center Settings unless instructed to by a VersaCall Technician.
- Control Center Address - the control center is software the communicates with all VersaCall software components - this is the server location.
- Control Center Port - this is the port that the control center uses to communicate.
- IACP Port - this is a specific port designated by the software - do not alter.
- Text-to-Speech - when using a phone modem or 2 way radio to communicate without audio files, select the Windows voice to be used when reading the communication messages.

- Coordinator
- Use this tab to add or edit coordinators.
- List will show all Coordinators installed on the system.
- Selecting a USB Coordinator from the list will open a Properties interface similar to the image below.

- Selecting a Remote (RS-232) Coordinator from the list will open a Properties interface similar to the image below.
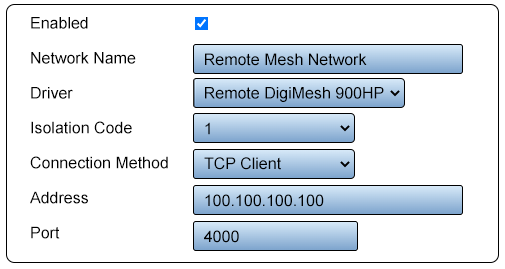
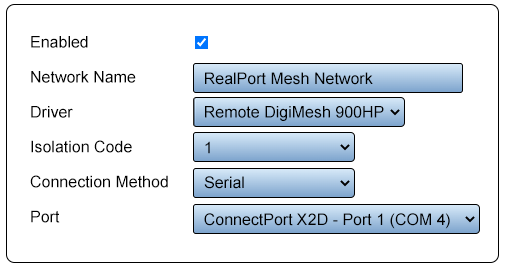
- Selecting a Remote X2 - RealPort Coordinator from the list will open a Properties interface similar to the image below.
- Paging Transmitter
- Use this tab to add or edit paging transmitters.
- List will show all Paging Transmitters installed on the system.
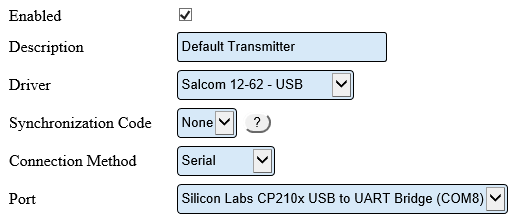
- Selecting a USB 12-62 Paging Transmitter from the list will open a Properties interface similar to the image below.
- Selecting a Remote 12-62 Paging Transmitter from the list will open a Properties interface similar to the image below.
- Selecting a USB 20-62 Paging Transmitter from the list will open a Properties interface similar to the image below.
- Selecting a Remote 20-62 Paging Transmitter from the list will open a Properties interface similar to the image below.
- Audio Out
- Use this tab to add or edit phone modems and/or 2-way radios.
- Image below shows a 2-Way Radio Setup.
Keyword Search
| Type Subject or Key Word to Query Archives |
|---|

|