|
|
| Line 1: |
Line 1: |
| If you need to add an Email Address as an output you will need to set it up in the VT3000 software. You must have the SMTP server configured in the VT3000 software. If you do not have this configured you will need to contact VersaCall for further assistance.
| | An Email Address can be setup as an input VT3000. The SMTP server must be configured before messages can be sent. If the SMTP server has not been setup, see [[Setup SMTP Server - (VT3000)]]. |
|
| |
|
| 1. Open the VT3000 web interface – log in with your user name and password – select Configuration from the main menu – select Devices from the Configuration menu – select Outputs from the Devices page.
| | ---- |
|
| |
|
| 2. On the Outputs page click on the Email icon under the Add New list.
| |
|
| |
|
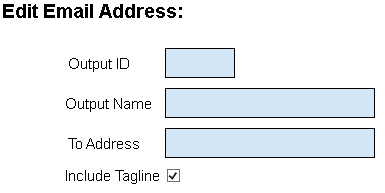
| 3. There are 2 sections on the Edit Email Address page. An explanation for the first section is below:
| | 1. Open the VT3000 web interface – log in - select Configuration – select Outputs. |
|
| |
|
| a. Output ID – this is assigned by the system and is not an editable field.
| | [[File:3107_1.png]][[File:3107_3.png]] |
| b. Output Name – this is where you will give the email address a name.
| |
| c. To Address – this is where you will enter the email address for the output.
| |
| d. Include Tagline – you will select this option if you a time stamp to show on the message.
| |
|
| |
|
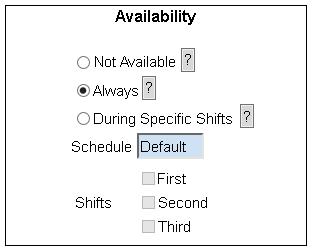
| 4. The second section is for setting up when this email address is to be notified. An explanation for this section is below.
| |
|
| |
|
| a. Not Available – this option would be selected if you do not want any messages going to the email address. You would use this if the person that had the email address was on vacation or no longer being notified of issues.
| | 2. Select the Email icon on the Add New list. |
| b. Always – this option would be selected if you want the email address to receive messages no matter the day or time.
| |
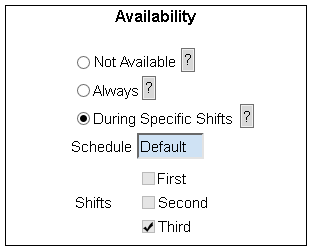
| c. During Specific Shifts – this option would be selected if you want the email address to receive messages during specific shifts that you have setup in the Shifts/Schedules section of the software.
| |
|
| |
|
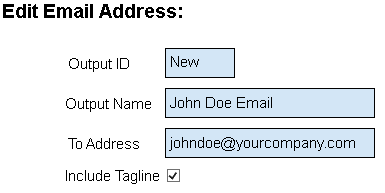
| 5. For our example we will enter John Doe Email in the Output Name field – enter [email protected] in the To Address field – leave Include Tagline checked as we want a time stamp on the email. | | [[File:3107_4.png]] |
|
| |
|
| 6. For the Availability we will set this email address up to receive messages during the First shift. Click on the During Specific shifts circle – leave Schedule on Default – click on the box next to First.
| |
|
| |
|
| 7. Once all options have been entered click on the Save & Exit button. If you need to add multiple email addresses at one time click on the Save & Add New button. You can use the Discard & Exit button to delete what you have entered and return to the Outputs page.
| | 3. Email Address Properties: |
|
| |
|
| The email address you setup will show on the Outputs list and will be available to be selected in Routing and Communications section.
| | [[File:3107_5.png]] |
| | |
| | |
| | a. Output ID – assigned by VT3000 software. |
| | b. Output Name – enter a name. |
| | c. To Address – enter the email address. |
| | d. Include Tagline – mark to show the date and time on the message. |
| | |
| | 4. Email Address Availability: |
| | |
| | [[File:3107_6.png]] |
| | |
| | |
| | a. Not Available – select if messages are not to be sent. |
| | b. Always – select if messages are to be sent regardless of the day or time. |
| | c. During Specific Shifts – select the specific shift messages are to be sent. |
| | |
| | 5. Example: |
| | |
| | [[File:3107_7.png]][[File:3107_8.png]] |
| | |
| | |
| | 7. Select Save & Exit, Save & Add New or Discard & Exit. |
| | |
| | [[File:3107_9.png]] |
An Email Address can be setup as an input VT3000. The SMTP server must be configured before messages can be sent. If the SMTP server has not been setup, see Setup SMTP Server - (VT3000).
1. Open the VT3000 web interface – log in - select Configuration – select Outputs.

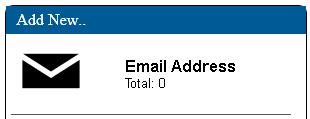
2. Select the Email icon on the Add New list.
3. Email Address Properties:
a. Output ID – assigned by VT3000 software.
b. Output Name – enter a name.
c. To Address – enter the email address.
d. Include Tagline – mark to show the date and time on the message.
4. Email Address Availability:
a. Not Available – select if messages are not to be sent.
b. Always – select if messages are to be sent regardless of the day or time.
c. During Specific Shifts – select the specific shift messages are to be sent.
5. Example:

7. Select Save & Exit, Save & Add New or Discard & Exit.
File:3107 9.png


