Difference between revisions of "VT3000 - Install Coordinator - Remote - Different Subnet"
SupportAdmin (talk | contribs) (Created page with "This guide will show how to configure a remote coordinator that is on a different subnet than the VersaCall computer/server. For this method, you must have the IP address of t...") |
SupportAdmin (talk | contribs) |
||
| Line 4: | Line 4: | ||
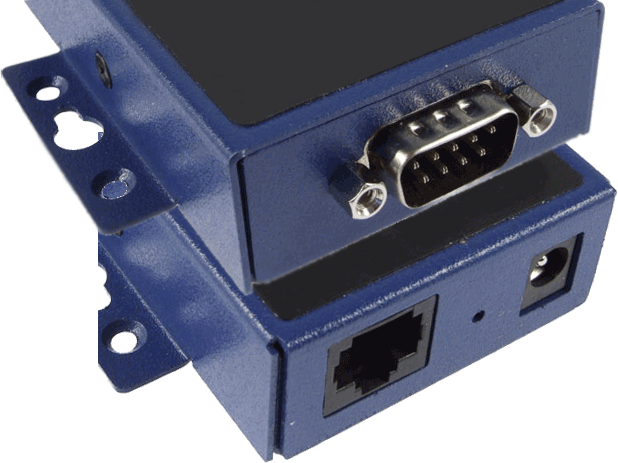
1. First connect the RS232-Over-Ethernet device (VESP211-232) by plugging it in to the Ethernet port setup by IT and connecting the power. Attach the serial cable to the Coordinator and the RS232 device. Connect the power plug to the coordinator then connect it to power. | 1. First connect the RS232-Over-Ethernet device (VESP211-232) by plugging it in to the Ethernet port setup by IT and connecting the power. Attach the serial cable to the Coordinator and the RS232 device. Connect the power plug to the coordinator then connect it to power. | ||
[[File: | [[File:3101_13.png]] | ||
Revision as of 02:42, 9 May 2017
This guide will show how to configure a remote coordinator that is on a different subnet than the VersaCall computer/server. For this method, you must have the IP address of the port that the RS232 device is plugged into – consult your IT department for this information. They may need to trace the device using the MAC address, this is printed on a label attached to the bottom of the RS-232 device. You will also need an IP address that you can use as a Static IP address for this device.
1. First connect the RS232-Over-Ethernet device (VESP211-232) by plugging it in to the Ethernet port setup by IT and connecting the power. Attach the serial cable to the Coordinator and the RS232 device. Connect the power plug to the coordinator then connect it to power.
2. Open a web browser (IE, Firefox or Chrome) – in a new tab type in the IP address for the port the RS232 device in plugged into or the IP address that was obtained by tracing the MAC address.
3. A login page will show – leave the Password field blank – click on the Login button.
4. The first option will be to enter a name for the device – enter any name that will help you identify it in the future – click on the Next button.
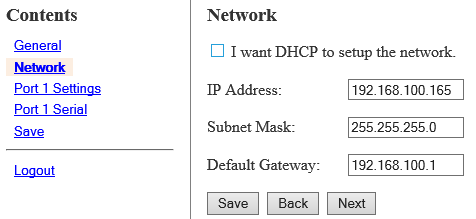
5. The next option allows you to setup a static IP address for the RS232 device. Enter in the information provided by your IT department – click on the Next button.
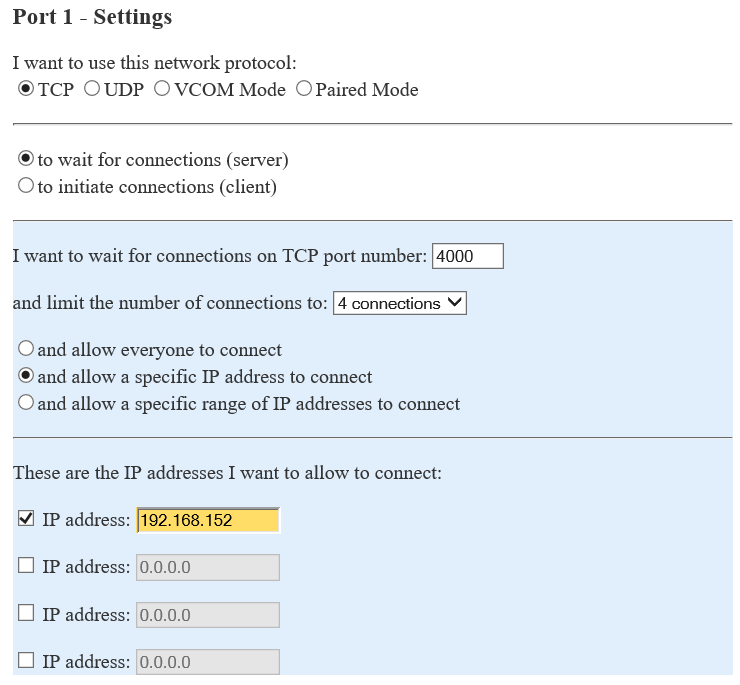
6. The next option is for setting up the type of Port connection that will be used.
    a.	Network Protocol – select TCP – select “to wait for connections”.
    b.	Port Number – enter 4000 for the Port number unless told otherwise by IT.
    c.	Limit – select 4 connections from the drop down list.
    d.	IP Address – enter the IP address of the VersaCall computer. If you do not know the IP address, please contact IT for further assistance.
NOTE: the IP address shown in the image is just for reference purposes – only use the IP address of your VersaCall computer.
Click on the Advanced button when all settings have been entered.
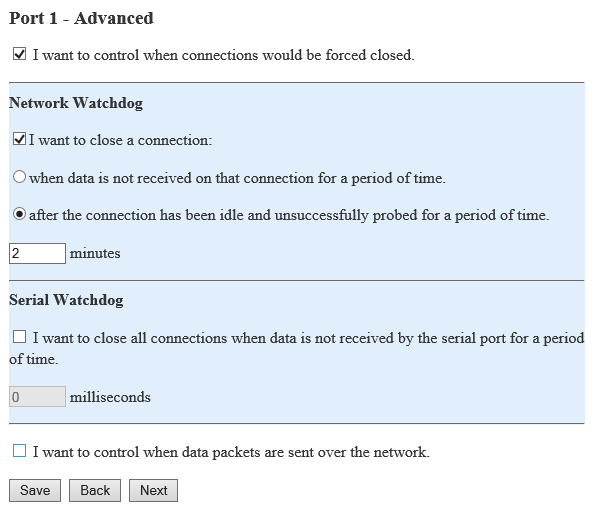
7. The Advanced Port settings page will load.
    a.	Advanced – click in the box next to “I want to control when connections would be forced to close” to place a check mark in it.
    b.	Network – click in the box next to “I want to close a connection” to place a check mark in it.
            i.	Select “after the connection ……” and enter 2 in the field for minutes.
    c.	Serial – uncheck the box and leave the milliseconds field blank.
    d.	Data Packets – do not select the option to control data packets.
Once all the settings have been entered click on the Next button.
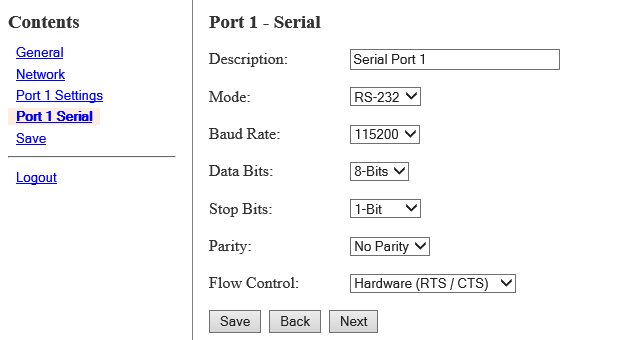
8. The Port 1 – Serial option will load:
    a.	Description – enter Serial Port 1
    b.	Mode – select RS-232
    c.	Baud Rate – select 115200
    d.	Data Bits – select 8-Bits
    e.	Stop Bits – select 1-Bit
    f.	Parity – select No Parity
    g.	Flow Control – select Hardware (RTS/CTS)
Once all fields have been addressed click on the Next button.
9. The final option is to Save the changes that have been made – click on the Save button.
