Difference between revisions of "VT3000 Sampler"
Jump to navigation
Jump to search
SupportAdmin (talk | contribs) (Created page with "Under Construction") |
SupportAdmin (talk | contribs) m (Text replacement - "https://www.linkedin.com/company/versacall-technologies-inc-/mycompany/" to "https://www.linkedin.com/company/versacall/") |
||
| (6 intermediate revisions by the same user not shown) | |||
| Line 1: | Line 1: | ||
{|style="background:transparent; color:black" border="0" height="230" align="center" valign="bottom" | |||
|+style="background:transparent| | |||
|-align="center" | |||
| | |||
|[[Image:CallUsBtn.png|Call Now 858-677-6766]] | |||
| | |||
|[[Image:SubmitTckBtn.png|link=https://www.versacall.com/customer-support/service-ticket]] | |||
| | |||
|[[Image:EmailUsBtn.png|link=mailto:[email protected]?Subject=Help%20Needed%20Wiki&body=Type%20Message%20Here]] | |||
|} | |||
<br> | |||
---- | |||
---- | |||
<br> | |||
{|style="margin:left; width: 800px; background:#eaf3ff; padding:5px; border:2px solid #000000;" | |||
|- | |||
|<big>'''Overview'''</big> | |||
{|style="margin:left; width: 800px; background:#F0F0F0; padding:5px; border:2px solid #000000;" | |||
|valign="top" | | |||
|- | |||
|A Sampler is a monitoring point used to create a count. The count can be from a wired input, a virtual button on the touch screen or a bar code scanner. | |||
|} | |||
|} | |||
<br> | |||
---- | |||
<br> | |||
{|style="margin:left; width: 800px; background:#eaf3ff; padding:5px; border:2px solid #000000;" | |||
|- | |||
|<big>'''Basic Functionality'''</big> | |||
{|style="margin:left; width: 800px; background:#F0F0F0; padding:5px; border:2px solid #000000;" | |||
|valign="top" | | |||
|- | |||
|Data Fields can be added, deleted, duplicated, copied or moved using the Icons in the Monitoring Points toolbox. | |||
{|style="margin:left;" | |||
|valign="top" | | |||
{|class="wikitable" style="background:white; align:center; width:775px;" | |||
|- | |||
|[[File:AddSampler2.png|center|100px]] || [[File:Delete2.png|center|100px]] || [[File:Copy2.png|center|100px]] || [[File:CopyClip2.png|center|100px]] | |||
|- | |||
|style="text-align:center" | '''Add a Sampler''' || style="text-align:center" | '''Delete a Sampler''' || style="text-align:center" | '''Duplicate a Sampler''' || style="text-align:center" | '''Copy a Sampler''' | |||
|} | |||
{|class="wikitable" style="background:white; align:center; width:775px;" | |||
|- | |||
|[[File:PasteClip2.png|center|100px]] || [[File:MoveUp2.png|center|100px]] || [[File:MoveDown2.png|center|100px]] | |||
|- | |||
|style="text-align:center" | '''Paste a Sampler''' || style="text-align:center" | '''Move a Sampler Up''' || style="text-align:center" | '''Move a Sampler Down''' | |||
|} | |||
|} | |||
|} | |||
|} | |||
<br> | |||
---- | |||
<br> | |||
{|style="margin:left; width: 800px; background:#eaf3ff; padding:5px; border:2px solid #000000;" | |||
|- | |||
|<big>'''Sampler Properties'''</big> | |||
{|style="margin:left; width: 800px; background:#F0F0F0; padding:5px; border:2px solid #000000;" | |||
|valign="top" | | |||
|- | |||
|After selecting to Add or Edit a Sampler, the Sampler Properties page will load. Sampler settings changed based on the Type selected, each type is shown and explained in the following sections. A BSC module does not require an input to be setup, for a Count, because the device has no physical inputs making all inputs virtual. The TIM and PSM will require an input be setup for a Count, either physical or virtual, to ensure functionality. | |||
{|style="margin:left;" | |||
|valign="top" | | |||
{|class="wikitable" style="background:white; align:center; width:775px;" | |||
|- | |||
|'''Linked Sampler''' - a Process is required to establish the sampler. This process will start and stop the sampler. | |||
|- | |||
|'''Standard Sampler''' - the sampler is started and stopped manually with a button on the touch screen. | |||
|- | |||
|'''Continuous Sampler''' - the sampler never starts nor stops, it is always on. | |||
|} | |||
{|class="wikitable" style="background:white; align:center; width:775px;" | |||
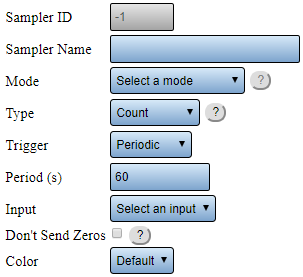
!style="text-align:center" | <big>'''Count Properties'''</big> | |||
|- | |||
|[[File:CountProp.png|center|303px]] | |||
|- | |||
|'''Sampler ID''' - assigned/created by VersaCall software. | |||
|- | |||
|'''Sampler Name''' - enter a name for the Count. | |||
|- | |||
|'''Mode''' - select Linked, Standard or Continuous depending on use. | |||
|- | |||
|'''Type''' - select Count for this example. | |||
|- | |||
|'''Trigger - As Occurs''' - record the count anytime one happens. Only used for counts the happen in 5 minutes or longer time spans. | |||
|- | |||
|'''Trigger - Periodic''' - record the count every X seconds. The time period is defined in the Period(s) field. | |||
|- | |||
|'''Period (s)''' - enter the number of seconds to elapse before recording the count. Will appear when Trigger - Periodic is selected. | |||
|- | |||
|'''Input''' - select the Discrete Input or Virtual Input setup for this count. This will only be required for a Count on a PSM or TIM. | |||
|- | |||
|'''Don't Send Zeros''' - select this so that a zero is not sent to the system when there is no count. This field will only appear when a Periodic Trigger is selected. | |||
|- | |||
|'''Color''' - select a color for the Count to appear on the touch screen. | |||
|} | |||
{|class="wikitable" style="background:white; align:center; width:775px;" | |||
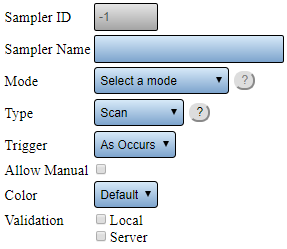
!style="text-align:center" | <big>'''Scan Properties'''</big> | |||
|- | |||
|[[File:ScanProp.png|center|287px]] | |||
|- | |||
|'''Sampler ID''' - assigned/created by VersaCall software. | |||
|- | |||
|'''Sampler Name''' - enter a name for the Count. | |||
|- | |||
|'''Mode''' - select Linked, Standard or Continuous depending on use. | |||
|- | |||
|'''Type''' - select Scan for this example. | |||
|- | |||
|'''Trigger - As Occurs''' - record the count anytime one happens. Only option available for a Scan. | |||
|- | |||
|'''Period (s)''' - enter the number of seconds to elapse before recording the count. Will appear when Trigger - Periodic is selected. | |||
|- | |||
|'''Allow Manual''' - select to allow the user to enter the Scan using the keyboard. | |||
|- | |||
|'''Validation''' - this is a custom option - please contact VersaCall Support for assistance. | |||
|} | |||
{|class="wikitable" style="background:white; align:center; width:775px;" | |||
!style="text-align:center" | <big>'''Placeholder Properties'''</big> | |||
|- | |||
|This is a custom option - please contact VersaCall Support for assistance. | |||
|} | |||
|} | |||
|} | |||
|} | |||
<br> | |||
---- | |||
---- | |||
<br> | |||
{|style="margin:auto;" | |||
|+ | |||
[[File:SearchHeader.png|center]] | |||
|align="center" | | |||
{|class="wikitable" | |||
|- | |||
|<inputbox>type=search</inputbox> | |||
|} | |||
|} | |||
<br> | |||
---- | |||
<br> | |||
[[File:VC Footer.png|center]] | |||
{|style="background:transparent; color:black" border="0" height="200" align="center" valign="bottom" cellpadding=10px cellspacing=10px | |||
|+style="background:transparent| | |||
|-align="center" | |||
| | |||
|[[File:LinkedIn.png|Follow Us On LinkedIn|link=https://www.linkedin.com/company/versacall/]] | |||
| | |||
|[[File:BlogIcon.png|View our Blog|link=https://www.versacall.com/blog/]] | |||
|} | |||
Latest revision as of 19:28, 20 April 2023

|

|

|
Overview
|
Basic Functionality
|
Sampler Properties
|
|
|

|


