Difference between revisions of "VT3000 Virtual Inputs"
Jump to navigation
Jump to search
SupportAdmin (talk | contribs) |
SupportAdmin (talk | contribs) m (Text replacement - "https://www.linkedin.com/company/versacall-technologies-inc-/mycompany/" to "https://www.linkedin.com/company/versacall/") |
||
| (3 intermediate revisions by the same user not shown) | |||
| Line 1: | Line 1: | ||
== | {|style="background:transparent; color:black" border="0" height="230" align="center" valign="bottom" | ||
|+style="background:transparent| | |||
|-align="center" | |||
| | |||
|[[Image:CallUsBtn.png|Call Now 858-677-6766]] | |||
| | |||
|[[Image:SubmitTckBtn.png|link=https://www.versacall.com/customer-support/service-ticket]] | |||
| | |||
|[[Image:EmailUsBtn.png|link=mailto:support@versacall.com?Subject=Help%20Needed%20Wiki&body=Type%20Message%20Here]] | |||
|} | |||
<br> | |||
< | |||
---- | ---- | ||
---- | ---- | ||
<br> | |||
{|style="margin:left; width: 800px; background:#eaf3ff; padding:5px; border:2px solid #000000;" | |||
|- | |||
= | |<big>'''Overview'''</big> | ||
{|style="margin:left; width: 800px; background:#F0F0F0; padding:5px; border:2px solid #000000;" | |||
|valign="top" | | |||
|- | |||
|Virtual Inputs are required when a configuration calls for a simulated input - not a wired input. An example of this type of input would be a count button on the touch screen. This feature is only available on the PSM, TIM and PC Input Module. This article offers a brief overview of the functionality and setup. Please contact VersaCall Support if you have a need to add Virtual Inputs to your devices. | |||
''' | |} | ||
|} | |||
<br> | |||
---- | ---- | ||
<br> | |||
{|style="margin:left; width: 800px; background:#eaf3ff; padding:5px; border:2px solid #000000;" | |||
|- | |||
== | |<big>'''Basic Functionality'''</big> | ||
{|style="margin:left; width: 800px; background:#F0F0F0; padding:5px; border:2px solid #000000;" | |||
|valign="top" | | |||
[[File: | |- | ||
|After selecting the Virtual Inputs tab, there will be Indicators setup or for a new module no Indicators will show. The toolbox of icons will have the same functionality. | |||
''' | {|style="margin:left;" | ||
|valign="top" | | |||
''' | {|class="wikitable" style="background:white; align:center; width:775px;" | ||
|- | |||
''' | |[[File:Add2.png|center|100px]] || [[File:Delete2.png|center|100px]] || [[File:Copy2.png|center|100px]] || [[File:CopyClip2.png|center|100px]] | ||
|- | |||
|style="text-align:center" | '''Add a Virtual Input''' || style="text-align:center" | '''Delete a Virtual Input''' || style="text-align:center" | '''Duplicate a Virtual Input''' || style="text-align:center" | '''Copy a Virtual Input''' | |||
|} | |||
{|class="wikitable" style="background:white; align:center; width:775px;" | |||
|- | |||
|[[File:PasteClip2.png|center|100px]] || [[File:MoveUp2.png|center|100px]] || [[File:MoveDown2.png|center|100px]] | |||
|- | |||
|style="text-align:center" | '''Paste a Virtual Input''' || style="text-align:center" | '''Move a Virtual Input Up''' || style="text-align:center" | '''Move a Virtual Input Down''' | |||
|} | |||
|} | |||
|} | |||
|} | |||
<br> | |||
---- | ---- | ||
<br> | |||
{|style="margin:left; width: 800px; background:#eaf3ff; padding:5px; border:2px solid #000000;" | |||
|- | |||
=== | |<big>'''Virtual Input Properties'''</big> | ||
{|style="margin:left; width: 800px; background:#F0F0F0; padding:5px; border:2px solid #000000;" | |||
[[ | |valign="top" | | ||
|- | |||
|After selecting to Add, Edit, Duplicate or Paste an Indicator - the Properties section will load. There are 3 different types of Virtual Inputs | |||
{|style="margin:left;" | |||
|valign="top" | | |||
{|class="wikitable" style="background:white; align:center; width:775px;" | |||
!style="text-align:center" | <big>'''Not Used'''</big> | |||
|- | |||
|If a Virtual Input is no longer being used, but you do not want to delete it completely, select the Not Used option. This will save the setup of the input and make it inactive - if you need to reactivate the input at a later date you would just have to change the Type instead of having to create it from the beginning. | |||
|- | |||
|[[File:VI NotUsed.png|center|300px]] | |||
|- | |||
|'''Description''' - enter a name for the input. | |||
|- | |||
|'''Type''' - select Not Used for this type. | |||
|} | |||
{|class="wikitable" style="background:white; align:center; width:775px;" | |||
!style="text-align:center" | <big>'''Transition'''</big> | |||
|- | |||
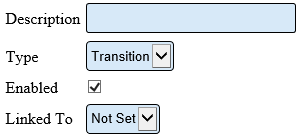
|If a Virtual Input is to be used as a switch to turn on and off an alarm, you will need to setup a Transition. | |||
|- | |||
|[[File:VI Transition.png|center|299px]] | |||
|- | |||
|'''Description''' - enter a name for the input. | |||
|- | |||
|'''Type''' - select Transition for this type. | |||
|- | |||
|'''Enabled''' - select this option if you want the input to always be on otherwise you will control it with an action on a Process or an Alarm. | |||
|- | |||
|'''Linked To''' - select the Alarm that the switch will turn on and off. You will need to setup the Alarm in Monitoring Points before it can be selected here. | |||
|} | |||
{|class="wikitable" style="background:white; align:center; width:775px;" | |||
!style="text-align:center" | <big>'''Count'''</big> | |||
|- | |||
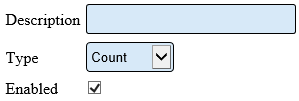
|If an on screen count button is required on a device, a Count input must be setup first. | |||
|- | |||
|[[File:VI Count.png|center|299px]] | |||
|- | |||
|'''Description''' - enter a name for the input. | |||
|- | |||
|'''Type''' - select Count for this type. | |||
|- | |||
|'''Enabled''' - select this option if you want the input to always be on otherwise you will control it with an action on a Process or an Alarm. | |||
|} | |||
|} | |||
|} | |||
|} | |||
<br> | |||
---- | |||
---- | |||
<br> | |||
{|style="margin:auto;" | |||
|+ | |||
[[File:SearchHeader.png|center]] | |||
|align="center" | | |||
{|class="wikitable" | |||
|- | |||
|<inputbox>type=search</inputbox> | |||
|} | |||
|} | |||
<br> | |||
---- | |||
<br> | |||
[[File:VC Footer.png|center]] | |||
{|style="background:transparent; color:black" border="0" height="200" align="center" valign="bottom" cellpadding=10px cellspacing=10px | |||
|+style="background:transparent| | |||
|-align="center" | |||
| | |||
|[[File:LinkedIn.png|Follow Us On LinkedIn|link=https://www.linkedin.com/company/versacall/]] | |||
| | |||
|[[File:BlogIcon.png|View our Blog|link=https://www.versacall.com/blog/]] | |||
|} | |||
Latest revision as of 19:29, 20 April 2023

|

|

|
Overview
|
Basic Functionality
|
Virtual Input Properties
|
|
|

|


