Difference between revisions of "VT3000 Routing"
Jump to navigation
Jump to search

SupportAdmin (talk | contribs) m (Text replacement - "https://www.linkedin.com/company/versacall-technologies-inc-/mycompany/" to "https://www.linkedin.com/company/versacall/") |
SupportAdmin (talk | contribs) |
||
| Line 9: | Line 9: | ||
|[[Image:EmailUsBtn.png|link=mailto:[email protected]?Subject=Help%20Needed%20Wiki&body=Type%20Message%20Here]] | |[[Image:EmailUsBtn.png|link=mailto:[email protected]?Subject=Help%20Needed%20Wiki&body=Type%20Message%20Here]] | ||
|} | |} | ||
< | <BR> | ||
-- | <div style="box-shadow: 0 0 10px 0 #00719e inset; border-radius:5px; padding:10px;"> | ||
<span style="color:#00719e; font-family: Helvetica; font-size:150%; font-variant: small-caps; padding-left:20px;">'''General Information'''</span> | |||
<BR> | |||
:*A route is a series of escalations/levels separated by a time interval. | |||
< | :*Each escalation/level can have one or more specific outputs assigned to them. | ||
:*This allows the user to specify when specific people are notified about an alarm/call. | |||
</div> | |||
<BR> | |||
<div style="box-shadow: 0 0 10px 0 #00719e inset; border-radius:5px; padding:10px;"> | |||
<span style="color:#00719e; font-family: Helvetica; font-size:150%; font-variant: small-caps; padding-left:20px;">'''Basic Functionality'''</span> | |||
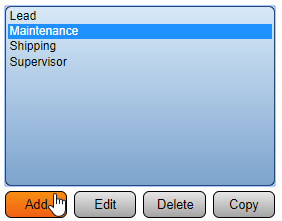
:<span style="color:#90A4AE; font-size:130%">'''Add a Route''' - Select the "Add" button at the bottom of the Routes list.</span> | |||
<gallery widths=282px heights=221px> | |||
Image:Add Route.png|link=VT3000 Routing | |||
</gallery> | |||
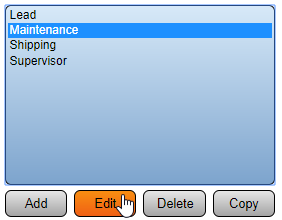
< | :<span style="color:#90A4AE; font-size:130%">'''Edit a Route''' - Select an existing Route from the list. Select the "Edit" button.</span> | ||
-- | <gallery widths=282px heights=220px> | ||
Image:Edit Route.png|link=VT3000 Routing | |||
</gallery> | |||
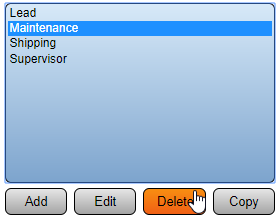
:<span style="color:#90A4AE; font-size:130%">'''Delete a Route''' - Select an existing Route from the list. Select the "Delete" button.</span> | |||
< | <gallery widths=279px heights=218px> | ||
Image:Delete Route.png|link=VT3000 Routing | |||
</gallery> | |||
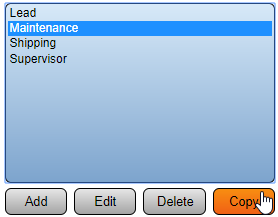
:<span style="color:#90A4AE; font-size:130%">'''Copy a Route''' - Select an existing Route from the list. Select the "Copy" button.</span> | |||
<gallery widths=279px heights=217px> | |||
Image:Copy Route.png|link=VT3000 Routing | |||
</gallery> | |||
</div> | |||
<BR> | |||
<div style="box-shadow: 0 0 10px 0 #00719e inset; border-radius:5px; padding:10px;"> | |||
<span style="color:#00719e; font-family: Helvetica; font-size:150%; font-variant: small-caps; padding-left:20px;">'''Routing Properties'''</span> | |||
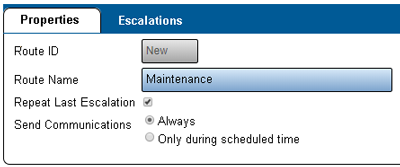
:*After selecting to Add, Edit, or Duplicate a Route - the Properties section will load. | |||
<gallery widths=400px heights=167px> | |||
Image:Route6.png|link=VT3000 Routing | |||
</gallery> | |||
:*'''Route ID''' - created/generated by the VersaCall Software. | |||
:*'''Route Name''' - enter a name for the Route. | |||
:*'''Repeat Last Escalation''' - select to repeat any communications setup on the last escalation. | |||
:*'''Send Communications''' - select to send communications & escalate only during scheduled time. | |||
:*'''Send - Always''' - send communications & escalate regardless of scheduled times. | |||
:*'''Send - Only During Scheduled Time''' - send communications & escalate only during scheduled times. Will not send communications on Breaks. | |||
</div> | |||
| | <BR> | ||
<div style="box-shadow: 0 0 10px 0 #00719e inset; border-radius:5px; padding:10px;"> | |||
<span style="color:#00719e; font-family: Helvetica; font-size:150%; font-variant: small-caps; padding-left:20px;">'''Escalation Properties'''</span> | |||
< | :<span style="color:#90A4AE; font-size:130%">'''Icon Functionality'''</span> | ||
-- | :*Once the Route Properties are setup, select the Escalations tab. | ||
< | :*Escalations allow the user to setup what outputs receive communications and when. | ||
<gallery widths=50px heights=50px perrow="4"> | |||
Image:Add2.png|<div style="text-align: center; color:#00719e">'''Add an Escalation'''</div>|link=VT3000 Routing | |||
Image:Delete2.png|<div style="text-align: center; color:#00719e">'''Delete an Escalation'''</div>|link=VT3000 Routing | |||
Image:Copy2.png|<div style="text-align: center; color:#00719e">'''Duplicate an Escalation'''</div>|link=VT3000 Routing | |||
Image:CopyClip2.png|<div style="text-align: center; color:#00719e">'''Copy an Escalation'''</div>|link=VT3000 Routing | |||
Image:PasteClip2.png|<div style="text-align: center; color:#00719e">'''Paste an Escalation'''</div>|link=VT3000 Routing | |||
Image:MoveUp2.png|<div style="text-align: center; color:#00719e">'''Move an Escalation Up'''</div>|link=VT3000 Routing | |||
Image:MoveDown2.png|<div style="text-align: center; color:#00719e">'''Move an Escalation Down'''</div>|link=VT3000 Routing | |||
</gallery> | |||
:<span style="color:#90A4AE; font-size:130%">'''Setup'''</span> | |||
:*'''Duration (s)''' - enter the number of Seconds that should elapse before the next escalation level is started. | |||
:*'''Description''' - enter a description of the escalation level if needed. | |||
<gallery widths=300px heights=54px> | |||
Image:Route2.png|link=VT3000 Routing | |||
</gallery> | |||
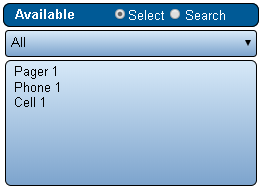
:<span style="color:#90A4AE; font-size:130%">'''Available List'''</span> | |||
:*'''Select''' - when this option is selected the user will see a list of all available outputs. | |||
:*'''Search''' - when this option is selected the user will be able to enter a keyword to search outputs. | |||
<gallery widths=261px heights=189px> | |||
Image:Route3.png|link=VT3000 Routing | |||
</gallery> | |||
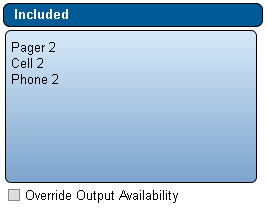
:<span style="color:#90A4AE; font-size:130%">'''Included List'''</span> | |||
:*All the outputs that have been added to the escalation will show in the Included list. | |||
<gallery widths=267px heights=209px> | |||
Image:Route7.png|link=VT3000 Routing | |||
</gallery> | |||
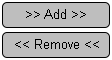
:<span style="color:#90A4AE; font-size:130%">'''Add/Remove Outputs'''</span> | |||
:*'''Add''' - to add outputs to an escalation, select the outputs from the "Available" list and select the "Add" button. | |||
< | :*'''Remove''' - to remove outputs from an escalation, select the outputs from the "Included" list and select the "Remove" button. | ||
-- | <gallery widths=112px heights=60px> | ||
< | Image:Route4.png|link=VT3000 Routing | ||
</gallery> | |||
</div> | |||
<BR> | |||
<div style="box-shadow: 0 0 10px 0 #00719e inset; border-radius:5px; padding:10px; padding-left:20px;"> | |||
<span style="color:#00719e; font-family: Helvetica; font-size:150%; font-variant: small-caps; padding-left:10px;">'''Keyword Search'''</span> | |||
{|style="margin:auto;" | |||
{|class="wikitable" style="align:center; width:600px;" | |||
| | |||
| | |||
| | |||
| | |||
|- | |- | ||
!<span style="color:#0054a6; font-size:120%"><big>Type Subject or Key Word to Query Archives</big></span> | |||
|- | |- | ||
|<inputbox>type=search</inputbox> | |<inputbox>type=search</inputbox> | ||
|} | |} | ||
|} | |} | ||
</div> | |||
<br> | <br> | ||
[[File:VC Footer.png|center|link=Main Page]] | |||
[[File:VC Footer.png|center]] | |||
{|style="background:transparent; color:black" border="0" height="200" align="center" valign="bottom" cellpadding=10px cellspacing=10px | {|style="background:transparent; color:black" border="0" height="200" align="center" valign="bottom" cellpadding=10px cellspacing=10px | ||
|+style="background:transparent| | |+style="background:transparent| | ||
Revision as of 14:12, 17 October 2023

|

|

|
General Information
- A route is a series of escalations/levels separated by a time interval.
- Each escalation/level can have one or more specific outputs assigned to them.
- This allows the user to specify when specific people are notified about an alarm/call.
Basic Functionality
- Add a Route - Select the "Add" button at the bottom of the Routes list.
- Edit a Route - Select an existing Route from the list. Select the "Edit" button.
- Delete a Route - Select an existing Route from the list. Select the "Delete" button.
- Copy a Route - Select an existing Route from the list. Select the "Copy" button.
Routing Properties
- After selecting to Add, Edit, or Duplicate a Route - the Properties section will load.
- Route ID - created/generated by the VersaCall Software.
- Route Name - enter a name for the Route.
- Repeat Last Escalation - select to repeat any communications setup on the last escalation.
- Send Communications - select to send communications & escalate only during scheduled time.
- Send - Always - send communications & escalate regardless of scheduled times.
- Send - Only During Scheduled Time - send communications & escalate only during scheduled times. Will not send communications on Breaks.
Escalation Properties
- Icon Functionality
- Once the Route Properties are setup, select the Escalations tab.
- Escalations allow the user to setup what outputs receive communications and when.
 Add an Escalation
 Delete an Escalation
 Duplicate an Escalation
 Copy an Escalation
 Paste an Escalation
 Move an Escalation Up
 Move an Escalation Down
- Setup
- Duration (s) - enter the number of Seconds that should elapse before the next escalation level is started.
- Description - enter a description of the escalation level if needed.

- Available List
- Select - when this option is selected the user will see a list of all available outputs.
- Search - when this option is selected the user will be able to enter a keyword to search outputs.
- Included List
- All the outputs that have been added to the escalation will show in the Included list.
- Add/Remove Outputs
- Add - to add outputs to an escalation, select the outputs from the "Available" list and select the "Add" button.
- Remove - to remove outputs from an escalation, select the outputs from the "Included" list and select the "Remove" button.
Keyword Search
| Type Subject or Key Word to Query Archives |
|---|

|