Difference between revisions of "VT3000 Filter Groups"
Jump to navigation
Jump to search

SupportAdmin (talk | contribs) m (Text replacement - "https://www.linkedin.com/company/versacall-technologies-inc-/mycompany/" to "https://www.linkedin.com/company/versacall/") |
SupportAdmin (talk | contribs) |
||
| Line 9: | Line 9: | ||
|[[Image:EmailUsBtn.png|link=mailto:[email protected]?Subject=Help%20Needed%20Wiki&body=Type%20Message%20Here]] | |[[Image:EmailUsBtn.png|link=mailto:[email protected]?Subject=Help%20Needed%20Wiki&body=Type%20Message%20Here]] | ||
|} | |} | ||
< | <BR> | ||
-- | <div style="box-shadow: 0 0 10px 0 #00719e inset; border-radius:5px; padding:10px;"> | ||
<span style="color:#00719e; font-family: Helvetica; font-size:150%; font-variant: small-caps; padding-left:20px;">'''General Information'''</span> | |||
:*A Filter Group is an item used to select specific devices or specific alarms on specific devices. | |||
:*All VersaCall software programs use the filter groups created here in VT3000. | |||
< | :*This includes VT3000, Virtual Panels IV, VRS II and AMS. | ||
:*Using a filter group in VP IV, would allow you to create a panel that only show Supervisor calls. | |||
:*There are multiple used for Filter Groups in each software module. | |||
</div> | |||
<BR> | |||
<div style="box-shadow: 0 0 10px 0 #00719e inset; border-radius:5px; padding:10px;"> | |||
<span style="color:#00719e; font-family: Helvetica; font-size:150%; font-variant: small-caps; padding-left:20px;">'''Basic Functionality'''</span> | |||
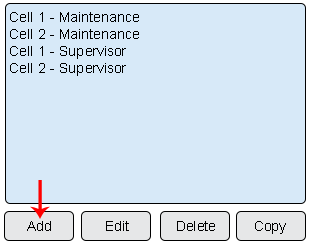
:<span style="color:#90A4AE; font-size:130%">'''Add a Filter Group''' - Select the '''Add''' button at the bottom of the Routes list.</span> | |||
<gallery widths=310px heights=245px> | |||
Image:Add Group.png|link=VT3000 Filter Groups | |||
< | </gallery> | ||
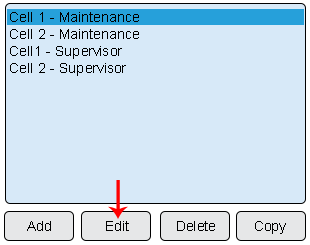
-- | :<span style="color:#90A4AE; font-size:130%">'''Edit a Filter Group''' - Select an existing Filter Group from the list. Select the '''Edit''' button.</span> | ||
<gallery widths=310px heights=245px> | |||
Image:Edit Group.png|link=VT3000 Filter Groups | |||
</gallery> | |||
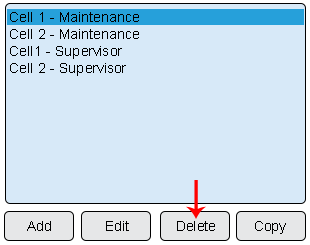
< | :<span style="color:#90A4AE; font-size:130%">'''Delete a Filter Group''' - Select an existing Filter Group from the list. Select the '''Delete''' button.</span> | ||
<gallery widths=310px heights=245px> | |||
Image:Delete Group.png|link=VT3000 Filter Groups | |||
</gallery> | |||
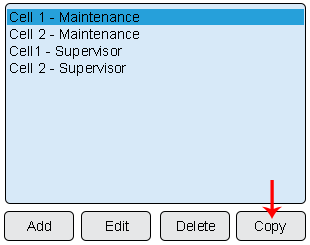
:<span style="color:#90A4AE; font-size:130%">'''Copy a Filter Group''' - Select an existing Filter Group from the list. Select the '''Copy''' button.</span> | |||
<gallery widths=310px heights=245px> | |||
Image:Copy Group.png|link=VT3000 Filter Groups | |||
</gallery> | |||
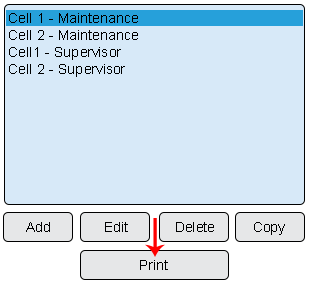
:<span style="color:#90A4AE; font-size:130%">'''Print a Filter Group''' - Select one or more Filter Groups from the list. Select the '''Print''' button.</span> | |||
| | <gallery widths=310px heights=284px> | ||
Image:Print Group.png|link=VT3000 Filter Groups | |||
</gallery> | |||
</div> | |||
<BR> | |||
<div style="box-shadow: 0 0 10px 0 #00719e inset; border-radius:5px; padding:10px;"> | |||
<span style="color:#00719e; font-family: Helvetica; font-size:150%; font-variant: small-caps; padding-left:20px;">'''Filter Group Properties'''</span> | |||
:*'''Group Name''' - enter a name for the Filter Group. | |||
<gallery widths=360px heights=40px> | |||
Image:Name Group.png|link=VT3000 Filter Groups | |||
</gallery> | |||
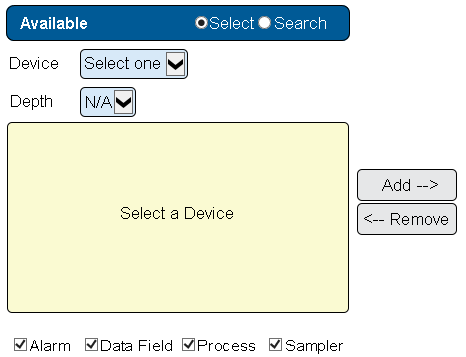
:*'''Available - Select''' - on the Available list, use the Select option to select devices using the Device drop down menu. | |||
:*'''Available - Search''' - on the Available list, use the Search option to enter names in a search field to find devices or monitoring points. | |||
:*'''List Area''' - once you select a device or enter search keywords, the results will show in the List area. | |||
:*'''Checkboxes''' - the checkboxes at the bottom of the list will allow you to filter the results by monitoring point type. | |||
:*'''Add/Remove''' - the Add & Remove buttons are used for adding monitoring points to the Included list and removing monitoring points from the Included list. | |||
<gallery widths=466px heights=357px> | |||
Image:Available Group.png|link=VT3000 Filter Groups | |||
</gallery> | |||
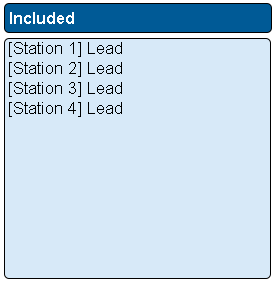
| | :*'''Included''' - after you have selected monitoring points to be added to the filter group, they will show on the Included list. | ||
<gallery widths=276px heights=284px> | |||
Image:Include Group.png|link=VT3000 Filter Groups | |||
< | </gallery> | ||
</div> | |||
< | <BR> | ||
<div style="box-shadow: 0 0 10px 0 #00719e inset; border-radius:5px; padding:10px; padding-left:20px;"> | |||
<span style="color:#00719e; font-family: Helvetica; font-size:150%; font-variant: small-caps; padding-left:10px;">'''Keyword Search'''</span> | |||
{|style="margin:auto;" | |||
{|class="wikitable" style="align:center; width:600px;" | |||
| | |||
| | |||
| | |||
|- | |- | ||
!<span style="color:#0054a6; font-size:120%"><big>Type Subject or Key Word to Query Archives</big></span> | |||
< | |||
|- | |- | ||
|<inputbox>type=search</inputbox> | |<inputbox>type=search</inputbox> | ||
|} | |} | ||
|} | |} | ||
</div> | |||
<br> | <br> | ||
[[File:VC Footer.png|center|link=Main Page]] | |||
[[File:VC Footer.png|center]] | |||
{|style="background:transparent; color:black" border="0" height="200" align="center" valign="bottom" cellpadding=10px cellspacing=10px | {|style="background:transparent; color:black" border="0" height="200" align="center" valign="bottom" cellpadding=10px cellspacing=10px | ||
|+style="background:transparent| | |+style="background:transparent| | ||
Revision as of 16:26, 17 October 2023

|

|

|
General Information
- A Filter Group is an item used to select specific devices or specific alarms on specific devices.
- All VersaCall software programs use the filter groups created here in VT3000.
- This includes VT3000, Virtual Panels IV, VRS II and AMS.
- Using a filter group in VP IV, would allow you to create a panel that only show Supervisor calls.
- There are multiple used for Filter Groups in each software module.
Basic Functionality
- Add a Filter Group - Select the Add button at the bottom of the Routes list.
- Edit a Filter Group - Select an existing Filter Group from the list. Select the Edit button.
- Delete a Filter Group - Select an existing Filter Group from the list. Select the Delete button.
- Copy a Filter Group - Select an existing Filter Group from the list. Select the Copy button.
- Print a Filter Group - Select one or more Filter Groups from the list. Select the Print button.
Filter Group Properties
- Group Name - enter a name for the Filter Group.
- Available - Select - on the Available list, use the Select option to select devices using the Device drop down menu.
- Available - Search - on the Available list, use the Search option to enter names in a search field to find devices or monitoring points.
- List Area - once you select a device or enter search keywords, the results will show in the List area.
- Checkboxes - the checkboxes at the bottom of the list will allow you to filter the results by monitoring point type.
- Add/Remove - the Add & Remove buttons are used for adding monitoring points to the Included list and removing monitoring points from the Included list.
- Included - after you have selected monitoring points to be added to the filter group, they will show on the Included list.
Keyword Search
| Type Subject or Key Word to Query Archives |
|---|

|