Difference between revisions of "VPIV - Create/Edit Rotating Panels"
SupportAdmin (talk | contribs) |
SupportAdmin (talk | contribs) |
||
| Line 1: | Line 1: | ||
= | =Create/Edit Rotating Panels= | ||
Rotating panels are used when you want to view multiple panels on one monitor. Each panel will appear on the screen for a set amount of time then the next panel will show. This helps when faced with having too many cells/objects on one panel to make is easy to read | Rotating panels are used when you want to view multiple panels on one monitor. Each panel will appear on the screen for a set amount of time then the next panel will show for a set amount of time. This helps when faced with having too many cells/objects on one panel to make is easy to read. | ||
=== | =Requirements= | ||
'''1.''' Create at least 2 Panels of any type. | |||
=Instructions - Create a Rotating Panel= | |||
'''1.''' Open the VT3000 web interface - select VP IV - select Rotating Panels icon. | '''1.''' Open the VT3000 web interface - select VP IV - select Rotating Panels icon. | ||
<gallery widths=257 heights=70> | |||
File:VPImage1.png | |||
</gallery> | |||
<gallery widths=100 heights=100> | |||
File:VP_Rotate.png | |||
</gallery> | |||
'''2.''' Click on the Add button. | '''2.''' Click on the Add button. | ||
<gallery widths=380 heights=210> | |||
File:Rotate1.png | |||
</gallery> | |||
'''3.''' Following options are available: | '''3.''' Following options are available: | ||
<gallery widths=700 heights=245> | |||
File:Rotate2.png | |||
</gallery> | |||
'''a. Rotating Panel Name''' - enter a name for this set of panels. | '''a. Rotating Panel Name''' - enter a name for this set of panels. | ||
| Line 26: | Line 37: | ||
'''ii. Duration''' - enter a number of seconds for the panel to appear on the monitor. | '''ii. Duration''' - enter a number of seconds for the panel to appear on the monitor. | ||
'''iii. Add''' - click on the Add button once the panel is selected and duration is entered. | '''iii. Add''' - click on the Add button once the panel is selected and duration is entered. | ||
'''4.''' A new line will appear under the last panel that was added. Repeat the process from above to add more panels to the rotation. | '''4.''' A new line will appear under the last panel that was added. Repeat the process from above to add more panels to the rotation. | ||
<gallery widths=795 heights=147> | |||
File:Rotate3.png | |||
</gallery> | |||
<gallery widths=794 heights=167> | |||
File:Rotate4.png | |||
</gallery> | |||
'''5.''' Once all panels have been added to the rotation, click on the Save & Exit button under the Rotation Panel Name. | '''5.''' Once all panels have been added to the rotation, click on the Save & Exit button under the Rotation Panel Name. | ||
<gallery widths=515 heights=105> | |||
File:Rotate5.png | |||
</gallery> | |||
= | =Instructions - Edit a Rotating Panel= | ||
Generally editing is used to alter the duration, but you can also change the panels being viewed. | Generally editing is used to alter the duration, but you can also change the panels being viewed. | ||
'''1.''' Open the VT3000 web interface - select VP IV - select Rotating Panels icon. | '''1.''' Open the VT3000 web interface - select VP IV - select Rotating Panels icon. | ||
<gallery widths=257 heights=70> | |||
File:VPImage1.png | |||
</gallery> | |||
<gallery widths=100 heights=100> | |||
File:VP_Rotate.png | |||
</gallery> | |||
'''2.''' Select a Rotating Panel from the list so that it is highlighted. | '''2.''' Select a Rotating Panel from the list so that it is highlighted. | ||
<gallery widths=351 heights=116> | |||
File:Rotate7.png | |||
</gallery> | |||
'''3.''' Click on the Edit button at the bottom of the list. | '''3.''' Click on the Edit button at the bottom of the list. | ||
<gallery widths=427 heights=61> | |||
File:Rotate8.png | |||
</gallery> | |||
'''4.''' On the Edit Rotating Panel screen you will see the same options available from the Adding/Creating section. | '''4.''' On the Edit Rotating Panel screen you will see the same options available from the Adding/Creating section. | ||
<gallery widths=797 heights=167> | |||
File:Rotate9.png | |||
</gallery> | |||
<gallery widths=798 heights=175> | |||
File:Rotate10.png | |||
</gallery> | |||
<gallery widths=799 heights=177> | |||
File:Rotate11.png | |||
</gallery> | |||
'''a. Rotating Panel Name''' - delete the old name and enter a new one. | '''a. Rotating Panel Name''' - delete the old name and enter a new one. | ||
| Line 79: | Line 105: | ||
'''5.''' Once all panels, in the rotation, have been edited - click on the Save & Exit button under the Rotation Panel Name. | '''5.''' Once all panels, in the rotation, have been edited - click on the Save & Exit button under the Rotation Panel Name. | ||
<gallery widths=515 heights=105> | |||
File:Rotate5.png | |||
</gallery> | |||
=Having Trouble?= | |||
<gallery widths=150px> | |||
File:ticketicon.png|Submit a Service Ticket|link=https://www.versacall.com/customer-support/service-ticket/ | |||
</gallery> | |||
Revision as of 14:58, 29 July 2019
Create/Edit Rotating Panels
Rotating panels are used when you want to view multiple panels on one monitor. Each panel will appear on the screen for a set amount of time then the next panel will show for a set amount of time. This helps when faced with having too many cells/objects on one panel to make is easy to read.
Requirements
1. Create at least 2 Panels of any type.
Instructions - Create a Rotating Panel
1. Open the VT3000 web interface - select VP IV - select Rotating Panels icon.
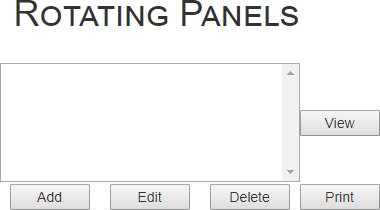
2. Click on the Add button.
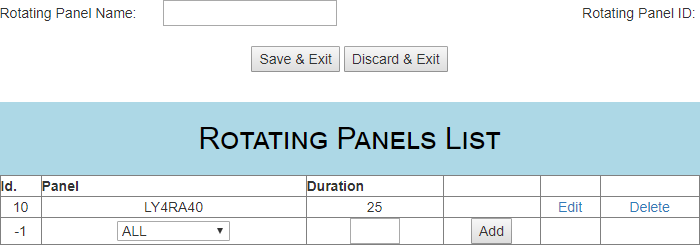
3. Following options are available:
    a. Rotating Panel Name - enter a name for this set of panels.
    b. Rotating Panel List - use this section to select panels and enter duration times (seconds).
         i. Panel - click on the down arrow to select a panel.
         ii. Duration - enter a number of seconds for the panel to appear on the monitor.
         iii. Add - click on the Add button once the panel is selected and duration is entered.
4. A new line will appear under the last panel that was added. Repeat the process from above to add more panels to the rotation.
5. Once all panels have been added to the rotation, click on the Save & Exit button under the Rotation Panel Name.
Instructions - Edit a Rotating Panel
Generally editing is used to alter the duration, but you can also change the panels being viewed.
1. Open the VT3000 web interface - select VP IV - select Rotating Panels icon.
2. Select a Rotating Panel from the list so that it is highlighted.
3. Click on the Edit button at the bottom of the list.
4. On the Edit Rotating Panel screen you will see the same options available from the Adding/Creating section.
    a. Rotating Panel Name - delete the old name and enter a new one.
    b. Rotating Panel List - all the panel previously added will be listed.
         i. Edit - click on the Edit link inline with the panel name to change it.
              1. Panel - select a different panel to display.
              2. Duration - enter a new duration time.
         ii. Update - click on the Update link inline with the panel name to save changes.
         iii. Add - add an additional panel to the existing rotation. Instructions are the same as Adding/Creating.
5. Once all panels, in the rotation, have been edited - click on the Save & Exit button under the Rotation Panel Name.


