Difference between revisions of "VT3000 - Setup Attached Light Stack - Call Station"
SupportAdmin (talk | contribs) |
SupportAdmin (talk | contribs) |
||
| Line 1: | Line 1: | ||
=Overview= | =Overview= | ||
This guide explains how to | This guide explains how to control a light stack that is attached/wired to a Call station. The example shown in the guide is for a 5 color light stack attached to a Call Station. Regardless of how many lights you have in your stack, the instructions will be exactly the same. | ||
There are 3 steps to the overall process: | |||
Attach/Wire the Light Stack | |||
Setup the Lights for the Module - Covered in this Guide | |||
Control the Lights for the Module | |||
| Line 7: | Line 15: | ||
'''1.''' VT3000 Core Software installed and running on your system. | '''1.''' VT3000 Core Software installed and running on your system. | ||
'''2.''' A Light Stack wired to a Call Station | '''2.''' A Light Stack wired to a Call Station. | ||
'''3.''' | '''3.''' The Call Station with the stack light, powered and communicating with the system. | ||
'''4.''' | '''4.''' An existing Call Station configuration in the system. | ||
| Line 24: | Line 32: | ||
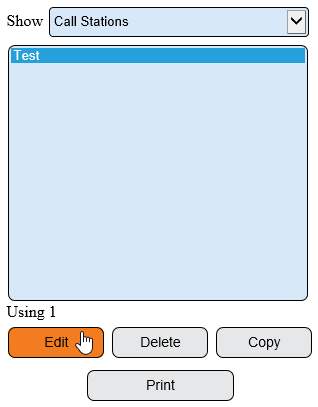
'''2.''' Select the Call Station from the list – select Edit. | '''2.''' Select the Configuration of the Call Station with the Light Stack attached from the list – select Edit. | ||
<gallery widths=318 heights=407> | <gallery widths=318 heights=407> | ||
| Line 40: | Line 48: | ||
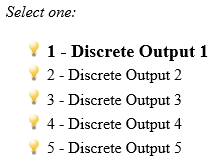
'''4.''' Select Discrete Output 1. | '''4.''' Select Discrete Output 1. | ||
<gallery widths=216 heights=166> | <gallery widths=216 heights=166> | ||
File:3137_6.png | File:3137_6.png | ||
| Line 48: | Line 53: | ||
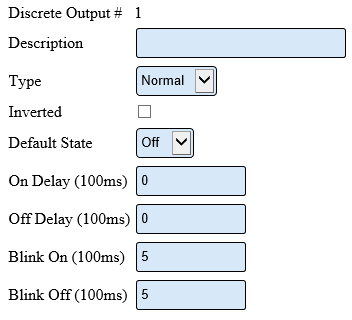
'''5.''' Discrete Output Properties: | '''5.''' An Explanation of the Discrete Output Properties for a Normal Type: | ||
<gallery widths=352 heights=320> | <gallery widths=352 heights=320> | ||
File:3137_7.png | File:3137_7.png | ||
</gallery> | </gallery> | ||
'''a. Description''' – enter a name for the output – light color. | '''a. Description''' – enter a name for the output – light color. | ||
'''b. Type''' – | '''b. Type''' – Normal – output will turn on/off when commanded. | ||
'''c. Inverted''' – output will do the opposite of normal. | '''c. Inverted''' – output will do the opposite of normal. | ||
'''d. Default State''' - what behavior the output will perform when it has no command. | |||
'''d. On Delay''' – number of milliseconds to elapse before the output turns on. | '''d. On Delay''' – number of milliseconds to elapse before the output turns on. | ||
'''e. Off Delay''' – number of milliseconds to elapse before the output turns off. | '''e. Off Delay''' – number of milliseconds to elapse before the output turns off. | ||
'''f. Blink On''' – number of milliseconds to stay on during blink. | '''f. Blink On''' – number of milliseconds to stay on during blink. | ||
'''g. Blink Off''' – number or milliseconds to stay off during blink. | '''g. Blink Off''' – number or milliseconds to stay off during blink. | ||
'''6.''' | |||
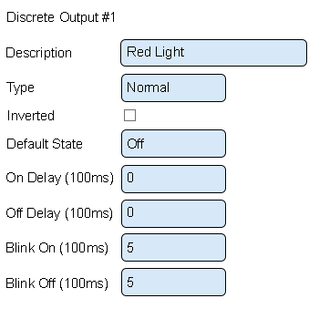
'''6.''' Setup Discrete Output 1 as the Red Light. This is done because the Red Light is wired into O1 on the Call Station. | |||
<gallery widths=347 heights=319> | <gallery widths=347 heights=319> | ||
File:3141_10.png | File:3141_10.png | ||
</gallery> | </gallery> | ||
'''a. Description''' – enter Red Light. | |||
'''b. Type''' – leave this as normal. | |||
'''c. Inverted''' – leave this unchecked. | |||
'''d. Default State''' – select Off. | |||
'''e. On Delay''' – leave this as Zero. | |||
'''f. Off Delay''' – leave this as Zero. | |||
'''g. Blink On''' – leave this as 5. | |||
'''h. Blink Off''' – leave this as 5. | |||
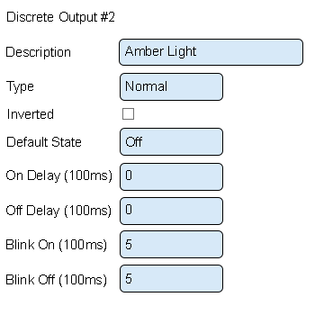
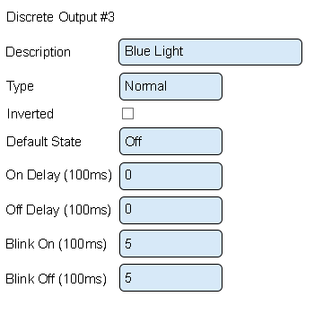
'''7.''' Setup the other lights in the exact same manner - only the Output Description will change. Examples of each light setup is shown below. Please use the Exact same order that we have shown below as this will match up with the way your Call Station has been wired. | |||
<gallery widths=348 heights=315> | <gallery widths=348 heights=315> | ||
File:3141_11.png | File:3141_11.png | ||
| Line 87: | Line 100: | ||
</gallery> | </gallery> | ||
'''a. Description''' – enter the light color. | |||
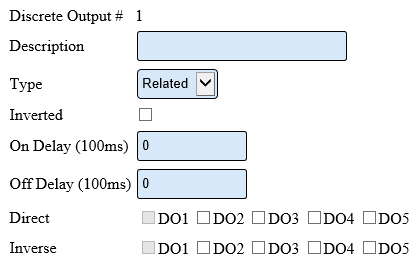
'''b. Type''' – | '''8.''' The Green light is setup to do the opposite of each of the other lights. For this reason, the Green light configuration is setup differently - we use a Related Type. The image below shows the options available for a Related Type: | ||
'''c. Inverted''' – | |||
'''d. | <gallery widths=418 heights=263> | ||
'''e. | File:3137_8.png | ||
'''f. | </gallery> | ||
'''g. | |||
'''a. Description''' – enter a name for the output – light color. | |||
'''b. Type''' – Related – output will turn on/off when another selected output is on/off. | |||
'''c. Inverted''' – output will do the opposite of normal. | |||
'''d. On Delay''' – number of milliseconds to elapse before the output turns on. | |||
'''e. Off Delay''' – number of milliseconds to elapse before the output turns off. | |||
'''f. Direct''' – output will do the exact same behavior as another selected output. | |||
'''g. Inverse''' – output will do the opposite behavior as another selected output. | |||
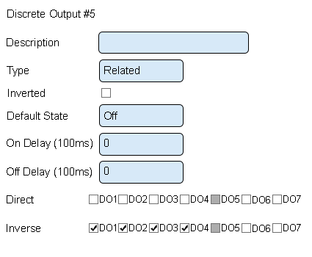
''' | '''9.''' The image below shows you how to set up the Green light. Please use the same setup shown below as it will match up with the way you wired the device: | ||
<gallery widths= | <gallery widths=419 heights=257> | ||
File:3141_14.png | File:3141_14.png | ||
</gallery> | </gallery> | ||
| Line 106: | Line 126: | ||
'''b. Type''' – select Related. | '''b. Type''' – select Related. | ||
'''c. Inverted''' – leave this unchecked. | '''c. Inverted''' – leave this unchecked. | ||
'''d. On Delay''' – leave this | '''d. On Delay''' – leave this as zero. | ||
'''e. Off Delay''' – leave this | '''e. Off Delay''' – leave this as zero. | ||
'''f. Direct''' – leave all unchecked. | '''f. Direct''' – leave these all unchecked. | ||
'''g. Inverse''' – mark DO1, DO2, DO3 and DO4. | '''g. Inverse''' – check mark DO1, DO2, DO3 and DO4. This tells the Green light to do the opposite of the other lights. | ||
'''10.''' Select Save & Exit. | '''10.''' Select Save & Exit. | ||
| Line 115: | Line 135: | ||
<gallery widths=252 heights=76> | <gallery widths=252 heights=76> | ||
File:3141_15.png | File:3141_15.png | ||
</gallery> | </gallery> | ||
Revision as of 20:47, 12 April 2021
Overview
This guide explains how to control a light stack that is attached/wired to a Call station. The example shown in the guide is for a 5 color light stack attached to a Call Station. Regardless of how many lights you have in your stack, the instructions will be exactly the same.
There are 3 steps to the overall process:
Attach/Wire the Light Stack
Setup the Lights for the Module - Covered in this Guide
Control the Lights for the Module
Requirements
1. VT3000 Core Software installed and running on your system.
2. A Light Stack wired to a Call Station.
3. The Call Station with the stack light, powered and communicating with the system.
4. An existing Call Station configuration in the system.
Instructions - Discrete Output Setup
1. Open the VT3000 web interface – log in – select Configuration – select Devices.
2. Select the Configuration of the Call Station with the Light Stack attached from the list – select Edit.
3. Select the Discrete Outputs tab.
4. Select Discrete Output 1.
5. An Explanation of the Discrete Output Properties for a Normal Type:
    a. Description – enter a name for the output – light color.
    b. Type – Normal – output will turn on/off when commanded.
    c. Inverted – output will do the opposite of normal.
    d. Default State - what behavior the output will perform when it has no command.
    d. On Delay – number of milliseconds to elapse before the output turns on.
    e. Off Delay – number of milliseconds to elapse before the output turns off.
    f. Blink On – number of milliseconds to stay on during blink.
    g. Blink Off – number or milliseconds to stay off during blink.
6. Setup Discrete Output 1 as the Red Light. This is done because the Red Light is wired into O1 on the Call Station.
    a. Description – enter Red Light.
    b. Type – leave this as normal.
    c. Inverted – leave this unchecked.
    d. Default State – select Off.
    e. On Delay – leave this as Zero.
    f. Off Delay – leave this as Zero.
    g. Blink On – leave this as 5.
    h. Blink Off – leave this as 5.
7. Setup the other lights in the exact same manner - only the Output Description will change. Examples of each light setup is shown below. Please use the Exact same order that we have shown below as this will match up with the way your Call Station has been wired.
8. The Green light is setup to do the opposite of each of the other lights. For this reason, the Green light configuration is setup differently - we use a Related Type. The image below shows the options available for a Related Type:
    a. Description – enter a name for the output – light color.
    b. Type – Related – output will turn on/off when another selected output is on/off.
    c. Inverted – output will do the opposite of normal.
    d. On Delay – number of milliseconds to elapse before the output turns on.
    e. Off Delay – number of milliseconds to elapse before the output turns off.
    f. Direct – output will do the exact same behavior as another selected output.
    g. Inverse – output will do the opposite behavior as another selected output.
9. The image below shows you how to set up the Green light. Please use the same setup shown below as it will match up with the way you wired the device:
    a. Description – enter Green Light.
    b. Type – select Related.
    c. Inverted – leave this unchecked.
    d. On Delay – leave this as zero.
    e. Off Delay – leave this as zero.
    f. Direct – leave these all unchecked.
    g. Inverse – check mark DO1, DO2, DO3 and DO4. This tells the Green light to do the opposite of the other lights.
10. Select Save & Exit.
Step by Step Guides
How to Install a Wireless Light Stack


