Difference between revisions of "VT3000 - Back Up Database - SQL Server"
SupportAdmin (talk | contribs) |
SupportAdmin (talk | contribs) |
||
| Line 3: | Line 3: | ||
= | =Instructions - Find the database(s) SQL Server location= | ||
'''1.''' Open the VT3000 web-interface - select VT3000 - select Administration - select System Settings, select Global. | '''1.''' Open the VT3000 web-interface - select VT3000 - select Administration - select System Settings, select Global. | ||
| Line 31: | Line 31: | ||
= | =Instructions - Backing Up the Database(s) SQL Server= | ||
The steps below show images from SQL Server 2008. The steps for other versions is the same and the screens will be very similar. | |||
<gallery widths= | '''1.''' Navigating to the Backup files can be difficult inside SQL Server. We suggest creating a new folder. Open Windows File Explorer by selecting the icon. | ||
File:SQL15.png | |||
<gallery widths=100 heights=84> | |||
File: | File:SQL15.png | ||
</gallery> | |||
'''2.''' Select the C Drive - right click on the icon and select New Folder. | |||
<gallery widths=90 heights=73> | |||
File:SQL16.png | |||
</gallery> | </gallery> | ||
''' | '''3.''' Name the new Folder SQL Backup. | ||
<gallery widths= | <gallery widths=100 heights=147> | ||
File:SQL17.png|Windows Start | File:SQL17.png | ||
</gallery> | |||
'''4.''' Select the Windows Start button - find the Microsoft SQL Server 2008 R2 (or your version up to SQL Server 2016) folder - select the folder to expand it. If you are using SQL Server 2017 or above you will select the SQL Server Tools (your version) folder. | |||
<gallery widths=100 heights=102> | |||
File:SQL18.png|Windows Start | |||
</gallery> | </gallery> | ||
<gallery widths=268 heights=40> | <gallery widths=268 heights=40> | ||
File:SQL19.png | File:SQL19.png | ||
</gallery> | |||
<gallery widths=211 heights=36> | |||
File:SQL22.png | |||
</gallery> | </gallery> | ||
''' | '''5.''' Find the SQL Server Management Studio icon - select it. | ||
<gallery widths=256 heights=44> | <gallery widths=256 heights=44> | ||
| Line 59: | Line 76: | ||
''' | '''6.''' On the Log In page enter the following for the Default VersaCall Computer/System (Enter your Login & Password if different) - click on the Connect button. If you are accessing another server, please contact your IT department for the sign in information. | ||
<gallery widths=401 heights=201> | <gallery widths=401 heights=201> | ||
| Line 70: | Line 87: | ||
''' | '''7.''' Expand the Databases folder - all of the VersaCall databases available will show. | ||
<gallery widths=266 heights=184> | <gallery widths=266 heights=184> | ||
| Line 76: | Line 93: | ||
</gallery> | </gallery> | ||
''' | '''8.''' Click on the Database you want to backup so that it is highlighted. | ||
<gallery widths=266 heights=184> | <gallery widths=266 heights=184> | ||
| Line 83: | Line 100: | ||
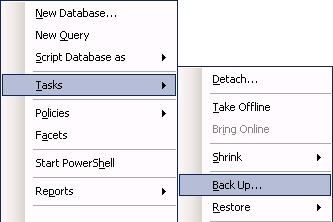
''' | '''9.''' Right click on the selected Database - select Tasks - select Backup. | ||
<gallery widths=333 heights=222> | <gallery widths=333 heights=222> | ||
| Line 90: | Line 107: | ||
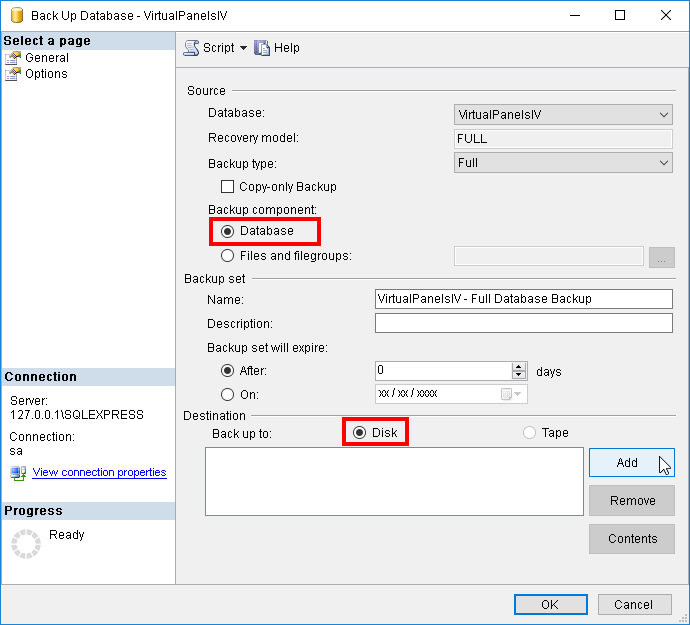
''' | '''10.''' Under Source - Backup Component - ensure Database is selected. Under Destination - ensure Disk is selected. Click on the Add button. | ||
<gallery widths=690 heights=625> | <gallery widths=690 heights=625> | ||
| Line 97: | Line 114: | ||
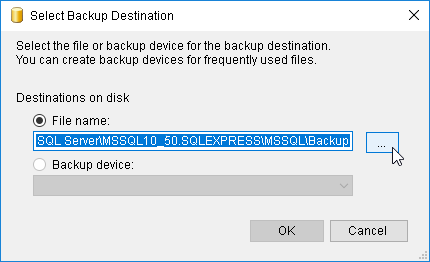
''' | '''11.''' Select the "..." button on the Select Backup Destination window. | ||
<gallery widths=430 heights=262> | <gallery widths=430 heights=262> | ||
| Line 104: | Line 121: | ||
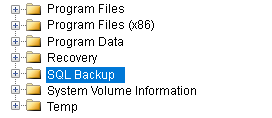
''' | '''12.''' Use the file tree to navigate to C:\SQL Backup - click on the folder so that it is highlighted. | ||
<gallery widths=272 heights=118> | <gallery widths=272 heights=118> | ||
| Line 111: | Line 128: | ||
''' | '''13.''' Go to the bottom of the window - ensure C:\SQL Backup is shown in the Selected Path field. | ||
<gallery widths=409 heights=87> | <gallery widths=409 heights=87> | ||
| Line 118: | Line 135: | ||
''' | '''14.''' Click in the File Name field - enter the name of the database to back up followed by ".bak". Select the OK button. | ||
<gallery widths=409 heights=87> | <gallery widths=409 heights=87> | ||
| Line 124: | Line 141: | ||
</gallery> | </gallery> | ||
''' | '''15.''' On the Select Backup Destination window ensure the File Name field is correct - select the OK button. | ||
<gallery widths=430 heights=262> | <gallery widths=430 heights=262> | ||
| Line 131: | Line 148: | ||
''' | '''16.''' In the Back up to section click on the location selected in the steps above so that it is highlighted - click on the OK button. | ||
<gallery widths=690 heights=625> | <gallery widths=690 heights=625> | ||
| Line 138: | Line 155: | ||
''' | '''17.''' A successful message will appear on the screen - select OK button. | ||
<gallery widths=607 heights=126> | <gallery widths=607 heights=126> | ||
| Line 145: | Line 162: | ||
''' | '''18.''' Repeat the steps above to backup any remaining databases. | ||
Revision as of 19:35, 10 September 2020
Overview
For this method to work properly, you must physically access the VersaCall computer or the Server that is storing the databases. You must create a folder to store the backup files to on the VersaCall Computer or Server storing the databases.
Instructions - Find the database(s) SQL Server location
1. Open the VT3000 web-interface - select VT3000 - select Administration - select System Settings, select Global.
2. Under the Database Locations heading, expand the details for one of the databases.
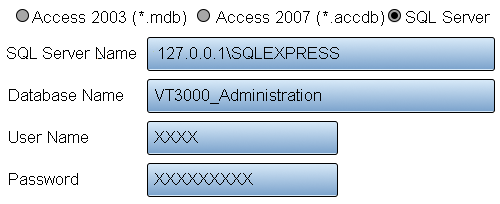
3. If the SQL Server Name field looks like the image below, you will need to access the VersaCall computer. User Name & Password will differ, we are representing it with (X).
4. If the SQL Server Name field has anything different from the image in # 3, you will need to access the Server that is storing the databases. You may need to contact your IT department for assistance.
Instructions - Backing Up the Database(s) SQL Server
The steps below show images from SQL Server 2008. The steps for other versions is the same and the screens will be very similar.
1. Navigating to the Backup files can be difficult inside SQL Server. We suggest creating a new folder. Open Windows File Explorer by selecting the icon.
2. Select the C Drive - right click on the icon and select New Folder.
3. Name the new Folder SQL Backup.
4. Select the Windows Start button - find the Microsoft SQL Server 2008 R2 (or your version up to SQL Server 2016) folder - select the folder to expand it. If you are using SQL Server 2017 or above you will select the SQL Server Tools (your version) folder.
5. Find the SQL Server Management Studio icon - select it.
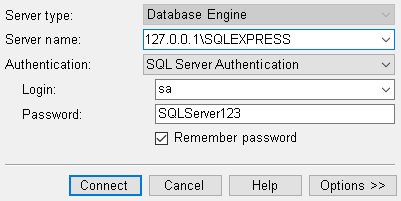
6. On the Log In page enter the following for the Default VersaCall Computer/System (Enter your Login & Password if different) - click on the Connect button. If you are accessing another server, please contact your IT department for the sign in information.
    a. Server Name - 127.0.0.1\SQLEXPRESS
    b. Login - sa
    c. Password - SQLServer123
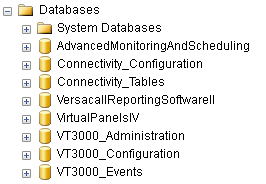
7. Expand the Databases folder - all of the VersaCall databases available will show.
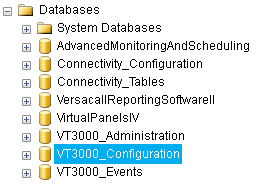
8. Click on the Database you want to backup so that it is highlighted.
9. Right click on the selected Database - select Tasks - select Backup.
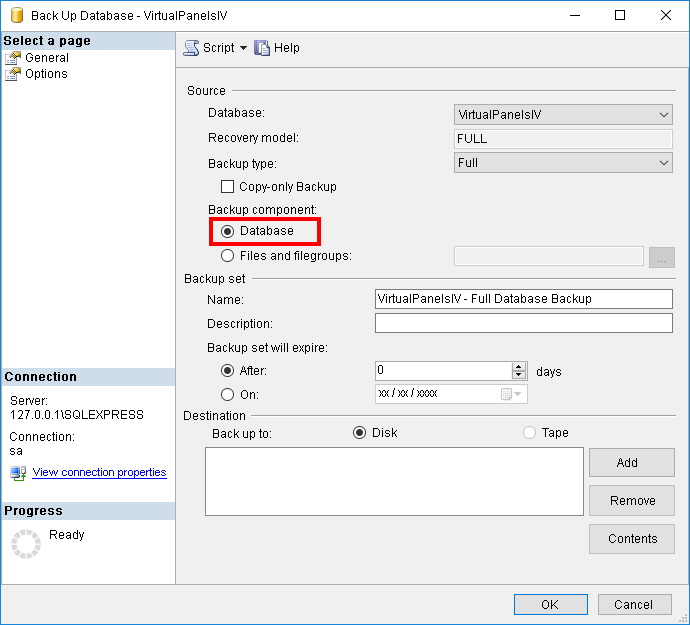
10. Under Source - Backup Component - ensure Database is selected. Under Destination - ensure Disk is selected. Click on the Add button.
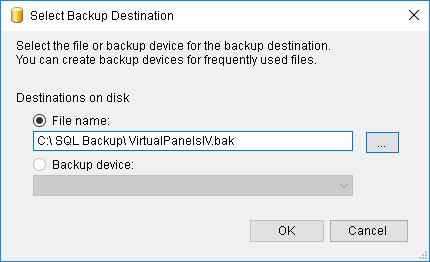
11. Select the "..." button on the Select Backup Destination window.
12. Use the file tree to navigate to C:\SQL Backup - click on the folder so that it is highlighted.
13. Go to the bottom of the window - ensure C:\SQL Backup is shown in the Selected Path field.
14. Click in the File Name field - enter the name of the database to back up followed by ".bak". Select the OK button.
15. On the Select Backup Destination window ensure the File Name field is correct - select the OK button.
16. In the Back up to section click on the location selected in the steps above so that it is highlighted - click on the OK button.
17. A successful message will appear on the screen - select OK button.
18. Repeat the steps above to backup any remaining databases.
Step by Step Guides
Restore/Update Databases - VT3000


