VT3000 - Update Database - SQL Server

From Versacall Support
Jump to navigation Jump to search
Call Now 858-677-6766 SubmitTckBtn.png EmailUsBtn.png


GeneralHeader.png

Overview
Use this method to update a VersaCall database using SQL Server. This may be needed if the update through the VT3000 Core software is not working properly or if you are storing the VersaCall databases on a separate computer/server. For this method to work properly, you must physically access the VersaCall computer or the Server that is storing the databases. The backup files must be on the VersaCall computer or the Server storing the databases.


Requirements
See Requirements Here
1. The VT3000 Core Software installed and running on your system.
2. The Databases must already exist in your SQL Server Instance.
3. A backup file saved to the Computer/Server that the SQL Server Instance is running on.
4. SQL Server Management Studio installed on the Computer/Server running the SQL Server Instance or on a computer that can access the computer from your network.
5. SQL Server Instance name (IP Address/Computer Domain Name & SQL Server Instance Name).
6. SQL Server Instance login (Username & Password).


InstructionHeader.png

Step 1.
Open the VT3000 web-interface - select VT3000 - select Administration - select System Settings - select Global.
3114 1.png
Icon systemsettings.png
Icon globalsettings.png
Administration System Settings Global


Step 2.
Under the Database Locations heading, expand the details for one of the databases.
Global2.png


Step 3.
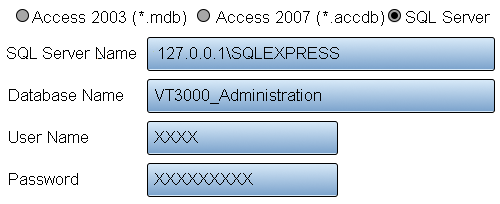
If the SQL Server Name field looks like the image below, you will need to access the VersaCall computer. User Name & Password will differ, we are representing it with (X).
Global3.png


Step 4.
If the SQL Server Name field has anything different from the image in Step # 3, you will need to access the Server that is storing the databases. You may need to contact your IT department for assistance.


Step 5.
Navigating to the Backup files can be difficult inside SQL Server. We suggest creating a new folder to place all the database files in. Open Windows File Explorer by selecting the icon on your computer.
SQL15.png
File Explorer


Step 6.
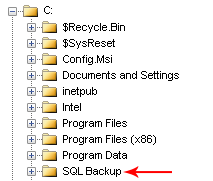
Select the C: Drive - right click in the drive and select Add New - select Folder. Name the folder SQL Backup. After creating the folder, copy all of your databases into the folder.
SQL16.png
SLQ51.png
SQL17.png
C: Drive New Folder SQL Backup


Step 7.
Select the Windows Start button - find the Microsoft SQL Server 2008 R2 (or your version up to SQL Server 2016) folder - select the folder to expand it.
If you are using SQL Server 2017 or above you will select the SQL Server Tools (your version) folder.
SQL18.png
SQL19.png
SQL22.png
Windows Start 2008 to 2016 Versions Versions above 2016


Step 8.
Find the SQL Server Management Studio icon - select it.
SQL20.png


Step 9.
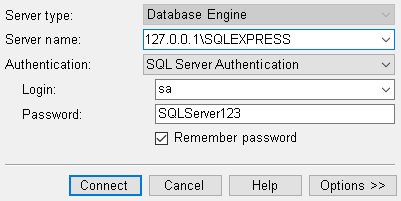
On the Log In page enter the following for the Default VersaCall setup where SQL Express is being used - click on the Connect button. If you are accessing another server, please contact your IT department for the sign in information.
SQL21.png
Server Name - 127.0.0.1\SQLEXPRESS
Login - sa
Password - SQLServer123


Step 10.
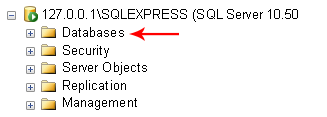
Click on the Databases folder so that it is highlighted - right click on the folder - select Restore Database.
SQL4.png


Step 11.
Under Source select Device - select the "..." button on the right.
SQL5.png


Step 12.
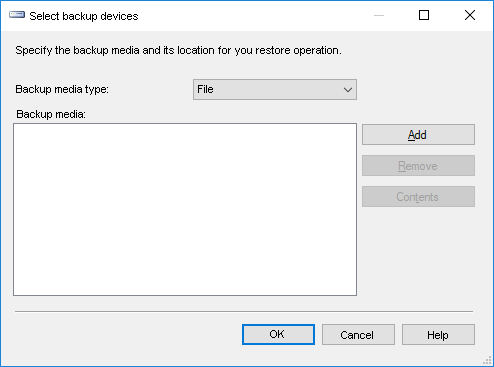
Select the Add button.
SQL6.png


Step 13.
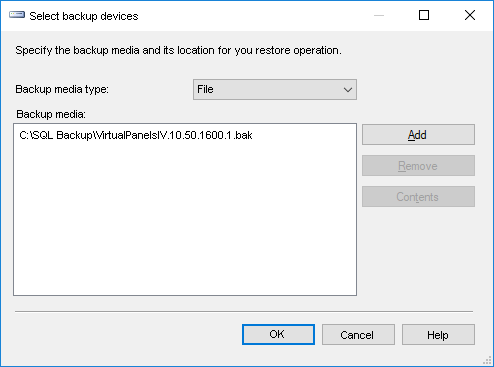
Use the file tree to navigate to C:\SQL Backup - expand the folder. This is the folder we suggested making in the previous steps. If you setup something different please navigate to that location.
SQL7.png


Step 14.
Select a database file (double click on the file).
SQL8.png


Step 15.
Click on the OK button at the bottom of the window - all the file information will be generated in the fields.
SQL9.png


Step 16.
Click on the OK button on the backup devices menu.
SQL10.png


Step 17.
Restore database page will load.
SLQ11.png
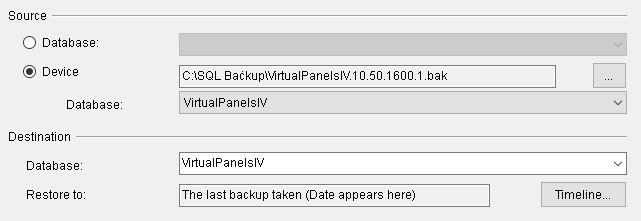
Source - shows the database file location that was selected.
Destination - ensure the correct Database is selected in the Database field. Our example shows we selected the Virtual Panels IV backup so we want to restore that to the existing Virtual Panels IV database.


Step 18.
Under the Restore Plan heading ensure the Restore box is checked next to the file selected previously.
SQL12.png


Step 19.
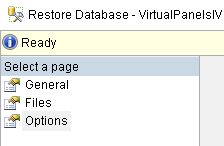
Select Options under the Select page heading inside the Restore Database window.
SQL23.png


Step 20.
Under the Restore Options heading click on the box for "Overwrite the existing database" option. Ensure the box is marked with a check mark.
SQL24.png


Step 21.
Under the Server Connections heading click on the box for "Close existing connections to destination database" option. Ensure the box is marked with a check mark.
SQL25.png


Step 22.
Select OK button at the bottom of the window.
SQL13.png


Step 23.
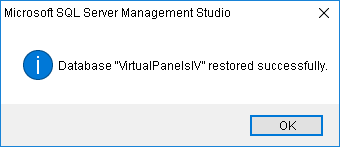
A successfully restored window will appear, select the OK button. If you do not see a successful message appear or you get an error message, please contact VersaCall Support for assistance.
SQL14.png


Step 24.
Repeat the steps for each additional database that you need to Update/Restore. When you have completed the Update/Restore, close all open windows and launch the VT3000 software to check that all your data is correct.


RelatedHowTos.png
Select a Guide Here
Backup VersaCall Databases using SQL Server
How to Script an SQL Database to an Earlier Version of SQL Server
Backup VersaCall Databases using VT3000 - Download Files
Backup VersaCall Databases using VT3000 - Make a Local Backup
Backup VersaCall Databases using VT3000 - Send the Backup to VersaCall
Update VersaCall Databases using VT3000
Restore VersaCall Databases using VT3000
How to Fix the "Database Connection Closed" Error


SearchHeader.png


VC Footer.png
Follow Us On LinkedIn View our Blog