Difference between revisions of "VT3000 - Create Filter Group"
Jump to navigation
Jump to search
SupportAdmin (talk | contribs) |
SupportAdmin (talk | contribs) |
||
| Line 18: | Line 18: | ||
|} | |} | ||
|} | |} | ||
<br> | |||
=<big>'''Instructions'''</big>= | |||
=Instructions= | <br> | ||
{|style="margin:left; width: 100px; background:#eaf3ff; padding:5px; border:2px solid #000000;" | |||
'''1.''' Open the VT3000 web interface – log in – select Configuration – select Filter Groups. | |- | ||
|<big>'''Step 1.'''</big> | |||
{|style="margin:left; width: 800px; background:#F0F0F0; padding:5px; border:2px solid #000000;" | |||
File: | |valign="top" | | ||
File: | |- | ||
< | |Open the VT3000 web interface – log in – select Configuration – select Filter Groups. | ||
{|style="margin:left;" | |||
|valign="top" | | |||
'''2.''' Select Add button. | {|class="wikitable" style="align=center; background:white;" | ||
|- | |||
|[[File:3151 1.png|100px]] || [[File:3151 2.png|100px]] | |||
File: | |- | ||
< | |style="text-align:center" | '''Configuration''' ||style="text-align:center" | '''Filter Groups''' | ||
|} | |||
|} | |||
'''3.''' Filter Group Properties: | |} | ||
|} | |||
<br> | |||
File: | ---- | ||
<br> | |||
{|style="margin:left; width: 100px; background:#eaf3ff; padding:5px; border:2px solid #000000;" | |||
|- | |||
|<big>'''Step 2.'''</big> | |||
{|style="margin:left; width: 800px; background:#F0F0F0; padding:5px; border:2px solid #000000;" | |||
|valign="top" | | |||
|- | |||
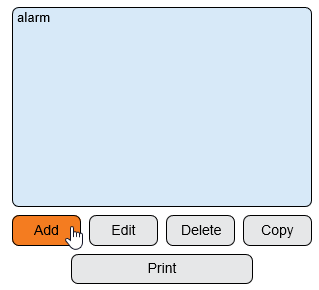
|Select Add button. | |||
{|style="margin:left;" | |||
|valign="top" | | |||
{|class="wikitable" style="background:white;" | |||
|- | |||
|[[File:3151 3.png|319px]] | |||
|} | |||
|} | |||
'''4.''' Example - using the Find option to only display devices with a Maintenance monitoring point. | |} | ||
|} | |||
<br> | |||
File: | ---- | ||
< | <br> | ||
{|style="margin:left; width: 100px; background:#eaf3ff; padding:5px; border:2px solid #000000;" | |||
|- | |||
'''5.''' Select Monitoring Points to add to the group - hold Ctrl button down & click | |<big>'''Step 3.'''</big> | ||
{|style="margin:left; width: 800px; background:#F0F0F0; padding:5px; border:2px solid #000000;" | |||
|valign="top" | | |||
File: | |- | ||
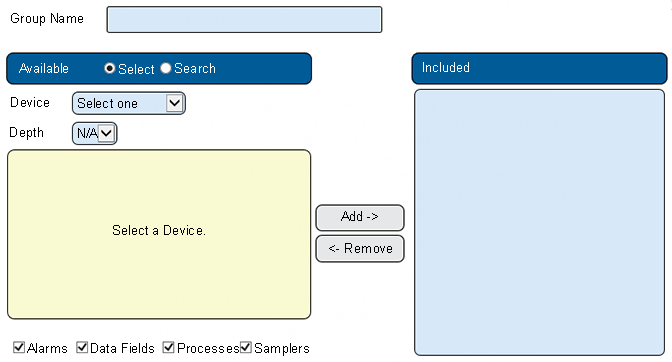
< | |Filter Group Properties: | ||
{|style="margin:left;" | |||
|valign="top" | | |||
'''6.''' Select the Add button to add Monitoring Points to the Group. | {|class="wikitable" style="align=center; background:white; width: 775px;" | ||
|- | |||
|[[File:3151 4.png|center|672px]] | |||
File: | |} | ||
< | {|class="wikitable" style="background:white; width: 775px; " | ||
|- | |||
|'''Group Name''' - enter a name for the group. | |||
'''7.''' The Included list will show the monitoring points added to the group. | |- | ||
|'''Available - Select''' - view devices from a list. | |||
|- | |||
File: | |'''Available - Search''' - view devices based on a key word search. | ||
< | |- | ||
|'''Device''' - shown when Select is used. Select a device from the list. | |||
|- | |||
'''8.''' Enter a name for the group in Group Name field. | |'''Depth''' - shown when Select is used. Select the number of levels to be shown in the list. | ||
|- | |||
|'''List''' - devices and alarms selected or searched. | |||
File: | |- | ||
< | |'''Included''' - shows the alarms, processes or data fields that have been added to the group. | ||
|- | |||
|'''Add''' - select the button to add an alarm, process or data field to the group. | |||
'''9.''' Select Save & Exit when completed. | |- | ||
|'''Remove''' - select the button to remove an alarm, process or data field from the group. | |||
File: | |- | ||
< | |'''Check Boxes''' - make the box of the monitoring point to be shown in the list. | ||
|} | |||
|} | |||
|} | |||
|} | |||
<br> | |||
---- | |||
<br> | |||
{|style="margin:left; width: 100px; background:#eaf3ff; padding:5px; border:2px solid #000000;" | |||
|- | |||
|<big>'''Step 4.'''</big> | |||
{|style="margin:left; width: 800px; background:#F0F0F0; padding:5px; border:2px solid #000000;" | |||
|valign="top" | | |||
|- | |||
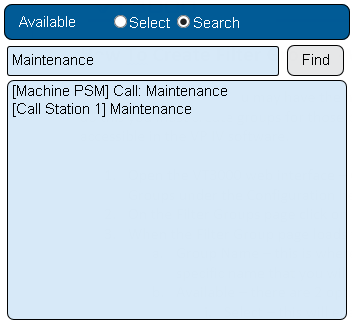
|Example - using the Find option to only display devices with a Maintenance monitoring point. | |||
{|style="margin:left;" | |||
|valign="top" | | |||
{|class="wikitable" style="background:white;" | |||
|- | |||
|[[File:3151 5.png|352px]] | |||
|} | |||
|} | |||
|} | |||
|} | |||
<br> | |||
---- | |||
<br> | |||
{|style="margin:left; width: 100px; background:#eaf3ff; padding:5px; border:2px solid #000000;" | |||
|- | |||
|<big>'''Step 5.'''</big> | |||
{|style="margin:left; width: 800px; background:#F0F0F0; padding:5px; border:2px solid #000000;" | |||
|valign="top" | | |||
|- | |||
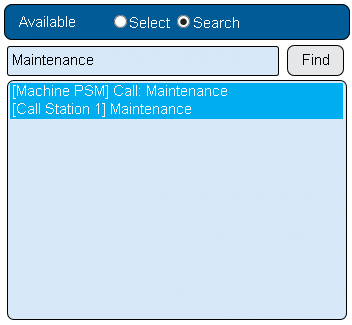
|Select Monitoring Points to add to the group - hold Ctrl button down & click for multiple selections. | |||
{|style="margin:left;" | |||
|valign="top" | | |||
{|class="wikitable" style="background:white;" | |||
|- | |||
|[[File:3151 6.png|352px]] | |||
|} | |||
|} | |||
|} | |||
|} | |||
<br> | |||
---- | |||
<br> | |||
{|style="margin:left; width: 100px; background:#eaf3ff; padding:5px; border:2px solid #000000;" | |||
|- | |||
|<big>'''Step 6.'''</big> | |||
{|style="margin:left; width: 800px; background:#F0F0F0; padding:5px; border:2px solid #000000;" | |||
|valign="top" | | |||
|- | |||
|Select the Add button to add Monitoring Points to the Group. | |||
{|style="margin:left;" | |||
|valign="top" | | |||
{|class="wikitable" style="background:white;" | |||
|- | |||
|[[File:3151 7.png|106px]] | |||
|} | |||
|} | |||
|} | |||
|} | |||
<br> | |||
---- | |||
<br> | |||
{|style="margin:left; width: 100px; background:#eaf3ff; padding:5px; border:2px solid #000000;" | |||
|- | |||
|<big>'''Step 7.'''</big> | |||
{|style="margin:left; width: 800px; background:#F0F0F0; padding:5px; border:2px solid #000000;" | |||
|valign="top" | | |||
|- | |||
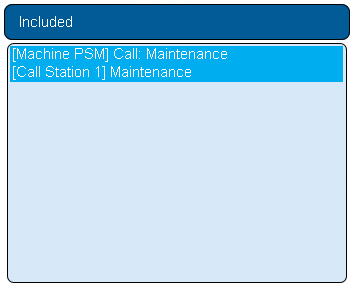
|The Included list will show the monitoring points added to the group. | |||
{|style="margin:left;" | |||
|valign="top" | | |||
{|class="wikitable" style="background:white;" | |||
|- | |||
|[[File:3151 8.png|352px]] | |||
|} | |||
|} | |||
|} | |||
|} | |||
<br> | |||
---- | |||
<br> | |||
{|style="margin:left; width: 100px; background:#eaf3ff; padding:5px; border:2px solid #000000;" | |||
|- | |||
|<big>'''Step 8.'''</big> | |||
{|style="margin:left; width: 800px; background:#F0F0F0; padding:5px; border:2px solid #000000;" | |||
|valign="top" | | |||
|- | |||
|Enter a name for the group in Group Name field. | |||
{|style="margin:left;" | |||
|valign="top" | | |||
{|class="wikitable" style="background:white;" | |||
|- | |||
|[[File:3151 9.png|434px]] | |||
|} | |||
|} | |||
|} | |||
|} | |||
<br> | |||
---- | |||
<br> | |||
{|style="margin:left; width: 100px; background:#eaf3ff; padding:5px; border:2px solid #000000;" | |||
|- | |||
|<big>'''Step 9.'''</big> | |||
{|style="margin:left; width: 800px; background:#F0F0F0; padding:5px; border:2px solid #000000;" | |||
|valign="top" | | |||
|- | |||
|Select Save & Exit when completed. | |||
{|style="margin:left;" | |||
|valign="top" | | |||
{|class="wikitable" style="background:white;" | |||
|- | |||
|[[File:3139 11.png|250px]] | |||
|} | |||
|} | |||
|} | |||
|} | |||
<br> | |||
---- | ---- | ||
---- | ---- | ||
<br> | |||
{|style="margin: auto; background:#eaf3ff; border:1px solid #2a4b8d" | {|style="margin: auto; background:#eaf3ff; border:1px solid #2a4b8d" | ||
|valign="top" | | |valign="top" | | ||
| Line 120: | Line 238: | ||
</inputbox> | </inputbox> | ||
|} | |} | ||
<br> | |||
[[Category:VT3000 Core Software]] | [[Category:VT3000 Core Software]] | ||
[[Category:Configuration]] | [[Category:Configuration]] | ||
[[Category:Filter Group]] | [[Category:Filter Group]] | ||
Revision as of 16:51, 5 November 2021
|
|
Instructions
Step 1.
|
Step 2.
|
Step 3.
|
Step 4.
|
Step 5.
|
Step 6.
|
Step 7.
|
Step 8.
|
Step 9.
|
|
| |||||

