Difference between revisions of "VPIV - Create a Messaging Panel"
Jump to navigation
Jump to search
SupportAdmin (talk | contribs) |
SupportAdmin (talk | contribs) |
||
| Line 1: | Line 1: | ||
{|style="margin:auto;" | |||
{|style="margin: | |||
|valign="top" | | |valign="top" | | ||
{|class="wikitable" style="background:#eaf3ff;" | {|class="wikitable" style="background:#eaf3ff; width:800px;" | ||
|- | |- | ||
!style="text-align: left;"|<big>'''Overview'''</big> | !style="text-align: left;"|<big>'''Overview'''</big> | ||
|- | |- | ||
|A Messaging Panel or Widget will show the Text, as a Message, entered in the communication path for an alarm. The first Communication Path, in the order, will display on the Messaging Panel or Widget. Creating a Messaging Panel or Widget is done in 4 sections. | |A Messaging Panel or Widget will show the Text, as a Message, entered in the communication path for an alarm. The first Communication Path, in the order, will display on the Messaging Panel or Widget. Creating a Messaging Panel or Widget is done in 4 sections. | ||
|- | |||
|style= "text-align:center" | '''NOTE''' - The instructions below apply to both a Panel & a Widget. Both are created exactly the same. | |||
|} | |||
|} | |||
<br> | |||
{|style="margin:auto;" | |||
|valign="top" | | |||
{|class="wikitable" style="background:#eaf3ff; width: 800px;" | |||
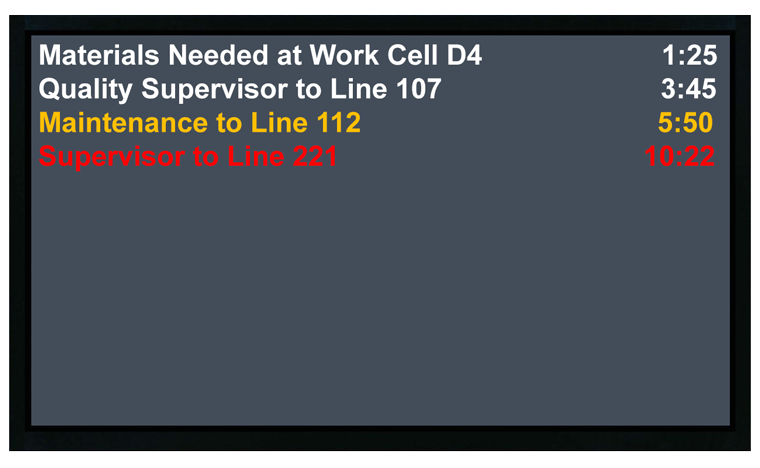
!style="text-align: left;"|<big>'''Example'''</big> | |||
|- | |||
|[[File:VPIVMess.png|center|760px]] | |||
|} | |} | ||
|} | |} | ||
{|style="margin: | <br> | ||
{|style="margin:auto;" | |||
|valign="top" | | |valign="top" | | ||
{|class="wikitable mw-collapsible mw-collapsed" style="background:#eaf3ff; width: 800px;" | {|class="wikitable mw-collapsible mw-collapsed" style="background:#eaf3ff; width: 800px;" | ||
| Line 22: | Line 27: | ||
|'''1.''' The VT3000 Core Software installed and running on your system. | |'''1.''' The VT3000 Core Software installed and running on your system. | ||
|- | |- | ||
|'''2.''' | |'''2.''' VPIV - Virtual Panels IV software installed and running on your system. | ||
|- | |- | ||
|'''3.''' Each alarm that you want to display on the panel or widget, must have text in the first Communication Path on the Device Configuration. | |'''3.''' Each alarm that you want to display on the panel or widget, must have text in the first Communication Path on the Device Configuration. | ||
|- | |- | ||
|'''4.''' If you plan to only show specfic Alarms or specfic Devices on the panel or widget, you will need to create the Filter Group(s) first. | |'''4.''' If you plan to only show specfic Alarms or specfic Devices on the panel or widget, you will need to create the Filter Group(s) first. | ||
|} | |||
|} | |||
=<big>'''Instructions'''</big>= | |||
<br> | |||
{|style="margin:left; width: 100px; background:#eaf3ff; padding:5px; border:2px solid #000000;" | |||
|- | |||
|<big>'''Step 1.'''</big> | |||
{|style="margin:left; width: 800px; background:#F0F0F0; padding:5px; border:2px solid #000000;" | |||
|valign="top" | | |||
|- | |||
|Open the VT3000 web interface - select VPIV button from the welcome page. | |||
{|style="margin:left;" | |||
|valign="top" | | |||
{|class="wikitable" style=" align="center; " background:white;" | |||
|- | |||
|[[File:VPImage1.png|center|257px]] | |||
|} | |||
|} | |||
|} | |||
|} | |||
<br> | |||
---- | |||
<br> | |||
{|style="margin:left; width: 100px; background:#eaf3ff; padding:5px; border:2px solid #000000;" | |||
|- | |||
|<big>'''Step 2.'''</big> | |||
{|style="margin:left; width: 800px; background:#F0F0F0; padding:5px; border:2px solid #000000;" | |||
|valign="top" | | |||
|- | |||
|Select either the Panels or Widgets icon depending on which type you want to create. | |||
{|style="margin:left;" | |||
|valign="top" | | |||
{|class="wikitable" style="background:white;" | |||
|- | |||
|[[File:VPIV_Panels.png|center|103px]] || [[File:VPIV_Widgets.png|center|103px]] | |||
|} | |||
|} | |||
|} | |||
|} | |||
<br> | |||
---- | |||
<br> | |||
{|style="margin:left; width: 100px; background:#eaf3ff; padding:5px; border:2px solid #000000;" | |||
|- | |||
|<big>'''Step 3.'''</big> | |||
{|style="margin:left; width: 800px; background:#F0F0F0; padding:5px; border:2px solid #000000;" | |||
|valign="top" | | |||
|- | |||
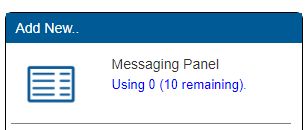
|Select Messaging Panel/Widget from the Add New menu. | |||
{|style="margin:left;" | |||
|valign="top" | | |||
{|class="wikitable" style="background:white;" | |||
|- | |||
|[[File:VPIV_Messaging.png|center|307px]] | |||
|} | |||
|} | |||
|} | |||
|} | |||
<br> | |||
---- | |||
<br> | |||
{|style="margin:left; width: 100px; background:#eaf3ff; padding:5px; border:2px solid #000000;" | |||
|- | |||
|<big>'''Step 4.'''</big> | |||
{|style="margin:left; width: 800px; background:#F0F0F0; padding:5px; border:2px solid #000000;" | |||
|valign="top" | | |||
|- | |||
|The first screen/tab is Properties - enter the following information in the fields provided: | |||
{|style="margin:left;" | |||
|valign="top" | | |||
{|class="wikitable" style="background:white; width:775px;" | |||
|- | |||
|[[File:VPIVMess20.png|center|700px]] | |||
|} | |||
{|class="wikitable" style="background:white;" | |||
|- | |||
|[[File:MessProp1.png|center|423px]] | |||
|} | |||
{|class="wikitable" style="background:white; width:775px;" | |||
|- | |||
|'''Name''' - enter a name for the panel/widget. | |||
|- | |||
|'''Refresh''' - enter a number of seconds for the panel/widget to refresh data. '''NOTE:''' do not enter a number less than 3. | |||
|- | |||
|'''ID''' - this field is generated automatically by the VPIV software. | |||
|} | |||
{|class="wikitable" style="background:white;" | |||
|- | |||
|[[File:MessProp2.png|center|185px]] | |||
|} | |||
{|class="wikitable" style="background:white; width:775px;" | |||
|- | |||
|'''Enable''' - place a check mark in the box to enable the Elapsed Time to show for the message. | |||
|- | |||
|'''Format - H:M:S''' - call/alarm duration time will display as Hours: Minutes: Seconds. | |||
|- | |||
|'''Format - H:M''' - call/alarm duration time will display as Hours: Minutes. | |||
|} | |||
{|class="wikitable" style="background:white;" | |||
|- | |||
|[[File:MessProp3.png|center|265px]] | |||
|} | |||
{|class="wikitable" style="background:white; width:775px;" | |||
|- | |||
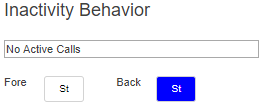
|'''Inactivity Behavior''' - enter the message to display when there are no active calls/alarms in the provided field box. | |||
|- | |||
|'''Color''' - select the Foreground and Background colors of the screen when there are no active calls/alarms. Background is the color of the screen. Foreground color is the color of the text. | |||
|} | |||
|} | |||
|} | |||
|} | |||
<br> | |||
---- | |||
<br> | |||
{|style="margin:left; width: 100px; background:#eaf3ff; padding:5px; border:2px solid #000000;" | |||
|- | |||
|<big>'''Step 5.'''</big> | |||
{|style="margin:left; width: 800px; background:#F0F0F0; padding:5px; border:2px solid #000000;" | |||
|valign="top" | | |||
|- | |||
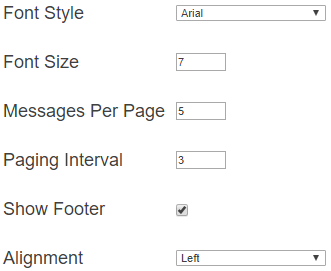
|After all changes have been made to the Properties tab - select the Layout tab - the following options are available. | |||
{|style="margin:left;" | |||
|valign="top" | | |||
{|class="wikitable" style="background:white; width:775px;" | |||
|- | |||
|[[File:VPIVMess21.png|center|700px]] | |||
|} | |||
{|class="wikitable" style="background:white;" | |||
|- | |||
|[[File:MessLayout1.png|center|331px]] | |||
|} | |||
{|class="wikitable" style="background:white; width:775px;" | |||
|- | |||
|'''Font Style''' - select Arial or Times New Roman - font style the message will appear as on the panel. | |||
|- | |||
|'''Font Size''' - enter a font size - generally a 4 or 5 font size will be correct. The user may need to view the panel first and adjust the font size. | |||
|- | |||
|'''Messages Per Page''' - enter the number of message to display on the panel at one time - generally 5 will be correct. The user may need to view the panel first and adjust the amount. | |||
|- | |||
|'''Paging Interval''' - enter the number of seconds to show each page of messages generally 3 will be correct. Anything above the number of messages per page will get put onto a second screen. | |||
|- | |||
|'''Show Footer''' - place a check mark to show the date and time at the bottom of the panel. | |||
|- | |||
|'''Alignment - Left''' - messages will align on the left side of the panel. | |||
|- | |||
|'''Alignment - Center''' - messages will align in the center of the panel. | |||
|- | |||
|'''Alignment -Right''' - messages will align on the right side of the panel. | |||
|} | |||
|} | |||
|} | |||
|} | |||
<br> | |||
---- | |||
<br> | |||
{|style="margin:left; width: 100px; background:#eaf3ff; padding:5px; border:2px solid #000000;" | |||
|- | |||
|<big>'''Step 6.'''</big> | |||
{|style="margin:left; width: 800px; background:#F0F0F0; padding:5px; border:2px solid #000000;" | |||
|valign="top" | | |||
|- | |||
|After all of the changes have been made to the Layout Tab - select the Color Tab. There are 2 different options available. | |||
{|style="margin:left;" | |||
|valign="top" | | |||
{|class="wikitable" style="background:white; width:775px;" | |||
|- | |||
|[[File:VPIVMess22.png|center|700px]] | |||
|} | |||
|} | |||
|} | |||
|} | |||
<br> | |||
---- | |||
<br> | |||
{|style="margin:left; width: 100px; background:#eaf3ff; padding:5px; border:2px solid #000000;" | |||
|- | |||
|<big>'''By State Change'''</big> | |||
{|style="margin:left; width: 800px; background:#F0F0F0; padding:5px; border:2px solid #000000;" | |||
|valign="top" | | |||
|- | |||
|This option allows the user to change the color of the text and/or background of the message based on the state of the alarm (Set or Acknowledged). This selection provides the options shown below. | |||
{|style="margin:left;" | |||
|valign="top" | | |||
{|class="wikitable" style="background:white; width:775px;" | |||
|- | |||
|[[File:MessPanel1.png|center|726px]] | |||
|} | |||
{|class="wikitable" style="background:white;" | |||
|- | |||
|[[File:MessPanel2.png|center|235px]] | |||
|} | |||
{|class="wikitable" style="background:white; width:775px;" | |||
|- | |||
|style= "text-align:center" | <u>'''Use the Color Swatches to setup individual colors for each state.'''</u> | |||
|} | |||
{|class="wikitable" style="background:white; width:775px;" | |||
|- | |||
|style= "text-align:center" | '''Activation''' | |||
|- | |||
|'''Background''' - set the color for the background of the message when the call/alarm is set. | |||
|- | |||
|'''Foreground''' - set the color for the text of the message when the call/alarm is set. | |||
|- | |||
|'''Blink''' - select this option to enable blinking for the set call/alarm. Colors will alternate between the Activation Background & Foreground and the Blink Background & Foreground. | |||
|- | |||
|'''Blink - Background''' - set the color for the background blink color when the call/alarm is set. | |||
|- | |||
|'''Blink - Foreground''' - set the color for the text blink color when the call/alarm is set. | |||
|} | |||
{|class="wikitable" style="background:white; width:775px;" | |||
|- | |||
|style= "text-align:center" | '''Ackowledge''' | |||
|- | |||
|'''Background''' - set the color for the background of the message when the call/alarm is acknowledged. | |||
|- | |||
|'''Foreground''' - set the color for the text of the message when the call/alarm is acknowledged. | |||
|- | |||
|'''Blink''' - select this option to enable blinking for the acknowledged call/alarm. Colors will alternate between the Activation Background & Foreground and the Blink Background & Foreground. | |||
|- | |||
|'''Blink - Background''' - set the color for the background blink color when the call/alarm is acknowledged. | |||
|- | |||
|'''Blink - Foreground''' - set the color for the text blink color when the call/alarm is acknowledged. | |||
|} | |||
|} | |||
|} | |||
|} | |||
<br> | |||
---- | |||
<br> | |||
{|style="margin:left; width: 100px; background:#eaf3ff; padding:5px; border:2px solid #000000;" | |||
|- | |||
|<big>'''By Time Threshold'''</big> | |||
{|style="margin:left; width: 800px; background:#F0F0F0; padding:5px; border:2px solid #000000;" | |||
|valign="top" | | |||
|- | |||
|This option allows the user to change the color of the text and/or background of the message based on how long (elapsed time) the call/alarm has been active. This selection provides the options shown below. | |||
{|style="margin:left;" | |||
|valign="top" | | |||
{|class="wikitable" style="background:white; width:775px;" | |||
|- | |||
|[[File:MessPanel3.png|center|767px]] | |||
|} | |||
{|class="wikitable" style="background:white;" | |||
|- | |||
|[[File:MessPanel4.png|center|631px]] | |||
|} | |||
{|class="wikitable" style="background:white; width:775px;" | |||
|- | |||
|style= "text-align:center" | <u>'''Use the Color Swatches to setup individual colors for each time interval.'''</u> | |||
|} | |||
{|class="wikitable" style="background:white; width:775px;" | |||
|- | |||
|style= "text-align:center" | '''Colors After - 1''' | |||
|- | |||
|'''Background''' - set the color for the background of the message when the call/alarm is within the time entered in field # 1. | |||
|- | |||
|'''Foreground''' - set the color for the text of the message when the call/alarm is within the time entered in field # 1. | |||
|- | |||
|'''Blink''' - select this option to enable blinking for the time interval. Colors will alternate between the Activation Background & Foreground and the Blink Background & Foreground. | |||
|- | |||
|'''Blink - Background''' - set the color for the background blink color when the call/alarm is within the time entered in field # 1. | |||
|- | |||
|'''Blink - Foreground''' - set the color for the text blink color when the call/alarm is within the time entered in field # 1. | |||
|} | |||
{|class="wikitable" style="background:white; width:775px;" | |||
|- | |||
|style= "text-align:center" | '''Colors After - 2''' | |||
|- | |||
|'''Background''' - set the color for the background of the message when the call/alarm is within the time entered in field # 2. | |||
|- | |||
|'''Foreground''' - set the color for the text of the message when the call/alarm is within the time entered in field # 2 | |||
|- | |||
|'''Blink''' - select this option to enable blinking for the time interval. Colors will alternate between the Activation Background & Foreground and the Blink Background & Foreground. | |||
|- | |||
|'''Blink - Background''' - set the color for the background blink color when the call/alarm is within the time entered in field # 2 | |||
|- | |||
|'''Blink - Foreground''' - set the color for the text blink color when the call/alarm is within the time entered in field # 2 | |||
|} | |||
|} | |||
|} | |||
|} | |||
<br> | |||
---- | |||
<br> | |||
{|style="margin:left; width: 100px; background:#eaf3ff; padding:5px; border:2px solid #000000;" | |||
|- | |||
|<big>'''Step 7.'''</big> | |||
{|style="margin:left; width: 800px; background:#F0F0F0; padding:5px; border:2px solid #000000;" | |||
|valign="top" | | |||
|- | |||
|After all of the changes have been made to the Color Tab - select the Filtering Tab. | |||
{|style="margin:left;" | |||
|valign="top" | | |||
{|class="wikitable" style="background:white; width:775px;" | |||
|- | |||
|[[File:VPIVMess23.png|center|700px]] | |||
|} | |||
|} | |||
|} | |||
|} | |||
<br> | |||
---- | |||
<br> | |||
{|style="margin:left; width: 100px; background:#eaf3ff; padding:5px; border:2px solid #000000;" | |||
|- | |||
|<big>'''Step 8.'''</big> | |||
{|style="margin:left; width: 800px; background:#F0F0F0; padding:5px; border:2px solid #000000;" | |||
|valign="top" | | |||
|- | |||
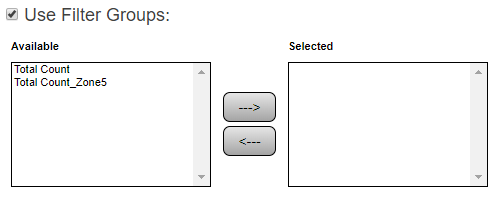
|Filtering is used to select a specific Filter Group(s) for the messages. The Panel will only show messages for the Call/Alarms included in the Filter Group(s). An example of this would be a filter group that is setup with only Maintenance calls/alarms in it. The panel would only show Maintenance messages. | |||
{|style="margin:left;" | |||
|valign="top" | | |||
{|class="wikitable" style="background:white;" | |||
|- | |||
|[[File:MessPanel5.png|center|499px]] | |||
|} | |||
{|class="wikitable" style="background:white; width:775px;" | |||
|- | |||
|'''Use Filter Groups''' - check the box if you want to enable the filtering by Filter Group. | |||
|- | |||
|'''Available''' - this list will show all of the Filter Groups that have been setup in the system. | |||
|- | |||
|'''Selected''' - this list will show all of the Filter Groups that have been Added/Selected for the panel. | |||
|- | |||
|'''Right Facing Arrow Button''' - select one or more Filter Groups from the Available List - select this button to add them to the Selected List. | |||
|- | |||
|'''Left Facing Arrow Button''' - select one of more Filter Groups from the Selected List - select this button to move them to the Available List. | |||
|} | |||
{|class="wikitable" style="background:white;" | |||
|- | |||
|[[File:MessPanel6.png|center|252px]] | |||
|} | |||
{|class="wikitable" style="background:white; width:775px;" | |||
|- | |||
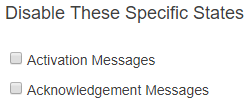
|'''Activation Messages''' - check this box if you DO NOT want to see Set messages on the panel. | |||
|- | |||
|'''Acknowledgement Messages''' - check this box if you DO NOT want to see Acknowledged messages on the panel. | |||
|} | |||
|} | |||
|} | |} | ||
|} | |} | ||
<br> | |||
< | |||
---- | ---- | ||
---- | ---- | ||
<br> | |||
{|style="margin: auto; background:#eaf3ff; border:1px solid #2a4b8d" | {|style="margin: auto; background:#eaf3ff; border:1px solid #2a4b8d" | ||
|valign="top" | | |valign="top" | | ||
| Line 207: | Line 406: | ||
</inputbox> | </inputbox> | ||
|} | |} | ||
<br> | |||
[[Category:Virtual Panels IV]] | [[Category:Virtual Panels IV]] | ||
[[Category:Messaging Panel]] | [[Category:Messaging Panel]] | ||
[[Category:Panels]] | [[Category:Panels]] | ||
Revision as of 22:09, 19 April 2022
|
|
|
Instructions
Step 1.
|
Step 2.
|
Step 3.
|
Step 4.
|
Step 5.
|
Step 6.
|
By State Change
|
By Time Threshold
|
Step 7.
|
Step 8.
|
|
| |||||||||
