Difference between revisions of "VPIV - Create/Edit Rotating Panels"
Jump to navigation
Jump to search
SupportAdmin (talk | contribs) |
SupportAdmin (talk | contribs) m (Text replacement - "https://www.linkedin.com/company/versacall-technologies-inc-/mycompany/" to "https://www.linkedin.com/company/versacall/") |
||
| (6 intermediate revisions by the same user not shown) | |||
| Line 1: | Line 1: | ||
{|style="background:transparent; color:black" border="0" height="230" align="center" valign="bottom" | |||
|+style="background:transparent| | |||
|-align="center" | |||
| | |||
< | |[[Image:CallUsBtn.png|Call Now 858-677-6766]] | ||
| | |||
|[[Image:SubmitTckBtn.png|link=https://www.versacall.com/customer-support/service-ticket]] | |||
| | |||
|[[Image:EmailUsBtn.png|link=mailto:[email protected]?Subject=Help%20Needed%20Wiki&body=Type%20Message%20Here]] | |||
|} | |||
<br> | |||
---- | ---- | ||
---- | |||
<br> | |||
{|style="margin:left; width: 100px; background:#eaf3ff; padding:5px; border:2px solid #000000;" | |||
|- | |||
|<big>'''Overview'''</big> | |||
{|style="margin:left; width: 800px; background:#F0F0F0; padding:5px; border:2px solid #000000;" | |||
|valign="top" | | |||
|- | |||
|Rotating panels are used when you want to view multiple panels on one monitor. Each panel will appear on the screen for a set amount of time then the next panel will show for a set amount of time. This helps when faced with having too many cells/objects on one panel to make is easy to read. | |||
|} | |||
|} | |||
<br> | |||
{|style="margin:left; width: 100px; background:#eaf3ff; padding:5px; border:2px solid #000000;" | |||
|- | |||
|<big>'''Requirements'''</big> | |||
{|style="margin:left; width: 800px; background:#F0F0F0; padding:5px; border:2px solid #000000;" | |||
|valign="top" | | |||
{| class="wikitable mw-collapsible mw-collapsed" width="775px;" | |||
|- | |||
|style="text-align: center;" | '''See Requirements Here''' | |||
|- | |||
|'''1.''' The VT3000 Core Software installed and running on your system. | |||
|- | |||
|'''2.''' VPIV - Virtual Panels IV software installed and running on your system. | |||
|- | |||
|'''3.''' At least 2 Panels created and saved in the system. | |||
|} | |||
|} | |||
|} | |||
<br> | |||
=<big>'''Instructions - Add/Create a Rotating Panel'''</big>= | |||
<br> | |||
{|style="margin:left; width: 100px; background:#eaf3ff; padding:5px; border:2px solid #000000;" | |||
|- | |||
|<big>'''Step 1.'''</big> | |||
{|style="margin:left; width: 800px; background:#F0F0F0; padding:5px; border:2px solid #000000;" | |||
|valign="top" | | |||
|- | |||
|Open the VT3000 web interface - select VPIV button from the welcome page. | |||
{|style="margin:left;" | {|style="margin:left;" | ||
|valign="top" | | |valign="top" | | ||
{|class="wikitable" style="background: | {|class="wikitable" style=" align="center; " background:white;" | ||
|- | |- | ||
|[[File:VPImage1.png|center|257px]] | |||
|} | |||
|} | |||
|} | |||
|} | |||
<br> | |||
---- | |||
<br> | |||
{|style="margin:left; width: 100px; background:#eaf3ff; padding:5px; border:2px solid #000000;" | |||
|- | |||
|<big>'''Step 2.'''</big> | |||
{|style="margin:left; width: 800px; background:#F0F0F0; padding:5px; border:2px solid #000000;" | |||
|valign="top" | | |||
|- | |||
|Select the Rotating Panels icon. | |||
{|style="margin:left;" | |||
|valign="top" | | |||
{|class="wikitable" style="background:white;" | |||
|- | |||
|[[File:VP_Rotate.png|center|100px]] | |||
|- | |||
|style= "text-align:center" | '''Rotating Panels''' | |||
|} | |||
|} | |||
|} | |||
|} | |||
<br> | |||
---- | |||
<br> | |||
{|style="margin:left; width: 100px; background:#eaf3ff; padding:5px; border:2px solid #000000;" | |||
|- | |- | ||
|Rotating panels | |<big>'''Step 3.'''</big> | ||
{|style="margin:left; width: 800px; background:#F0F0F0; padding:5px; border:2px solid #000000;" | |||
|valign="top" | | |||
|- | |||
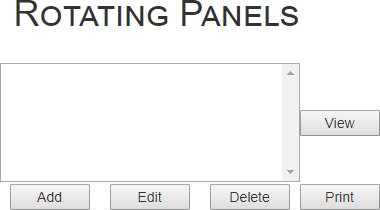
|Click on the Add button at the bottom of the Rotating Panels list. | |||
{|style="margin:left;" | |||
|valign="top" | | |||
{|class="wikitable" style="background:white;" | |||
|- | |||
|[[File:Rotate1.png|center|380px]] | |||
|} | |||
|} | |||
|} | |||
|} | |||
<br> | |||
---- | |||
<br> | |||
{|style="margin:left; width: 100px; background:#eaf3ff; padding:5px; border:2px solid #000000;" | |||
|- | |||
|<big>'''Step 4.'''</big> | |||
{|style="margin:left; width: 800px; background:#F0F0F0; padding:5px; border:2px solid #000000;" | |||
|valign="top" | | |||
|- | |||
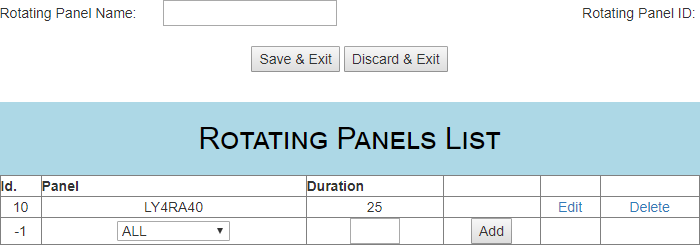
|The Rotating Panel Properties will load, the following properties are shown/available. | |||
{|style="margin:left;" | |||
|valign="top" | | |||
{|class="wikitable" style="background:white; width:775px;" | |||
|- | |||
|[[File:Rotate2.png|center|700px]] | |||
|} | |||
{|class="wikitable" style="background:white; width:775px;" | |||
|- | |||
|'''Rotating Panel Name''' - enter a name for this set of panels. | |||
|- | |||
|'''Save & Exit''' - once all panels have been added select this button to save the changes/setup. | |||
|- | |||
|'''Discard & Exit''' - select this button at anytime to discard all changes/setup. | |||
|- | |||
|'''Rotating Panel List''' - use this section to select panels and enter duration times (seconds). | |||
|- | |||
|'''Panel''' - click on the down arrow to select a panel. | |||
|- | |||
|'''Duration''' - enter a number of seconds for the panel to appear on the monitor. | |||
|- | |||
|'''Add''' - click on the Add button once the panel is selected and duration is entered. | |||
|} | |||
{|class="wikitable" style="background:white; width:775px;" | |||
|- | |||
|style="text-align:center" | '''NOTE:''' To edit the Standard color - select the color from the list - select Edit - alter any property explained above. | |||
|} | |||
|} | |||
|} | |||
|} | |||
<br> | |||
---- | |||
<br> | |||
{|style="margin:left; width: 100px; background:#eaf3ff; padding:5px; border:2px solid #000000;" | |||
|- | |||
|<big>'''Step 5.'''</big> | |||
{|style="margin:left; width: 800px; background:#F0F0F0; padding:5px; border:2px solid #000000;" | |||
|valign="top" | | |||
|- | |||
|After you select to Add a panel, a new row will appear below the previous row automatically. | |||
{|style="margin:left;" | |||
|valign="top" | | |||
{|class="wikitable" style="background:white; width:775px;" | |||
|- | |||
|[[File:Rotate3.png|center|770px]] | |||
|} | |||
|} | |||
|} | |||
|} | |||
<br> | |||
---- | |||
<br> | |||
{|style="margin:left; width: 100px; background:#eaf3ff; padding:5px; border:2px solid #000000;" | |||
|- | |||
|<big>'''Step 6.'''</big> | |||
{|style="margin:left; width: 800px; background:#F0F0F0; padding:5px; border:2px solid #000000;" | |||
|valign="top" | | |||
|- | |||
|Continue to select Panels, enter the duration and select Add for all the panels you want to show in the Rotating Panel you are creating. | |||
{|style="margin:left;" | |||
|valign="top" | | |||
{|class="wikitable" style="background:white; width:775px;" | |||
|- | |||
|[[File:Rotate4.png|center|770px]] | |||
|} | |||
|} | |||
|} | |||
|} | |||
<br> | |||
---- | |||
<br> | |||
{|style="margin:left; width: 100px; background:#eaf3ff; padding:5px; border:2px solid #000000;" | |||
|- | |||
|<big>'''Step 6.'''</big> | |||
{|style="margin:left; width: 800px; background:#F0F0F0; padding:5px; border:2px solid #000000;" | |||
|valign="top" | | |||
|- | |||
|When all the panels needed have been added to the Rotating Panel - select the Save & Exit button. | |||
{|style="margin:left;" | |||
|valign="top" | | |||
{|class="wikitable" style="background:white;" | |||
|- | |||
|[[File:Rotate5.png|center|515px]] | |||
|} | |||
|} | |||
|} | |||
|} | |||
<br> | |||
=<big>'''Instructions - Edit a Rotating Panel'''</big>= | |||
<br> | |||
{|style="margin:left; width: 100px; background:#eaf3ff; padding:5px; border:2px solid #000000;" | |||
|- | |||
|<big>'''Step 1.'''</big> | |||
{|style="margin:left; width: 800px; background:#F0F0F0; padding:5px; border:2px solid #000000;" | |||
|valign="top" | | |||
|- | |||
|Open the VT3000 web interface - select VPIV button from the welcome page. | |||
{|style="margin:left;" | |||
|valign="top" | | |||
{|class="wikitable" style=" align="center; " background:white;" | |||
|- | |||
|[[File:VPImage1.png|center|257px]] | |||
|} | |||
|} | |||
|} | |||
|} | |||
<br> | |||
---- | |||
<br> | |||
{|style="margin:left; width: 100px; background:#eaf3ff; padding:5px; border:2px solid #000000;" | |||
|- | |||
|<big>'''Step 2.'''</big> | |||
{|style="margin:left; width: 800px; background:#F0F0F0; padding:5px; border:2px solid #000000;" | |||
|valign="top" | | |||
|- | |||
|Select the Rotating Panels icon. | |||
{|style="margin:left;" | |||
|valign="top" | | |||
{|class="wikitable" style="background:white;" | |||
|- | |||
|[[File:VP_Rotate.png|center|100px]] | |||
|- | |||
|style= "text-align:center" | '''Rotating Panels''' | |||
|} | |||
|} | |||
|} | |||
|} | |||
<br> | |||
---- | |||
<br> | |||
{|style="margin:left; width: 100px; background:#eaf3ff; padding:5px; border:2px solid #000000;" | |||
|- | |||
|<big>'''Step 3.'''</big> | |||
{|style="margin:left; width: 800px; background:#F0F0F0; padding:5px; border:2px solid #000000;" | |||
|valign="top" | | |||
|- | |||
|Select a Rotating Panel from the list so that it is highlighted. | |||
{|style="margin:left;" | |||
|valign="top" | | |||
{|class="wikitable" style="background:white;" | |||
|- | |||
|[[File:Rotate7.png|center|351px]] | |||
|} | |||
|} | |||
|} | |} | ||
|} | |} | ||
<br> | |||
---- | |||
<br> | |||
{|style="margin:left; width: 100px; background:#eaf3ff; padding:5px; border:2px solid #000000;" | |||
|- | |||
|<big>'''Step 4.'''</big> | |||
{|style="margin:left; width: 800px; background:#F0F0F0; padding:5px; border:2px solid #000000;" | |||
|valign="top" | | |||
|- | |||
|Click on the Edit button at the bottom of the Rotating Panels list. | |||
{|style="margin:left;" | {|style="margin:left;" | ||
|valign="top" | | |valign="top" | | ||
{|class="wikitable | {|class="wikitable" style="background:white;" | ||
|- | |- | ||
|''' | |[[File:Rotate8.png|center|427px]] | ||
|} | |||
|} | |||
|} | |||
|} | |||
<br> | |||
---- | |||
<br> | |||
{|style="margin:left; width: 100px; background:#eaf3ff; padding:5px; border:2px solid #000000;" | |||
|- | |||
|<big>'''Step 5.'''</big> | |||
{|style="margin:left; width: 800px; background:#F0F0F0; padding:5px; border:2px solid #000000;" | |||
|valign="top" | | |||
|- | |- | ||
| | |Click on the Edit link in the row that contains the Panel you want to edit. | ||
{|style="margin:left;" | |||
|valign="top" | | |||
{|class="wikitable" style="background:white; width=775px;" | |||
|- | |- | ||
| | |[[File:Rotate9.png|center|770px]] | ||
|} | |||
|} | |} | ||
|} | |} | ||
|} | |||
<br> | |||
< | |||
---- | ---- | ||
<br> | |||
{|style="margin:left; width: 100px; background:#eaf3ff; padding:5px; border:2px solid #000000;" | |||
|- | |||
|<big>'''Step 6.'''</big> | |||
{|style="margin:left; width: 800px; background:#F0F0F0; padding:5px; border:2px solid #000000;" | |||
|valign="top" | | |||
|- | |||
|Select a different panel from the list or edit the duration. In our example we changed the Duration to 65 seconds. After you have made your changes, click on the Update link in that row. | |||
{|style="margin:left;" | |||
|valign="top" | | |||
{|class="wikitable" style="background:white; width=775px;" | |||
|- | |||
|[[File:Rotate11.png|center|770px]] | |||
|} | |||
|} | |||
|} | |||
|} | |||
<br> | |||
---- | ---- | ||
<br> | |||
{|style="margin:left; width: 100px; background:#eaf3ff; padding:5px; border:2px solid #000000;" | |||
{|style="margin: | |- | ||
|<big>'''Step 6.'''</big> | |||
{|style="margin:left; width: 800px; background:#F0F0F0; padding:5px; border:2px solid #000000;" | |||
|valign="top" | | |valign="top" | | ||
{| class=" | |- | ||
|Make any other changes needed for the Rotating Panel - select the Save & Exit button to save all of the changes. | |||
{|style="margin:left;" | |||
|valign="top" | | |||
{|class="wikitable" style="background:white;" | |||
|- | |||
|[[File:Rotate5.png|center|515px]] | |||
|} | |||
|} | |||
|} | |||
|} | |||
<br> | |||
---- | |||
---- | |||
<br> | |||
{|style="margin:auto;" | |||
|+ | |||
[[File:RelatedHowTos.png|center]] | |||
|align="center" | | |||
{| class="wikitable mw-collapsible mw-collapsed" width="400px;" | |||
|- | |||
|style="text-align: center;" | '''Select a Guide Here''' | |||
|- | |- | ||
|[[VPIV - Create a Messaging Panel|Create a Messaging Panel]] | |[[VPIV - Create a Messaging Panel|Create a Messaging Panel]] | ||
| Line 148: | Line 352: | ||
|[[VPIV - Create a Performance Table Panel|Create a Performance (Table) Panel]] | |[[VPIV - Create a Performance Table Panel|Create a Performance (Table) Panel]] | ||
|} | |} | ||
| | |} | ||
<br> | |||
---- | |||
<br> | |||
{|style="margin:auto;" | |||
|+ | |||
[[File:SearchHeader.png|center]] | |||
|align="center" | | |||
{|class="wikitable" | |||
|- | |- | ||
| | |<inputbox>type=search</inputbox> | ||
|} | |} | ||
| | ---- | ||
| | <br> | ||
[[File:VC Footer.png|center]] | |||
{|style="background:transparent; color:black" border="0" height="200" align="center" valign="bottom" cellpadding=10px cellspacing=10px | |||
|+style="background:transparent| | |||
|-align="center" | |||
| | |||
|[[File:LinkedIn.png|Follow Us On LinkedIn|link=https://www.linkedin.com/company/versacall/]] | |||
| | |||
|[[File:BlogIcon.png|View our Blog|link=https://www.versacall.com/blog/]] | |||
|} | |} | ||
Latest revision as of 19:24, 20 April 2023

|

|

|
Overview
|
Requirements
|
Instructions - Add/Create a Rotating Panel
Step 1.
|
Step 2.
|
Step 3.
|
Step 4.
|
Step 5.
|
Step 6.
|
Step 6.
|
Instructions - Edit a Rotating Panel
Step 1.
|
Step 2.
|
Step 3.
|
Step 4.
|
Step 5.
|
Step 6.
|
Step 6.
|
|
|
|


