Difference between revisions of "VT3000 - Create Filter Group"
SupportAdmin (talk | contribs) m (Text replacement - "https://www.linkedin.com/company/versacall-technologies-inc-/mycompany/" to "https://www.linkedin.com/company/versacall/") |
SupportAdmin (talk | contribs) |
||
| Line 9: | Line 9: | ||
|[[Image:EmailUsBtn.png|link=mailto:[email protected]?Subject=Help%20Needed%20Wiki&body=Type%20Message%20Here]] | |[[Image:EmailUsBtn.png|link=mailto:[email protected]?Subject=Help%20Needed%20Wiki&body=Type%20Message%20Here]] | ||
|} | |} | ||
< | [[File:GenInfot-Head.png|300px|link=VT3000 - Create Filter Group]] | ||
<div style="box-shadow:2px 2px 15px #90A4AE; border-radius:5px; padding:10px"> | |||
*Filter Groups are used to select specific alarms, data fields, processes and/or specific devices. | |||
*A Filter Group can be usde to filter data on a Panel (VPIV) or Report (VRS II). | |||
*Filter Groups require 1 or More Devices, Alarms, Data Fields, and/or Processes to be selected. | |||
</div> | |||
<BR> | |||
<BR> | |||
[[File:Require-Head.png|300px|link=VT3000 - Create Filter Group]] | |||
<div style="box-shadow:2px 2px 15px #90A4AE; border-radius:5px; padding:10px"> | |||
*The VT3000 Core Software installed and running on your system. | |||
*Permission to Add or Edit a Filter Group. | |||
</div> | |||
<BR> | |||
<BR> | |||
[[File:Video-Head.png|300px|link=VT3000 - Create Filter Group]] | |||
<div style="box-shadow:2px 2px 15px #90A4AE; border-radius:5px; padding:10px"> | |||
<BR> | |||
<embedvideo service="youtube">https://www.youtube.com/watch?v=kKv-vNBmM74</embedvideo> | |||
<BR> | |||
</div> | |||
<BR> | |||
<BR> | |||
[[File:Instruction-Head.png|300px|link=VT3000 - Create Filter Group]] | |||
<div style="box-shadow:2px 2px 15px #90A4AE; border-radius:5px; padding:10px"> | |||
<BR> | |||
<span style="color:#90A4AE; font-size:130%">'''Step 1'''</span> | |||
<BR> | |||
Open the VT3000 web interface – select VT3000 Core Software - log in – select Configuration – select Filter Groups. | |||
<gallery widths=100px> | |||
File:3151 1.png | |||
File:3151 2.png | |||
</gallery> | |||
<BR> | |||
---- | ---- | ||
<span style="color:#90A4AE; font-size:130%">'''Step 2'''</span> | |||
<BR> | |||
Select Add to create a New Filter Group. Select an existing Filter Group then select Edit to change it. | |||
<gallery widths=300px heights=286px> | |||
File:FilterAdd-1.png | |||
File:FilterAdd-2.png | |||
</gallery> | |||
<BR> | |||
---- | ---- | ||
< | <span style="color:#90A4AE; font-size:130%">'''Step 3'''</span> | ||
<BR> | |||
The Filter Group Properties page will load - the following options are available: | |||
<gallery widths=672px heights=362px> | |||
File:3151 4.png | |||
</gallery> | |||
*'''Group Name''' - enter a name for the Filter Group. | |||
*'''Available - Select''' - view devices from a list. | |||
*'''Available - Search''' - view devices based on a key word search. | |||
*'''Device''' - shown when Select is used. Select a device from the list. | |||
*'''Depth''' - shown when Select is used. Select the number of levels to be shown in the list. | |||
*'''List''' - devices and alarms selected or searched. | |||
< | *'''Included''' - shows the alarms, processes or data fields that have been added to the group. | ||
*'''Add''' - select the button to add an alarm, process or data field to the group. | |||
*'''Remove''' - select the button to remove an alarm, process or data field from the group. | |||
*'''Check Boxes''' - make the box of the monitoring point to be shown in the list. | |||
<BR> | |||
< | |||
---- | ---- | ||
<span style="color:#90A4AE; font-size:130%">'''Step 4'''</span> | |||
<BR> | |||
Enter a name for the Filter Group. | |||
<gallery widths=434px heights=49px> | |||
File:3151 9.png | |||
</gallery> | |||
<BR> | |||
---- | ---- | ||
< | <span style="color:#90A4AE; font-size:130%">'''Step 5'''</span> | ||
<BR> | |||
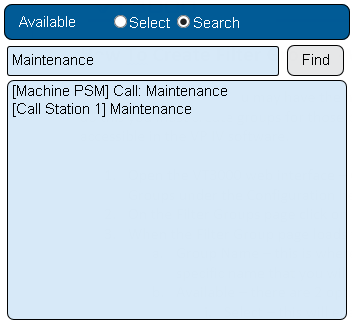
Below is an example of using the "Search" feature using "Maintenance" as the keyword. | |||
<gallery widths=352px heights=325px> | |||
File:3151 5.png | |||
</gallery> | |||
<BR> | |||
< | |||
---- | ---- | ||
< | <span style="color:#90A4AE; font-size:130%">'''Step 6'''</span> | ||
<BR> | |||
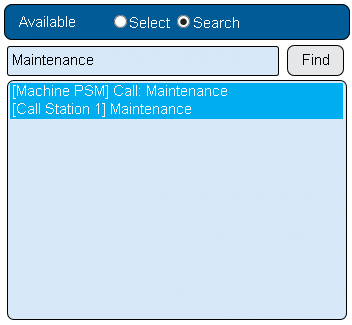
Select Monitoring Points to add to the Filter Group. Hold Ctrl button & click to select multiples. | |||
<gallery widths=352px heights=325px> | |||
File:3151 6.png | |||
</gallery> | |||
<BR> | |||
< | |||
---- | ---- | ||
< | <span style="color:#90A4AE; font-size:130%">'''Step 7'''</span> | ||
<BR> | |||
When all Monitoring Points have been selected, click on the Add button to add them to the Filter Group. | |||
<gallery widths=106px heights=35px> | |||
File:3151 7.png | |||
</gallery> | |||
<BR> | |||
< | |||
---- | ---- | ||
< | <span style="color:#90A4AE; font-size:130%">'''Step 8'''</span> | ||
<BR> | |||
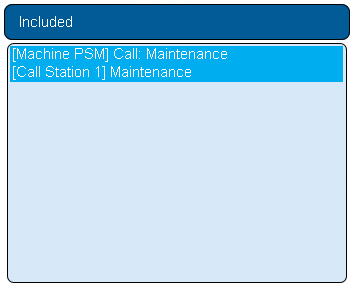
The Included List will now show all of the Monitoring Points that were selected and added. | |||
<gallery widths=352px heights=288px> | |||
File:3151 8.png | |||
</gallery> | |||
<BR> | |||
< | |||
---- | ---- | ||
< | <span style="color:#90A4AE; font-size:130%">'''Step 9'''</span> | ||
<BR> | |||
Use the same steps to add additional Devices and/or Monitoring Points to the Group - select Save & Exit when completed. | |||
<gallery widths=244px heights=39px> | |||
File:Save-Discard.png | |||
</gallery> | |||
</div> | |||
<BR> | |||
<BR> | |||
[[File:Related-Head.png|300px|link=VT3000 - Create Filter Group]] | |||
<div style="box-shadow:2px 2px 15px #90A4AE; border-radius:5px; padding:10px"> | |||
< | |||
< | |||
< | |||
| | |||
< | |||
{|style="margin:auto;" | {|style="margin:auto;" | ||
{| class="wikitable mw-collapsible mw-collapsed" width="600px;" | |||
{| class="wikitable mw-collapsible mw-collapsed" width=" | |||
|- | |- | ||
| | |Select a Guide Here | ||
|- | |- | ||
|[[VT3000 - Print Out - Filter Group|Create a Filter Group Print Out]] | |[[VT3000 - Print Out - Filter Group|Create a Filter Group Print Out]] | ||
|} | |} | ||
|} | |} | ||
< | </div> | ||
<BR> | |||
<BR> | |||
[[File:Search-Head.png|300px|link=VT3000 - Create Filter Group]] | |||
<div style="box-shadow:2px 2px 15px #90A4AE; border-radius:5px; padding:10px"> | |||
{|style="margin:auto;" | {|style="margin:auto;" | ||
| | {|class="wikitable" style="align:center; width:600px;" | ||
|- | |||
!<span style="color:#0054a6; font-size:120%"><big>Type Subject or Key Word to Query Archives</big></span> | |||
|- | |- | ||
|<inputbox>type=search</inputbox> | |<inputbox>type=search</inputbox> | ||
|} | |} | ||
|} | |} | ||
</div> | |||
<br> | <br> | ||
---- | ---- | ||
Latest revision as of 19:14, 9 October 2023

|

|

|
- Filter Groups are used to select specific alarms, data fields, processes and/or specific devices.
- A Filter Group can be usde to filter data on a Panel (VPIV) or Report (VRS II).
- Filter Groups require 1 or More Devices, Alarms, Data Fields, and/or Processes to be selected.
- The VT3000 Core Software installed and running on your system.
- Permission to Add or Edit a Filter Group.
Step 1
Open the VT3000 web interface – select VT3000 Core Software - log in – select Configuration – select Filter Groups.
Step 2
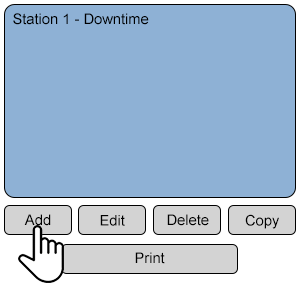
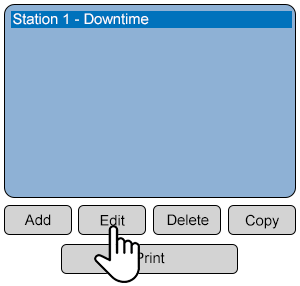
Select Add to create a New Filter Group. Select an existing Filter Group then select Edit to change it.
Step 3
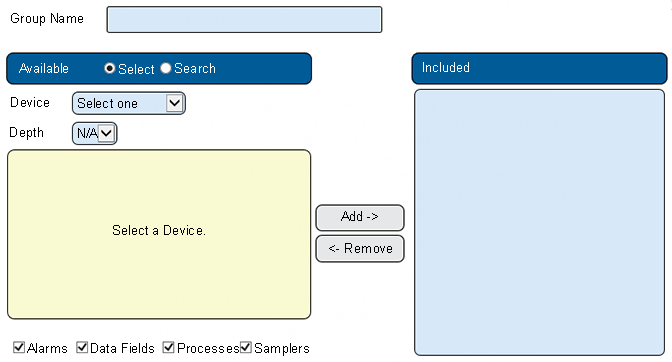
The Filter Group Properties page will load - the following options are available:
- Group Name - enter a name for the Filter Group.
- Available - Select - view devices from a list.
- Available - Search - view devices based on a key word search.
- Device - shown when Select is used. Select a device from the list.
- Depth - shown when Select is used. Select the number of levels to be shown in the list.
- List - devices and alarms selected or searched.
- Included - shows the alarms, processes or data fields that have been added to the group.
- Add - select the button to add an alarm, process or data field to the group.
- Remove - select the button to remove an alarm, process or data field from the group.
- Check Boxes - make the box of the monitoring point to be shown in the list.
Step 4
Enter a name for the Filter Group.
Step 5
Below is an example of using the "Search" feature using "Maintenance" as the keyword.
Step 6
Select Monitoring Points to add to the Filter Group. Hold Ctrl button & click to select multiples.
Step 7
When all Monitoring Points have been selected, click on the Add button to add them to the Filter Group.
Step 8
The Included List will now show all of the Monitoring Points that were selected and added.
Step 9
Use the same steps to add additional Devices and/or Monitoring Points to the Group - select Save & Exit when completed.
| Select a Guide Here |
| Create a Filter Group Print Out |
| Type Subject or Key Word to Query Archives |
|---|

|


