Difference between revisions of "VT3000 - Add Shifts/Schedule"
SupportAdmin (talk | contribs) |
SupportAdmin (talk | contribs) |
||
| (23 intermediate revisions by the same user not shown) | |||
| Line 1: | Line 1: | ||
= | {|style="background:transparent; color:black" border="0" height="230" align="center" valign="bottom" | ||
The Shifts/Schedules section is used to set up a schedule of shifts being used in your plant. This schedule is shared with all VersaCall applications. | |+style="background:transparent| | ||
|-align="center" | |||
| | |||
= | |[[Image:CallUsBtn.png|Call Now 858-677-6766]] | ||
| | |||
|[[Image:SubmitTckBtn.png|link=https://www.versacall.com/customer-support/service-ticket]] | |||
| | |||
|[[Image:EmailUsBtn.png|link=mailto:[email protected]?Subject=Help%20Needed%20Wiki&body=Type%20Message%20Here]] | |||
= | |} | ||
[[File:GenInfot-Head.png|300px|link=VT3000 - Add Shifts/Schedule]] | |||
'''1 | <div style="box-shadow:2px 2px 15px #90A4AE; border-radius:5px; padding:10px; width:800px"> | ||
*The Shifts/Schedules section is used to set up a schedule of shifts being used in your plant. | |||
<gallery widths= | *This schedule is shared with all VersaCall applications. | ||
File:Shift_1.png | *Reports & Virtual Panels will use the Schedule to filter data. | ||
File:Shift_2.png | </div> | ||
<BR> | |||
<BR> | |||
[[File:Require-Head.png|300px|link=VT3000 - Add Shifts/Schedule]] | |||
<div style="box-shadow:2px 2px 15px #90A4AE; border-radius:5px; padding:10px; width:800px"> | |||
*The VT3000 Core Software installed and running on your system. | |||
*Permission to Add, Edit or Delete Schedules. | |||
</div> | |||
<BR> | |||
<BR> | |||
[[File:Video-Head.png|300px|link=VT3000 - Add Shifts/Schedule]] | |||
<div style="box-shadow:2px 2px 15px #90A4AE; border-radius:5px; padding:10px; width:800px"> | |||
<BR> | |||
<embedvideo service="youtube">https://www.youtube.com/watch?v=0FjCGRhjJ60</embedvideo> | |||
<BR> | |||
</div> | |||
<BR> | |||
<BR> | |||
[[File:Instruction-Head.png|300px|link=VT3000 - Add Shifts/Schedule]] | |||
<div style="box-shadow:2px 2px 15px #90A4AE; border-radius:5px; padding:10px; width:800px"> | |||
<BR> | |||
<span style="color:#90A4AE; font-size:130%">'''Step 1'''</span> | |||
<BR> | |||
Open the VT3000 web interface – select VT3000 Core Software - log in – select Configuration – select Shifts/Schedules. | |||
<gallery widths=100px> | |||
File:Shift_1.png | |||
File:Shift_2.png | |||
</gallery> | </gallery> | ||
</div> | |||
<BR> | |||
'''2 | <div style="box-shadow:2px 2px 15px #90A4AE; border-radius:5px; padding:10px; width:800px"> | ||
<span style="color:#90A4AE; font-size:130%">'''Step 2'''</span> | |||
<gallery widths= | <BR> | ||
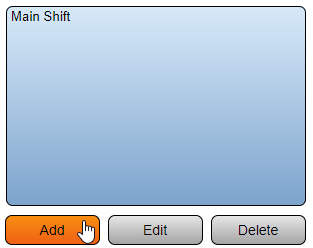
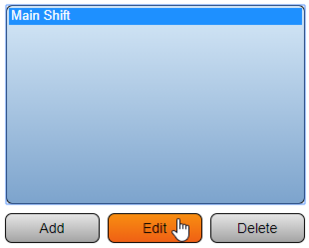
File:Shift_3.png | Select Add or select an existing schedule then select the Edit button. | ||
<gallery widths=313px heights=248px> | |||
File:Shift_3.png | |||
File:Shift_4.png | |||
</gallery> | </gallery> | ||
< | </div> | ||
<BR> | |||
< | <div style="box-shadow:2px 2px 15px #90A4AE; border-radius:5px; padding:10px; width:800px"> | ||
<span style="color:#90A4AE; font-size:130%">'''Step 3'''</span> | |||
<BR> | |||
'''3 | By default the schedule is set to Standard schedule type – the following options are available. | ||
<gallery widths=331px heights=124px> | |||
<gallery widths= | |||
File:Shift_5.png | File:Shift_5.png | ||
</gallery> | </gallery> | ||
*'''Schedule Name''' – enter a name for the schedule. | |||
*'''Start of Day''' – enter your start of day time. | |||
*'''Crossover''' – leave this set to Auto Detect. | |||
*'''Schedule Type''' – leave this set to Standard. | |||
</div> | |||
<BR> | |||
<div style="box-shadow:2px 2px 15px #90A4AE; border-radius:5px; padding:10px; width:800px"> | |||
'''4 | <span style="color:#90A4AE; font-size:130%">'''Step 4'''</span> | ||
<BR> | |||
<gallery widths= | When a Rotating schedule type is selected - the following options are available. | ||
<gallery widths=366px heights=195px> | |||
File:Shift_6.png | File:Shift_6.png | ||
</gallery> | </gallery> | ||
*'''Schedule Name''' – enter a name for the schedule. | |||
*'''Start of Day''' – enter your start of day time. | |||
*'''Schedule Type''' – select Rotating. | |||
*'''Reference Date''' – select the day your week/rotating schedule begins. | |||
*'''# of Days in Rotation''' – enter to total number of days to be included in this schedule. | |||
</div> | |||
<BR> | |||
<div style="box-shadow:2px 2px 15px #90A4AE; border-radius:5px; padding:10px; width:800px"> | |||
'''5 | <span style="color:#90A4AE; font-size:130%">'''Step 5'''</span> | ||
<BR> | |||
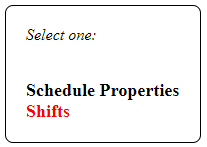
<gallery widths= | Select Shifts from the Select One menu. | ||
<gallery widths=207px heights=147px> | |||
File:Shift_7.png | File:Shift_7.png | ||
</gallery> | </gallery> | ||
</div> | |||
<BR> | |||
'''6 | <div style="box-shadow:2px 2px 15px #90A4AE; border-radius:5px; padding:10px; width:800px"> | ||
<span style="color:#90A4AE; font-size:130%">'''Step 6'''</span> | |||
<gallery widths= | <BR> | ||
Select the Add button for a new shift or select an existing shift and select the Edit button. | |||
<gallery widths=316px heights=192px> | |||
File:Shift_8.png | File:Shift_8.png | ||
</gallery> | </gallery> | ||
</div> | |||
<BR> | |||
'''7 | <div style="box-shadow:2px 2px 15px #90A4AE; border-radius:5px; padding:10px; width:800px"> | ||
<span style="color:#90A4AE; font-size:130%">'''Step 7'''</span> | |||
<gallery widths= | <BR> | ||
<span style="color:#90A4AE; font-size:130%">'''Shift Setup'''</span> | |||
<BR> | |||
A Standard schedule - Shift will have the following options: | |||
<gallery widths=693px heights=295px> | |||
File:Shift_9.png | File:Shift_9.png | ||
</gallery> | </gallery> | ||
*'''Shift Name''' – enter the name for the shift. | |||
*'''Use by Default''' – leave this checked. | |||
*'''Start Time''' – enter the time the shift begins. | |||
*'''End Time''' – enter the time the shift ends. | |||
*'''Applies To''' – select the days this shift will be used. | |||
*'''Breaks''' – select Add Break to setup a break/lunch. | |||
</div> | |||
<BR> | |||
<gallery widths= | <div style="box-shadow:2px 2px 15px #90A4AE; border-radius:5px; padding:10px; width:800px"> | ||
<span style="color:#90A4AE; font-size:130%">'''Step 7'''</span> | |||
<BR> | |||
<span style="color:#90A4AE; font-size:130%">'''Break Setup'''</span> | |||
<BR> | |||
A Standard schedule - Break will have the following options: | |||
<gallery widths=651px heights=101px> | |||
File:Shift_10.png | File:Shift_10.png | ||
</gallery> | </gallery> | ||
*'''Start Time''' – enter the time the break begins. | |||
*'''End Time''' – enter the time the break ends. | |||
*'''Description''' – enter a name for the break. | |||
*'''Delete''' – select Delete to remove a break after it has been added. | |||
</div> | |||
<BR> | |||
<div style="box-shadow:2px 2px 15px #90A4AE; border-radius:5px; padding:10px; width:800px"> | |||
<span style="color:#90A4AE; font-size:130%">'''Step 8'''</span> | |||
<BR> | |||
'''8 | A Rotating Schedule - Shift will have the following options: | ||
<gallery widths=463px heights=257px> | |||
<gallery widths= | |||
File:Shift_11.png | File:Shift_11.png | ||
</gallery> | </gallery> | ||
*'''Shift Name''' – enter a name for the shift. | |||
*'''Shift ID''' – this is created by the VT3000 software. | |||
*'''Use by Default''' – leave this checked. | |||
*'''Days''' – based on the Reference Date, select a day to setup. | |||
</div> | |||
<BR> | |||
<div style="box-shadow:2px 2px 15px #90A4AE; border-radius:5px; padding:10px; width:800px"> | |||
'''9 | <span style="color:#90A4AE; font-size:130%">'''Step 9'''</span> | ||
<BR> | |||
<gallery widths= | <span style="color:#90A4AE; font-size:130%">'''Shift Setup'''</span> | ||
<BR> | |||
A Rotating Schedule - Shift will have the following options: | |||
<gallery widths=627px heights=271px> | |||
File:Shift_12.png | File:Shift_12.png | ||
</gallery> | </gallery> | ||
*'''Enabled''' – select to enable this shift for this day. | |||
*'''Start Time''' – enter the time the shift will begin. | |||
*'''End Time''' – enter the time the shift will end. | |||
*'''Breaks''' – select Add Break to setup a break/lunch. | |||
</div> | |||
<BR> | |||
<gallery widths= | <div style="box-shadow:2px 2px 15px #90A4AE; border-radius:5px; padding:10px; width:800px"> | ||
<span style="color:#90A4AE; font-size:130%">'''Step 9'''</span> | |||
<BR> | |||
<span style="color:#90A4AE; font-size:130%">'''Break Setup'''</span> | |||
<BR> | |||
A Rotating Schedule - Break will have the following options: | |||
<gallery widths=650px heights=98px> | |||
File:Shift_13.png | File:Shift_13.png | ||
</gallery> | </gallery> | ||
*'''Start Time''' – enter the time the break begins. | |||
*'''End Time''' – enter the time the break ends. | |||
*'''Description''' – enter a name for the break. | |||
*'''Delete''' – select Delete to remove a break after it has been added. | |||
</div> | |||
<BR> | |||
<div style="box-shadow:2px 2px 15px #90A4AE; border-radius:5px; padding:10px; width:800px"> | |||
<span style="color:#90A4AE; font-size:130%">'''Step 10'''</span> | |||
<BR> | |||
'''10 | After the shifts are set up, the Preview at the top of the page will show the shift setup. | ||
<gallery widths=557px heights=56px> | |||
File:Shift-14-II.png | |||
<gallery widths= | |||
File: | |||
</gallery> | </gallery> | ||
</div> | |||
<BR> | |||
<div style="box-shadow:2px 2px 15px #90A4AE; border-radius:5px; padding:10px; width:800px"> | |||
=Step | <span style="color:#90A4AE; font-size:130%">'''Step 11'''</span> | ||
<BR> | |||
Select Save & Exit when schedule is complete. | |||
<gallery widths=244px heights=39px> | |||
File:Save-Discard.png | |||
<gallery widths= | |||
File: | |||
</gallery> | </gallery> | ||
</div> | |||
<BR> | |||
= | <BR> | ||
[[File:Related-Head.png|300px|link=VT3000 - Add Shifts/Schedule]] | |||
<div style="box-shadow:2px 2px 15px #90A4AE; border-radius:5px; padding:10px; width:800px"> | |||
{|style="margin:auto;" | |||
{| class="wikitable mw-collapsible mw-collapsed" width="600px;" | |||
|- | |||
|Select a Guide Here | |||
|- | |||
|[[VT3000 - Augment a Schedule|Augment a Schedule (Day(s) or Shift(s)]] | |||
|- | |||
|[[VT3000 - Print Out - Schedule|Create a Schedule Print Out]] | |||
|} | |||
|} | |||
</div> | |||
<BR> | |||
<BR> | |||
[[File:Search-Head.png|300px|link=VT3000 - Add Shifts/Schedule]] | |||
<div style="box-shadow:2px 2px 15px #90A4AE; border-radius:5px; padding:10px; width:800px"> | |||
{|style="margin:auto;" | |||
{|class="wikitable" style="align:center; width:600px;" | |||
|- | |||
!<span style="color:#0054a6; font-size:120%"><big>Type Subject or Key Word to Query Archives</big></span> | |||
|- | |||
|<inputbox>type=search</inputbox> | |||
|} | |||
|} | |||
</div> | |||
<br> | |||
---- | |||
<br> | |||
[[File:VC Footer.png|center]] | |||
{|style="background:transparent; color:black" border="0" height="200" align="center" valign="bottom" cellpadding=10px cellspacing=10px | |||
|+style="background:transparent| | |||
|-align="center" | |||
| | |||
|[[File:LinkedIn.png|Follow Us On LinkedIn|link=https://www.linkedin.com/company/versacall/]] | |||
| | |||
|[[File:BlogIcon.png|View our Blog|link=https://www.versacall.com/blog/]] | |||
|} | |||
<br> | |||
[[Category:VT3000 Core Software]] | [[Category:VT3000 Core Software]] | ||
[[Category:Configuration]] | [[Category:Configuration]] | ||
[[Category:Shifts & Schedules]] | [[Category:Shifts & Schedules]] | ||
Latest revision as of 20:09, 9 October 2023

|

|

|
- The Shifts/Schedules section is used to set up a schedule of shifts being used in your plant.
- This schedule is shared with all VersaCall applications.
- Reports & Virtual Panels will use the Schedule to filter data.
- The VT3000 Core Software installed and running on your system.
- Permission to Add, Edit or Delete Schedules.
Step 1
Open the VT3000 web interface – select VT3000 Core Software - log in – select Configuration – select Shifts/Schedules.
Step 3
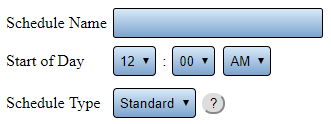
By default the schedule is set to Standard schedule type – the following options are available.
- Schedule Name – enter a name for the schedule.
- Start of Day – enter your start of day time.
- Crossover – leave this set to Auto Detect.
- Schedule Type – leave this set to Standard.
Step 4
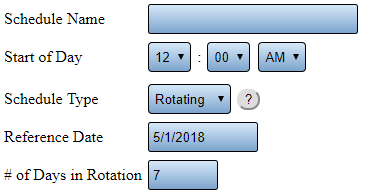
When a Rotating schedule type is selected - the following options are available.
- Schedule Name – enter a name for the schedule.
- Start of Day – enter your start of day time.
- Schedule Type – select Rotating.
- Reference Date – select the day your week/rotating schedule begins.
- # of Days in Rotation – enter to total number of days to be included in this schedule.
Step 6
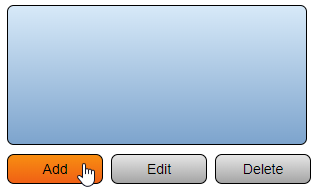
Select the Add button for a new shift or select an existing shift and select the Edit button.
Step 7
Shift Setup
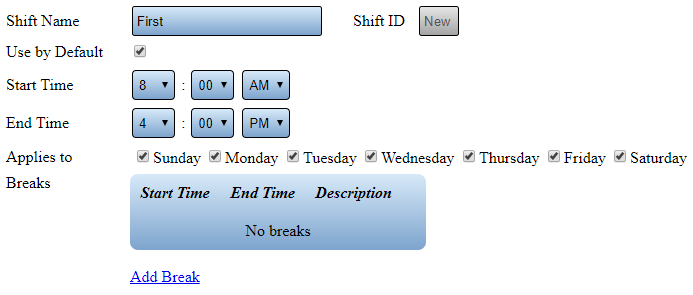
A Standard schedule - Shift will have the following options:
- Shift Name – enter the name for the shift.
- Use by Default – leave this checked.
- Start Time – enter the time the shift begins.
- End Time – enter the time the shift ends.
- Applies To – select the days this shift will be used.
- Breaks – select Add Break to setup a break/lunch.
Step 7
Break Setup
A Standard schedule - Break will have the following options:
- Start Time – enter the time the break begins.
- End Time – enter the time the break ends.
- Description – enter a name for the break.
- Delete – select Delete to remove a break after it has been added.
Step 8
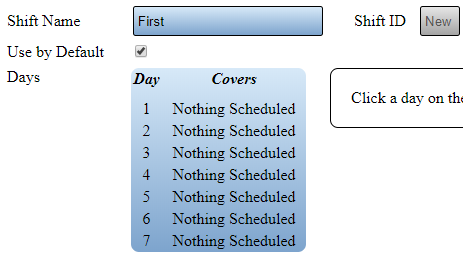
A Rotating Schedule - Shift will have the following options:
- Shift Name – enter a name for the shift.
- Shift ID – this is created by the VT3000 software.
- Use by Default – leave this checked.
- Days – based on the Reference Date, select a day to setup.
Step 9
Shift Setup
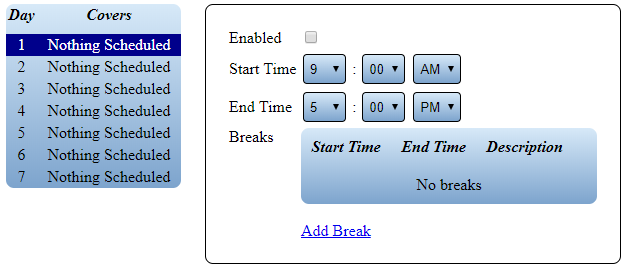
A Rotating Schedule - Shift will have the following options:
- Enabled – select to enable this shift for this day.
- Start Time – enter the time the shift will begin.
- End Time – enter the time the shift will end.
- Breaks – select Add Break to setup a break/lunch.
Step 9
Break Setup
A Rotating Schedule - Break will have the following options:
- Start Time – enter the time the break begins.
- End Time – enter the time the break ends.
- Description – enter a name for the break.
- Delete – select Delete to remove a break after it has been added.
| Select a Guide Here |
| Augment a Schedule (Day(s) or Shift(s) |
| Create a Schedule Print Out |
| Type Subject or Key Word to Query Archives |
|---|

|


