Difference between revisions of "VT3000 - Add User Group"
Jump to navigation
Jump to search

SupportAdmin (talk | contribs) m (SupportAdmin moved page Add A New User Group to Add A User Group - (VT3000) without leaving a redirect) |
SupportAdmin (talk | contribs) |
||
| (24 intermediate revisions by the same user not shown) | |||
| Line 1: | Line 1: | ||
User Groups | {|style="background:transparent; color:black" border="0" height="230" align="center" valign="bottom" | ||
|+style="background:transparent| | |||
|-align="center" | |||
| | |||
|[[Image:CallUsBtn.png|Call Now 858-677-6766]] | |||
| | |||
|[[Image:SubmitTckBtn.png|link=https://www.versacall.com/customer-support/service-ticket]] | |||
| | |||
|[[Image:EmailUsBtn.png|link=mailto:[email protected]?Subject=Help%20Needed%20Wiki&body=Type%20Message%20Here]] | |||
|} | |||
<BR> | |||
<div style="box-shadow: 0 0 10px 0 #b1d5ee inset; border-radius:5px; padding:10px; padding-left:20px; background:#ebf4fa;"> | |||
<span style="color:#00719e; font-family: Helvetica; font-size:150%; font-variant: small-caps; padding-left:20px;">'''General Information'''</span> | |||
:*User Groups define specific permissions within all VersaCall software. | |||
VT3000 | :*All Users must be assigned to a specific User Group. | ||
</div> | |||
VersaCall Reporting Software | <BR> | ||
<div style="box-shadow: 0 0 10px 0 #b1d5ee inset; border-radius:5px; padding:10px; padding-left:20px; background:#ebf4fa;"> | |||
<span style="color:#00719e; font-family: Helvetica; font-size:150%; font-variant: small-caps; padding-left:20px;">'''Requirements'''</span> | |||
:*The VT3000 Core Software installed and running on your system. | |||
Connectivity | :*Permission to Add or Edit a User Group. | ||
</div> | |||
<BR> | |||
<div style="box-shadow: 0 0 10px 0 #b1d5ee inset; border-radius:5px; padding:10px; padding-left:20px; background:#ebf4fa;"> | |||
<span style="color:#00719e; font-family: Helvetica; font-size:150%; font-variant: small-caps; padding-left:20px;">'''Video Walkthrough'''</span> | |||
:<embedvideo service="youtube">https://www.youtube.com/watch?v=BKOHcvjuskU</embedvideo> | |||
</div> | |||
<BR> | |||
<div style="box-shadow: 0 0 10px 0 #b1d5ee inset; border-radius:5px; padding:10px; padding-left:20px; background:#ebf4fa;"> | |||
<span style="color:#00719e; font-family: Helvetica; font-size:150%; font-variant: small-caps; padding-left:20px;">'''Instructions'''</span> | |||
:<span style="color:#90A4AE; font-size:120%">Open the VT3000 web interface – select VT3000 Core Software - log in – select Administration – select Users.</span> | |||
<gallery widths=100px heights=100px perrow="4"> | |||
Image:3114_1.png|<div style="text-align: center; color:#00719e">'''Administration'''</div>|link=VT3000 - Add User Group | |||
Image:3113_1.png|<div style="text-align: center; color:#00719e">'''User Groups'''</div>|link=VT3000 - Add User Group | |||
</gallery> | |||
<BR> | |||
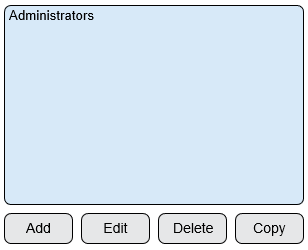
:<span style="color:#90A4AE; font-size:120%">Select the Add button to add a new group.</span> | |||
<gallery widths=308px heights=250px> | |||
Image:3113_2.png|link=VT3000 - Add User Group | |||
</gallery> | |||
<BR> | |||
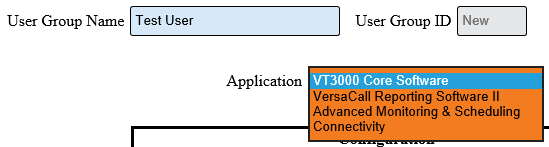
:<span style="color:#90A4AE; font-size:120%">User Group Properties:</span> | |||
:*'''User Group Name''' – enter a name for the user group. | |||
:*'''User Group ID''' – assigned by the VT3000 software. | |||
:*'''Application''' – select the down arrow for list of software. | |||
<gallery widths=549px heights=147px> | |||
Image:3113_3.png|link=VT3000 - Add User Group | |||
</gallery> | |||
<BR> | |||
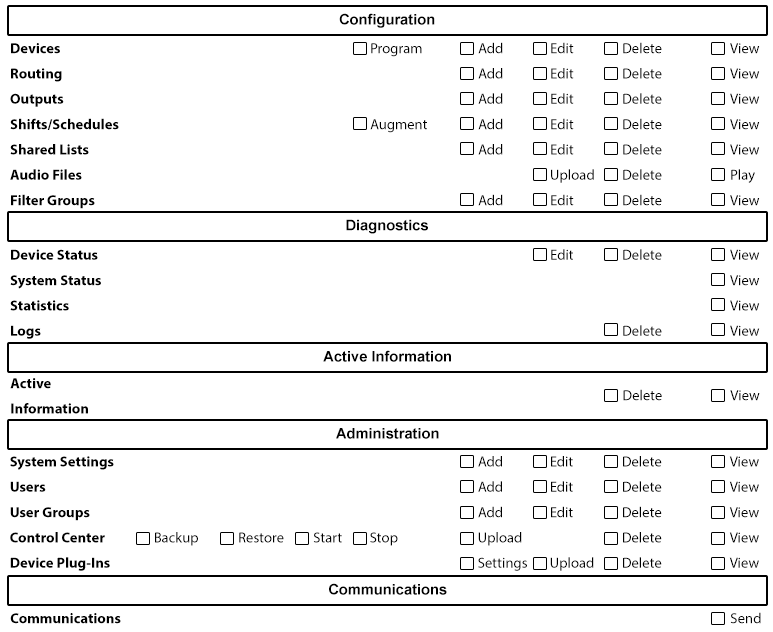
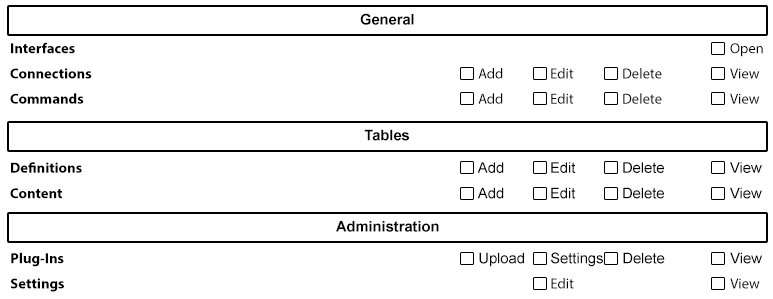
:<span style="color:#90A4AE; font-size:120%">Below is an image of the VT3000 Permissions that can be enabled. To enable a permission, click on the box next to the item/permission you want to enable.</span> | |||
<gallery widths=773px heights=632px> | |||
Image:VT3000-Group.png|link=VT3000 - Add User Group | |||
</gallery> | |||
<BR> | |||
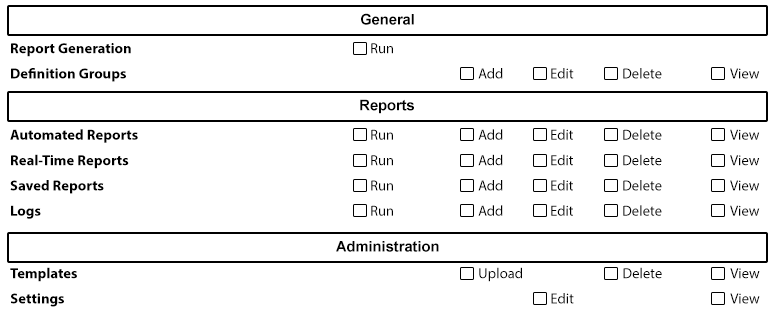
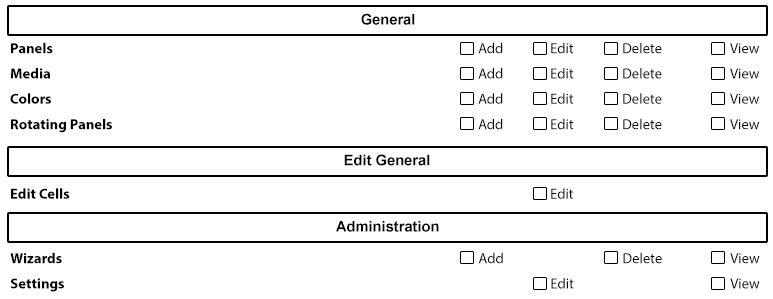
:<span style="color:#90A4AE; font-size:120%">Below is an image of the VersaCall Reporting Software Permissions that can be enabled. To enable a permission, click on the box next to the item/permission you want to enable.</span> | |||
<gallery widths=773px heights=320px> | |||
Image:VRS-Group.png|link=VT3000 - Add User Group | |||
</gallery> | |||
<BR> | |||
:<span style="color:#90A4AE; font-size:120%">Below is an image of the AMS Permissions that can be enabled. To enable a permission, click on the box next to the item/permission you want to enable.</span> | |||
<gallery widths=773px heights=150px> | |||
Image:AMS-Group.png|link=VT3000 - Add User Group | |||
</gallery> | |||
<BR> | |||
:<span style="color:#90A4AE; font-size:120%">Below is an image of the Connectivity Permissions that can be enabled. To enable a permission, click on the box next to the item/permission you want to enable.</span> | |||
<gallery widths=773px heights=299px> | |||
Image:Connectivity-Group.png|link=VT3000 - Add User Group | |||
</gallery> | |||
<BR> | |||
:<span style="color:#90A4AE; font-size:120%">Below is an image of the Virtual Panels IV Permissions that can be enabled. To enable a permission, click on the box next to the item/permission you want to enable.</span> | |||
<gallery widths=773px heights=299px> | |||
Image:VPIV-Group.png|link=VT3000 - Add User Group | |||
</gallery> | |||
<BR> | |||
:<span style="color:#90A4AE; font-size:120%">Mark the specific permissions required for each application - select Save & Exit when complete.</span> | |||
<gallery widths=238px heights=41px> | |||
Image:3114_5.png|link=VT3000 - Add User Group | |||
</gallery> | |||
</div> | |||
<BR> | |||
<div style="box-shadow: 0 0 10px 0 #b1d5ee inset; border-radius:5px; padding:10px; padding-left:20px; background:#ebf4fa;"> | |||
<span style="color:#00719e; font-family: Helvetica; font-size:150%; font-variant: small-caps; padding-left:10px;">'''Related Guides'''</span> | |||
::<span style="font-size:120%; line-height: 3.5em; background:white; border:thin solid #90A4AE; border-radius:5px; padding:5px">[[VT3000 - Add User|'''Add User - VT3000 Sign In''']]</span> | |||
::<span style="font-size:120%; line-height: 3.5em; background:white; border:thin solid #90A4AE; border-radius:5px; padding:5px">[[VT3000 - Edit User Log In|'''Edit User - VT3000 Sign In''']]</span> | |||
::<span style="font-size:120%; line-height: 3.5em; background:white; border:thin solid #90A4AE; border-radius:5px; padding:5px">[[VT3000 - Edit a User Group Permissions|'''Edit User Group - Permissions''']]</span> | |||
</div> | |||
<BR> | |||
<div style="box-shadow: 0 0 10px 0 #b1d5ee inset; border-radius:5px; padding:10px; padding-left:20px; background:#ebf4fa;"> | |||
<span style="color:#00719e; font-family: Helvetica; font-size:150%; font-variant: small-caps; padding-left:10px;">'''Keyword Search'''</span> | |||
{|style="margin:auto;" | |||
{|class="wikitable" style="align:center; width:600px;" | |||
|- | |||
!<span style="color:#0054a6; font-size:120%"><big>Type Subject or Key Word to Query Archives</big></span> | |||
|- | |||
|<inputbox>type=search</inputbox> | |||
|} | |||
|} | |||
</div> | |||
<BR> | |||
[[File:VC Footer.png|center|link=Main Page]] | |||
{|style="background:transparent; color:black" border="0" height="200" align="center" valign="bottom" cellpadding=10px cellspacing=10px | |||
|+style="background:transparent| | |||
|-align="center" | |||
| | |||
|[[File:LinkedIn.png|Follow Us On LinkedIn|link=https://www.linkedin.com/company/versacall/]] | |||
| | |||
|[[File:BlogIcon.png|View our Blog|link=https://www.versacall.com/blog/]] | |||
|} | |||
[[Category:VT3000 Core Software]] | |||
[[Category:Administration]] | |||
[[Category:User Groups]] | |||
Latest revision as of 15:29, 21 November 2023

|

|

|
General Information
- User Groups define specific permissions within all VersaCall software.
- All Users must be assigned to a specific User Group.
Requirements
- The VT3000 Core Software installed and running on your system.
- Permission to Add or Edit a User Group.
Video Walkthrough
Instructions
- Open the VT3000 web interface – select VT3000 Core Software - log in – select Administration – select Users.
 Administration
 User Groups
- Select the Add button to add a new group.
- User Group Properties:
- User Group Name – enter a name for the user group.
- User Group ID – assigned by the VT3000 software.
- Application – select the down arrow for list of software.
- Below is an image of the VT3000 Permissions that can be enabled. To enable a permission, click on the box next to the item/permission you want to enable.
- Below is an image of the VersaCall Reporting Software Permissions that can be enabled. To enable a permission, click on the box next to the item/permission you want to enable.
- Below is an image of the AMS Permissions that can be enabled. To enable a permission, click on the box next to the item/permission you want to enable.

- Below is an image of the Connectivity Permissions that can be enabled. To enable a permission, click on the box next to the item/permission you want to enable.
- Below is an image of the Virtual Panels IV Permissions that can be enabled. To enable a permission, click on the box next to the item/permission you want to enable.
- Mark the specific permissions required for each application - select Save & Exit when complete.
Keyword Search
| Type Subject or Key Word to Query Archives |
|---|

|