Difference between revisions of "VT3000 - Add User Group"
Jump to navigation
Jump to search
SupportAdmin (talk | contribs) |
SupportAdmin (talk | contribs) |
||
| Line 1: | Line 1: | ||
=Overview | {|style="margin:left;" | ||
User Groups define specific permissions within all VersaCall software. All Users must be assigned to a specific User Group. | |valign="top" | | ||
{|class="wikitable" style="background:#eaf3ff; width:800px;" | |||
|- | |||
=Requirements | !style="text-align: left;"|<big>'''Overview'''</big> | ||
|- | |||
'''1.''' The VT3000 Core Software installed and running on your system. | |User Groups define specific permissions within all VersaCall software. All Users must be assigned to a specific User Group. | ||
|} | |||
'''2.''' Permission to Add or Edit a User Group. | |} | ||
{|style="margin:left;" | |||
|valign="top" | | |||
=Instructions= | {|class="wikitable mw-collapsible mw-collapsed" style="background:#eaf3ff; width:800px;" | ||
!style="text-align: left;"|<big>'''Requirements'''</big> | |||
'''1.''' Open the VT3000 web interface – log in – select Administration – select | |- | ||
|'''1.''' The VT3000 Core Software installed and running on your system. | |||
|- | |||
File: | |'''2.''' Permission to Add or Edit a User Group. | ||
File:3113_1.png|User Groups | |} | ||
< | |} | ||
<br> | |||
=<big>'''Instructions'''</big>= | |||
'''2.''' Select the Add button to add a new group. | <br> | ||
{|style="margin:left; width: 100px; background:#eaf3ff; padding:5px; border:2px solid #000000;" | |||
|- | |||
File:3113_2.png | |<big>'''Step 1.'''</big> | ||
< | {|style="margin:left; width: 800px; background:#F0F0F0; padding:5px; border:2px solid #000000;" | ||
|valign="top" | | |||
|- | |||
'''3.''' User Group Properties: | |Open the VT3000 web interface – select VT3000 Core Software - log in – select Administration – select Users. | ||
{|style="margin:left;" | |||
|valign="top" | | |||
File:3113_3.png | {|class="wikitable" style="background:white; align:center;" | ||
|- | |||
|[[File:3114_1.png|center|93px]] || [[File:3113_1.png|center|93px]] | |||
|- | |||
|style="text-align:center" | '''Administration''' ||style="text-align:center" | '''User Groups''' | |||
|} | |||
|} | |||
|} | |||
'''4.''' | |} | ||
<br> | |||
---- | |||
File:3113_4.png|''' | <br> | ||
</ | {|style="margin:left; width: 100px; background:#eaf3ff; padding:5px; border:2px solid #000000;" | ||
|- | |||
|<big>'''Step 2.'''</big> | |||
{|style="margin:left; width: 800px; background:#F0F0F0; padding:5px; border:2px solid #000000;" | |||
File:3113_5.png|''' | |valign="top" | | ||
</ | |- | ||
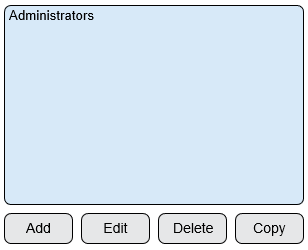
|Select the Add button to add a new group. | |||
{|style="margin:left;" | |||
|valign="top" | | |||
File:3113_6.png|''' | {|class="wikitable" style="background:white;" | ||
</ | |- | ||
|[[File:3113_2.png|center|308px]] | |||
|} | |||
|} | |||
File:3113_7.png|''' | |} | ||
</ | |} | ||
<br> | |||
---- | |||
<br> | |||
File:3113_8.png|''' | {|style="margin:left; width: 100px; background:#eaf3ff; padding:5px; border:2px solid #000000;" | ||
< | |- | ||
|<big>'''Step 3.'''</big> | |||
''' | {|style="margin:left; width: 800px; background:#F0F0F0; padding:5px; border:2px solid #000000;" | ||
|valign="top" | | |||
|- | |||
File:3114_5.png | |User Group Properties: | ||
< | {|style="margin:left;" | ||
|valign="top" | | |||
{|class="wikitable" style="background:white; align:center; width:775px;" | |||
|- | |||
|[[File:3113_3.png|border|center|549px]] | |||
|} | |||
{|class="wikitable" style="background:white; align:center; width:775px;" | |||
|- | |||
|'''User Group Name''' – enter a name for the user group. | |||
|- | |||
|'''User Group ID''' – assigned by the VT3000 software. | |||
|- | |||
|'''Application''' – select the down arrow for list of software. | |||
|} | |||
|} | |||
|} | |||
|} | |||
<br> | |||
---- | |||
<br> | |||
{|style="margin:left; width: 100px; background:#eaf3ff; padding:5px; border:2px solid #000000;" | |||
|- | |||
|<big>'''Step 4.'''</big> | |||
{|style="margin:left; width: 800px; background:#F0F0F0; padding:5px; border:2px solid #000000;" | |||
|valign="top" | | |||
|- | |||
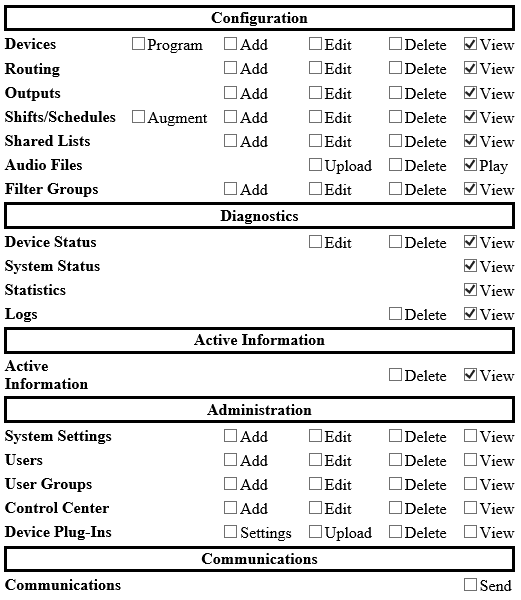
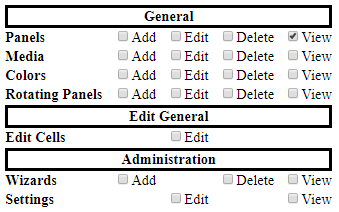
|Below is an image of the VT3000 Permissions that can be enabled. To enable a permission, click on the box next to the item/permission you want to enable. | |||
{|style="margin:left;" | |||
|valign="top" | | |||
{|class="wikitable" style="background:white; align:center;" | |||
|- | |||
|[[File:3113_4.png|center|521px]] | |||
|} | |||
|} | |||
|} | |||
|} | |||
<br> | |||
---- | |||
<br> | |||
{|style="margin:left; width: 100px; background:#eaf3ff; padding:5px; border:2px solid #000000;" | |||
|- | |||
|<big>'''Step 5.'''</big> | |||
{|style="margin:left; width: 800px; background:#F0F0F0; padding:5px; border:2px solid #000000;" | |||
|valign="top" | | |||
|- | |||
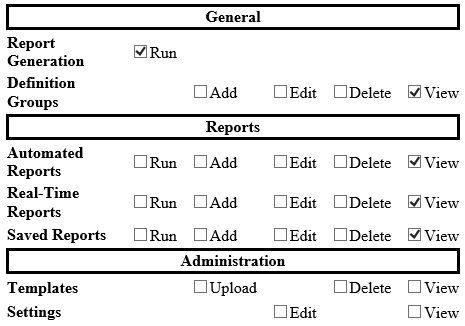
|Below is an image of the VersaCall Reporting Software Permissions that can be enabled. To enable a permission, click on the box next to the item/permission you want to enable. | |||
{|style="margin:left;" | |||
|valign="top" | | |||
{|class="wikitable" style="background:white; align:center;" | |||
|- | |||
|[[File:3113_5.png|center|465px]] | |||
|} | |||
|} | |||
|} | |||
|} | |||
<br> | |||
---- | |||
<br> | |||
{|style="margin:left; width: 100px; background:#eaf3ff; padding:5px; border:2px solid #000000;" | |||
|- | |||
|<big>'''Step 6.'''</big> | |||
{|style="margin:left; width: 800px; background:#F0F0F0; padding:5px; border:2px solid #000000;" | |||
|valign="top" | | |||
|- | |||
|Below is an image of the AMS Permissions that can be enabled. To enable a permission, click on the box next to the item/permission you want to enable. | |||
{|style="margin:left;" | |||
|valign="top" | | |||
{|class="wikitable" style="background:white; align:center;" | |||
|- | |||
|[[File:3113_6.png|center|443px]] | |||
|} | |||
|} | |||
|} | |||
|} | |||
<br> | |||
---- | |||
<br> | |||
{|style="margin:left; width: 100px; background:#eaf3ff; padding:5px; border:2px solid #000000;" | |||
|- | |||
|<big>'''Step 7.'''</big> | |||
{|style="margin:left; width: 800px; background:#F0F0F0; padding:5px; border:2px solid #000000;" | |||
|valign="top" | | |||
|- | |||
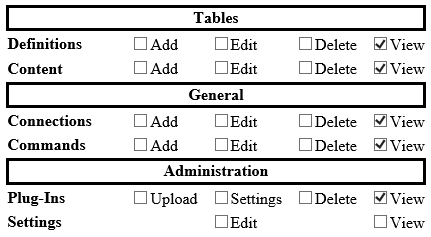
|Below is an image of the Connectivity Permissions that can be enabled. To enable a permission, click on the box next to the item/permission you want to enable. | |||
{|style="margin:left;" | |||
|valign="top" | | |||
{|class="wikitable" style="background:white; align:center;" | |||
|- | |||
|[[File:3113_7.png|center|431px]] | |||
|} | |||
|} | |||
|} | |||
|} | |||
<br> | |||
---- | |||
<br> | |||
{|style="margin:left; width: 100px; background:#eaf3ff; padding:5px; border:2px solid #000000;" | |||
|- | |||
|<big>'''Step 8.'''</big> | |||
{|style="margin:left; width: 800px; background:#F0F0F0; padding:5px; border:2px solid #000000;" | |||
|valign="top" | | |||
|- | |||
|Below is an image of the Virtual Panels IV Permissions that can be enabled. To enable a permission, click on the box next to the item/permission you want to enable. | |||
{|style="margin:left;" | |||
|valign="top" | | |||
{|class="wikitable" style="background:white; align:center;" | |||
|- | |||
|[[File:3113_8.png|center|339px]] | |||
|} | |||
|} | |||
|} | |||
|} | |||
<br> | |||
---- | |||
<br> | |||
{|style="margin:left; width: 100px; background:#eaf3ff; padding:5px; border:2px solid #000000;" | |||
|- | |||
|<big>'''Step 9.'''</big> | |||
{|style="margin:left; width: 800px; background:#F0F0F0; padding:5px; border:2px solid #000000;" | |||
|valign="top" | | |||
|- | |||
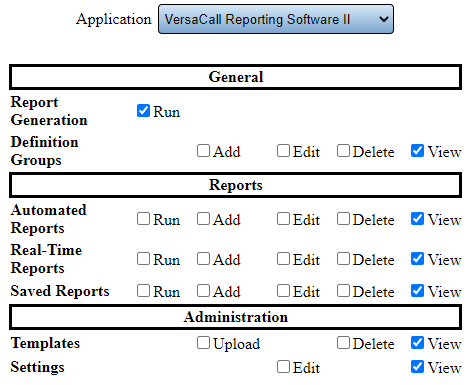
|Below is an example of setting up a Run & View Only Group for the VersaCall Reporting Software. You can create any type of Group that you need. | |||
{|style="margin:left;" | |||
|valign="top" | | |||
{|class="wikitable" style="background:white; align:center;" | |||
|- | |||
|[[File:3113 22.png|center|469px]] | |||
|} | |||
|} | |||
|} | |||
|} | |||
<br> | |||
---- | |||
<br> | |||
{|style="margin:left; width: 100px; background:#eaf3ff; padding:5px; border:2px solid #000000;" | |||
|- | |||
|<big>'''Step 10.'''</big> | |||
{|style="margin:left; width: 800px; background:#F0F0F0; padding:5px; border:2px solid #000000;" | |||
|valign="top" | | |||
|- | |||
|Mark the specific permissions required for each application - select Save & Exit when complete. | |||
{|style="margin:left;" | |||
|valign="top" | | |||
{|class="wikitable" style="background:white; align:center;" | |||
|- | |||
|[[File:3114_5.png|center|238px]] | |||
|} | |||
|} | |||
|} | |||
|} | |||
<br> | |||
---- | ---- | ||
---- | ---- | ||
<br> | |||
{|style="margin: auto; background:#eaf3ff; border:1px solid #2a4b8d" | {|style="margin: auto; background:#eaf3ff; border:1px solid #2a4b8d" | ||
|valign="top" | | |valign="top" | | ||
| Line 98: | Line 247: | ||
</inputbox> | </inputbox> | ||
|} | |} | ||
<br> | |||
[[Category:VT3000 Core Software]] | [[Category:VT3000 Core Software]] | ||
[[Category:Administration]] | [[Category:Administration]] | ||
[[Category:User Groups]] | [[Category:User Groups]] | ||
Revision as of 18:25, 15 December 2021
|
|
Instructions
Step 1.
|
Step 2.
|
Step 3.
|
Step 4.
|
Step 5.
|
Step 6.
|
Step 7.
|
Step 8.
|
Step 9.
|
Step 10.
|
|
| |||||||


