Difference between revisions of "VRS - Edit an Automated Report"
Jump to navigation
Jump to search
SupportAdmin (talk | contribs) |
SupportAdmin (talk | contribs) m (Text replacement - "https://www.linkedin.com/company/versacall-technologies-inc-/mycompany/" to "https://www.linkedin.com/company/versacall/") |
||
| (8 intermediate revisions by the same user not shown) | |||
| Line 1: | Line 1: | ||
{|style="background:transparent; color:black" border="0" height="230" align="center" valign="bottom" | |||
{|style="background:transparent; color:black" border="0" height="230" align="center" valign="bottom" | |||
|+style="background:transparent| | |+style="background:transparent| | ||
|-align="center" | |-align="center" | ||
| | |||
|[[Image:CallUsBtn.png|Call Now 858-677-6766]] | |||
| | | | ||
|[[Image:SubmitTckBtn.png|link=https://www.versacall.com/customer-support/service-ticket]] | |[[Image:SubmitTckBtn.png|link=https://www.versacall.com/customer-support/service-ticket]] | ||
| Line 8: | Line 9: | ||
|[[Image:EmailUsBtn.png|link=mailto:[email protected]?Subject=Help%20Needed%20Wiki&body=Type%20Message%20Here]] | |[[Image:EmailUsBtn.png|link=mailto:[email protected]?Subject=Help%20Needed%20Wiki&body=Type%20Message%20Here]] | ||
|} | |} | ||
<br> | |||
---- | |||
---- | ---- | ||
<br> | <br> | ||
{|style="margin: | [[File:GeneralHeader.png]] | ||
<br> | |||
{|style="margin:left; width: 100px; background:#eaf3ff; padding:5px; border:2px solid #000000;" | |||
|- | |||
|<big>'''Overview'''</big> | |||
{|style="margin:left; width: 800px; background:#F0F0F0; padding:5px; border:2px solid #000000;" | |||
|valign="top" | | |valign="top" | | ||
|- | |- | ||
|An Automated Report is created so that it can run without any user interaction. The report will run and email the results to users. This type of report can only be setup if your system currently sends emails to users. Automated reports are delivered as either an Excel File, PDF File or JPEG File. | |An Automated Report is created so that it can run without any user interaction. The report will run and email the results to users. This type of report can only be setup if your system currently sends emails to users. Automated reports are delivered as either an Excel File, PDF File or JPEG File. | ||
|} | |} | ||
|} | |} | ||
{|style="margin: | <br> | ||
{|style="margin:left; width: 100px; background:#eaf3ff; padding:5px; border:2px solid #000000;" | |||
|- | |||
|<big>'''Requirements'''</big> | |||
{|style="margin:left; width: 800px; background:#F0F0F0; padding:5px; border:2px solid #000000;" | |||
|valign="top" | | |valign="top" | | ||
{|class="wikitable mw-collapsible mw-collapsed" | {| class="wikitable mw-collapsible mw-collapsed" width="775px;" | ||
|- | |||
|style="text-align: center;" | '''See Requirements Here''' | |||
|- | |- | ||
|'''1.''' The VT3000 Core Software installed and running on your system. | |'''1.''' The VT3000 Core Software installed and running on your system. | ||
| Line 29: | Line 39: | ||
|- | |- | ||
|'''3.''' At least 1 Automated Report created and saved in the system. | |'''3.''' At least 1 Automated Report created and saved in the system. | ||
|- | |||
|'''4.''' Email must be enabled in the VT3000 Core Software in order to send the Automated Report out. | |||
|} | |} | ||
|} | |} | ||
|} | |||
<br> | |||
---- | |||
---- | |||
<br> | <br> | ||
[[File:InstructionHeader.png]] | |||
<br> | <br> | ||
{|style="margin:left; width: 100px; background:#eaf3ff; padding:5px; border:2px solid #000000;" | {|style="margin:left; width: 100px; background:#eaf3ff; padding:5px; border:2px solid #000000;" | ||
| Line 45: | Line 61: | ||
{|class="wikitable" style="background:white; align:center;" | {|class="wikitable" style="background:white; align:center;" | ||
|- | |- | ||
|[[File:UpTemp3.png|center | |[[File:UpTemp3.png|center]] | ||
|} | |} | ||
{|class="wikitable" style="background:white; align:center;" | {|class="wikitable" style="background:white; align:center;" | ||
|- | |- | ||
|[[File:UpTemp4.png|center | |[[File:UpTemp4.png|center]] | ||
|} | |} | ||
|} | |} | ||
| Line 68: | Line 84: | ||
{|class="wikitable" style="background:white; width:775;" | {|class="wikitable" style="background:white; width:775;" | ||
|- | |- | ||
|[[File:EditAuto1.png|center | |[[File:EditAuto1.png|center]] | ||
|} | |} | ||
|} | |} | ||
| Line 85: | Line 101: | ||
{|style="margin:left;" | {|style="margin:left;" | ||
|valign="top" | | |valign="top" | | ||
{|class="wikitable" style="background:white; align:center;" | {|class="wikitable" style="background:white; align:center; width:775px;" | ||
|- | |- | ||
|[[File: | |[[File:AutoReport3.png|center]] | ||
|} | |} | ||
{|class="wikitable" style="background:white; align:center; width:775px;" | {|class="wikitable" style="background:white; align:center; width:775px;" | ||
| Line 109: | Line 125: | ||
{|style="margin:left; width: 100px; background:#eaf3ff; padding:5px; border:2px solid #000000;" | {|style="margin:left; width: 100px; background:#eaf3ff; padding:5px; border:2px solid #000000;" | ||
|- | |- | ||
|<big>''' | |<big>'''Step 4.'''</big> | ||
{|style="margin:left; width: 800px; background:#F0F0F0; padding:5px; border:2px solid #000000;" | {|style="margin:left; width: 800px; background:#F0F0F0; padding:5px; border:2px solid #000000;" | ||
|valign="top" | | |valign="top" | | ||
|- | |- | ||
| | |Select the Pencil icon button in the Actions section inline with the Automated Report you want to edit. | ||
{|style="margin:left;" | {|style="margin:left;" | ||
|valign="top" | | |valign="top" | | ||
{|class="wikitable" style="background:white; align:center;" | {|class="wikitable" style="background:white; align:center;" | ||
|- | |- | ||
|[[File: | |[[File:AutoReport5.png|center]] | ||
|} | |} | ||
|} | |} | ||
| Line 128: | Line 144: | ||
{|style="margin:left; width: 100px; background:#eaf3ff; padding:5px; border:2px solid #000000;" | {|style="margin:left; width: 100px; background:#eaf3ff; padding:5px; border:2px solid #000000;" | ||
|- | |- | ||
|<big>''' | |<big>'''Step 5.'''</big> | ||
{|style="margin:left; width: 800px; background:#F0F0F0; padding:5px; border:2px solid #000000;" | {|style="margin:left; width: 800px; background:#F0F0F0; padding:5px; border:2px solid #000000;" | ||
|valign="top" | | |valign="top" | | ||
|- | |- | ||
| | |'''IMPORTANT''': After changing any Step or Property you MUST select the Next button on each proceeding step or property, even if you do not make any changes, until you reach the Email page. | ||
|- | |||
|Once you are on the Email page select the Save & Exit button to save your change(s). Failure to follow the process can result in changes not being saved. | |||
{|style="margin:left;" | {|style="margin:left;" | ||
|valign="top" | | |valign="top" | | ||
{|class="wikitable" style="background:white; align:center;" | {|class="wikitable" style="background:white; align:center; width:775px;" | ||
|- | |||
|[[File:EditReal8.png|center]] | |||
|- | |||
|Use the Prev button to go back through all the steps or properties. | |||
|- | |- | ||
| | |Use the Next button to go forward through all the steps until you reach the Properties page. | ||
|} | |} | ||
{|class="wikitable" style="background:white; align:center;" | {|class="wikitable" style="background:white; align:center; width:775px;" | ||
|- | |||
|[[File:EditReal9.png|center]] | |||
|- | |||
|Use the Save & Exit button to save any changes you made to the Steps or Properties. | |||
|- | |- | ||
| | |Use the Discard & Exit button to NOT save any changes you made to the Steps or Properties. | ||
|} | |} | ||
|} | |} | ||
| Line 151: | Line 177: | ||
{|style="margin:left; width: 100px; background:#eaf3ff; padding:5px; border:2px solid #000000;" | {|style="margin:left; width: 100px; background:#eaf3ff; padding:5px; border:2px solid #000000;" | ||
|- | |- | ||
|<big>''' | |<big>'''Step 6.'''</big> | ||
{|style="margin:left; width: 800px; background:#F0F0F0; padding:5px; border:2px solid #000000;" | {|style="margin:left; width: 800px; background:#F0F0F0; padding:5px; border:2px solid #000000;" | ||
|valign="top" | | |valign="top" | | ||
|- | |- | ||
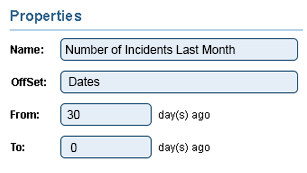
| | |After selecting the Edit icon, the Properties page will load automatically. This will be your starting point to editing the Automated Report. | ||
{|style="margin:left;" | {|style="margin:left;" | ||
|valign="top" | | |valign="top" | | ||
{|class="wikitable" style="background:white; align:center;" | {|class="wikitable" style="background:white; align:center;" | ||
|- | |- | ||
|[[File: | |[[File:AutoReport7.png|center]] | ||
|} | |} | ||
|} | |} | ||
| Line 170: | Line 196: | ||
{|style="margin:left; width: 100px; background:#eaf3ff; padding:5px; border:2px solid #000000;" | {|style="margin:left; width: 100px; background:#eaf3ff; padding:5px; border:2px solid #000000;" | ||
|- | |- | ||
|<big>''' | |<big>'''Step 7.'''</big> | ||
{|style="margin:left; width: 800px; background:#F0F0F0; padding:5px; border:2px solid #000000;" | {|style="margin:left; width: 800px; background:#F0F0F0; padding:5px; border:2px solid #000000;" | ||
|valign="top" | | |valign="top" | | ||
|- | |- | ||
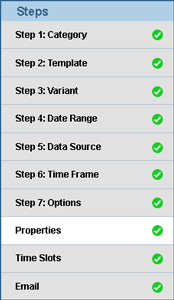
| | |To easily access a specific Step you need to change, click on the step in the list on the left. This can only be used for selecting the First/Initial Step that needs to be changed. | ||
{|style="margin:left;" | {|style="margin:left;" | ||
|valign="top" | | |valign="top" | | ||
{|class="wikitable" style="background:white; align:center;" | {|class="wikitable" style="background:white; align:center;" | ||
|- | |- | ||
|[[File: | |[[File:EditAuto5.png|center]] | ||
|} | |||
|} | |||
|} | |} | ||
|} | |} | ||
<br> | <br> | ||
---- | ---- | ||
<br> | |||
{|style="margin:left; width: 100px; background:#eaf3ff; padding:5px; border:2px solid #000000;" | |||
|- | |||
|<big>'''Step. 8'''</big> | |||
{|style="margin:left; width: 800px; background:#F0F0F0; padding:5px; border:2px solid #000000;" | |||
|valign="top" | | |||
|- | |||
|After you make changes to the First/Initial Step, use the Next or Prev button to navigate through the remaining Steps & Properties. | |||
{|style="margin:left;" | |||
|valign="top" | | |||
{|class="wikitable" style="background:white; align:center;" | {|class="wikitable" style="background:white; align:center;" | ||
|- | |- | ||
|[[File: | |[[File:EditReal8.png|center]] | ||
|} | |||
|} | |||
|} | |} | ||
|} | |} | ||
<br> | <br> | ||
---- | ---- | ||
{| | <br> | ||
{|style="margin:left; width: 100px; background:#eaf3ff; padding:5px; border:2px solid #000000;" | |||
|- | |- | ||
| | |<big>'''Step. 9'''</big> | ||
{|style="margin:left; width: 800px; background:#F0F0F0; padding:5px; border:2px solid #000000;" | |||
{| | |valign="top" | | ||
|- | |- | ||
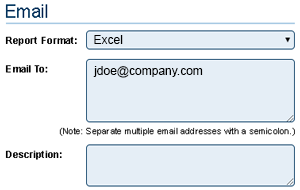
| | |Once you reach the Email page, make any changes that need to be made. | ||
| | {|style="margin:left;" | ||
|valign="top" | | |||
{|class="wikitable" style="background:white; align:center;" | {|class="wikitable" style="background:white; align:center;" | ||
|- | |- | ||
|[[File: | |[[File:AutoReport6.png|center]] | ||
|} | |||
|} | |} | ||
|} | |} | ||
|} | |} | ||
<br> | <br> | ||
---- | ---- | ||
<br> | |||
{|style="margin:left; width: 100px; background:#eaf3ff; padding:5px; border:2px solid #000000;" | |||
|- | |||
|<big>'''Step. 10'''</big> | |||
{|style="margin:left; width: 800px; background:#F0F0F0; padding:5px; border:2px solid #000000;" | |||
|valign="top" | | |||
|- | |||
|Select the Save & Exit button to save your changes. If you do not want to save your changes, select the Discard & Exit button. | |||
{|style="margin:left;" | |||
|valign="top" | | |||
{|class="wikitable" style="background:white; align:center;" | {|class="wikitable" style="background:white; align:center;" | ||
|- | |- | ||
|[[File: | |[[File:EditReal9.png|center]] | ||
|} | |||
|} | |} | ||
|} | |} | ||
|} | |} | ||
<br> | <br> | ||
---- | ---- | ||
{| | <br> | ||
{|style="margin:left; width: 100px; background:#eaf3ff; padding:5px; border:2px solid #000000;" | |||
|- | |||
|<big>'''Step. 11'''</big> | |||
{|style="margin:left; width: 800px; background:#F0F0F0; padding:5px; border:2px solid #000000;" | |||
|valign="top" | | |||
|- | |- | ||
| | |You will be returned to the Automated Reports page. Any changes that were made on the report in regards to the Name, Template, Variant, or Date Offset will be reflected. | ||
| | {|style="margin:left;" | ||
|valign="top" | | |||
{|class="wikitable" style="background:white; align:center;" | {|class="wikitable" style="background:white; align:center;" | ||
|- | |- | ||
|[[File: | |[[File:AutoReport3.png|center]] | ||
|} | |} | ||
|} | |} | ||
| Line 256: | Line 290: | ||
---- | ---- | ||
<br> | <br> | ||
{|style="margin: auto; | {|style="margin:auto;" | ||
| | |+ | ||
{| class=" | [[File:RelatedHowTos.png|center]] | ||
|align="center" | | |||
{| class="wikitable mw-collapsible mw-collapsed" width="400px;" | |||
|- | |- | ||
| | |style="text-align: center;" | '''Select a Guide Here''' | ||
|- | |- | ||
|[[ | |[[VRS - Create an Automated Report|Create/Add an Automated Report]] | ||
|- | |- | ||
|[[ | |[[VRS - Run an Automated Report - Manually|Manually Run an Automated Report]] | ||
|- | |- | ||
|[[ | |[[VRS - Delete an Automated Report|Remove/Delete an Automated Report]] | ||
|} | |} | ||
|} | |} | ||
| Line 284: | Line 317: | ||
|} | |} | ||
|} | |} | ||
<br> | |||
---- | ---- | ||
<br> | <br> | ||
| Line 291: | Line 325: | ||
|-align="center" | |-align="center" | ||
| | | | ||
|[[File:LinkedIn.png|Follow Us On LinkedIn|link=https://www.linkedin.com/company/versacall | |[[File:LinkedIn.png|Follow Us On LinkedIn|link=https://www.linkedin.com/company/versacall/]] | ||
| | | | ||
|[[File:BlogIcon.png|View our Blog|link=https://www.versacall.com/blog/]] | |[[File:BlogIcon.png|View our Blog|link=https://www.versacall.com/blog/]] | ||
|} | |} | ||
Latest revision as of 19:24, 20 April 2023

|

|

|
Overview
|
Requirements
|
Step 1.
|
Step 2.
|
Step 3.
| |||||||||||||||||||
Step 4.
|
Step 5.
|
Step 6.
|
Step 7.
|
Step. 8
|
Step. 9
|
Step. 10
|
Step. 11
|
|
|
|

|


