Difference between revisions of "VT3000 - Back Up Database Locally - VT3000 Core"
Jump to navigation
Jump to search
SupportAdmin (talk | contribs) |
SupportAdmin (talk | contribs) m (Text replacement - "https://www.linkedin.com/company/versacall-technologies-inc-/mycompany/" to "https://www.linkedin.com/company/versacall/") |
||
| (7 intermediate revisions by the same user not shown) | |||
| Line 1: | Line 1: | ||
=Overview= | {|style="background:transparent; color:black" border="0" height="230" align="center" valign="bottom" | ||
Use the instructions below to make a backup of all databases or a specific database(s) Locally. This means the backup will be made on the VersaCall Server. This backup can be used to Restore your system should you have an issue. Keep in mind the backup will be on the same computer and the VersaCall software. | |+style="background:transparent| | ||
|-align="center" | |||
| | |||
=Requirements= | |[[Image:CallUsBtn.png|Call Now 858-677-6766]] | ||
| | |||
'''1.''' The VT3000 Core Software | |[[Image:SubmitTckBtn.png|link=https://www.versacall.com/customer-support/service-ticket]] | ||
| | |||
'''2.''' SQL Server must be installed and running on the same Computer/Server as the VT3000 Core Software. | |[[Image:EmailUsBtn.png|link=mailto:[email protected]?Subject=Help%20Needed%20Wiki&body=Type%20Message%20Here]] | ||
|} | |||
<br> | |||
= | ---- | ||
---- | |||
'''1.''' Open the VT3000 web interface – log in – select Administration – select Control Center. | <br> | ||
[[File:GeneralHeader.png]] | |||
<br> | |||
File:3176_1.png| | {|style="margin:left; width: 100px; background:#eaf3ff; padding:5px; border:2px solid #000000;" | ||
File:3176_2.png|Control Center | |- | ||
< | |<big>'''Overview'''</big> | ||
{|style="margin:left; width: 800px; background:#F0F0F0; padding:5px; border:2px solid #000000;" | |||
|valign="top" | | |||
'''2.''' Select the Databases tab. | |- | ||
|Use the instructions below to make a backup of all databases or a specific database(s) Locally. This means the backup will be made on the VersaCall Server. This backup can be used to Restore your system should you have an issue. Keep in mind the backup will be on the same computer and the VersaCall software. | |||
|} | |||
File:3176_3.png | |} | ||
< | <br> | ||
{|style="margin:left; width: 100px; background:#eaf3ff; padding:5px; border:2px solid #000000;" | |||
|- | |||
'''3.''' Icon Tools: | |<big>'''Requirements'''</big> | ||
{|style="margin:left; width: 800px; background:#F0F0F0; padding:5px; border:2px solid #000000;" | |||
|valign="top" | | |||
File:3176_4.png| | {| class="wikitable mw-collapsible mw-collapsed" width="775px;" | ||
File:3176_5.png| | |- | ||
File:3176_6.png| | |style="text-align: center;" | '''See Requirements Here''' | ||
File:3176_7.png| | |- | ||
File:3176_8.png| | |'''1.''' The VT3000 Core Software installed and running on your system. | ||
File:3176_9.png|Import | |- | ||
< | |'''2.''' SQL Server must be installed and running on the same Computer/Server as the VT3000 Core Software. | ||
|} | |||
|} | |||
'''4.''' Select Backup icon. | |} | ||
<br> | |||
---- | |||
File:3176_10.png | ---- | ||
< | <br> | ||
[[File:VideoHeader.png]] | |||
<br> | |||
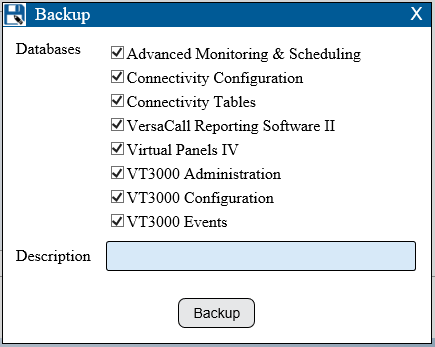
'''5.''' Check the box for database(s) you want to Backup. | {|style="margin:left; width: 100px; background:#eaf3ff; padding:5px; border:2px solid #000000;" | ||
|- | |||
|<big>'''Video'''</big> | |||
File:3176_11.png | {|style="margin:left; width: 800px; background:#F0F0F0; padding:5px; border:2px solid #000000;" | ||
< | |valign="top" | | ||
|- | |||
|[[File:Databases Local Backup.mkv|center|775px]] | |||
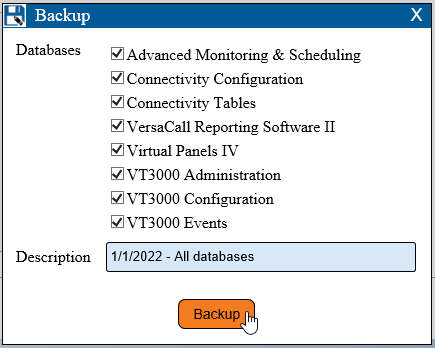
'''6.''' Enter a description (usually the date) - select Backup button. | |} | ||
|} | |||
<br> | |||
File:3176_12.png | ---- | ||
< | ---- | ||
<br> | |||
[[File:InstructionHeader.png]] | |||
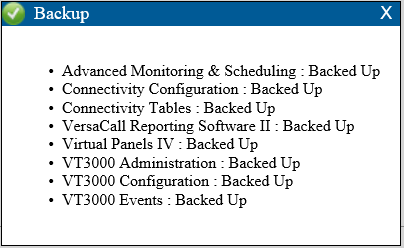
'''7.''' Select X to close the Confirmation Window. | <br> | ||
{|style="margin:left; width: 100px; background:#eaf3ff; padding:5px; border:2px solid #000000;" | |||
|- | |||
File:3176_13.png | |<big>'''Step 1.'''</big> | ||
</ | {|style="margin:left; width: 800px; background:#F0F0F0; padding:5px; border:2px solid #000000;" | ||
|valign="top" | | |||
|- | |||
|Open the VT3000 web interface – select VT3000 Core Software - log in – select Administration – select Control Center. | |||
{|style="margin:left;" | |||
|valign="top" | | |||
{|class="wikitable" style="background:white; align:center;" | |||
|- | |||
|[[File:3176_1.png|center|93px]] || [[File:3176_2.png|center|93px]] | |||
|- | |||
|style="text-align:center" | '''Administration''' ||style="text-align:center" | '''Control Center''' | |||
|} | |||
|} | |||
|} | |||
|} | |||
<br> | |||
---- | |||
<br> | |||
{|style="margin:left; width: 100px; background:#eaf3ff; padding:5px; border:2px solid #000000;" | |||
|- | |||
|<big>'''Step 2.'''</big> | |||
{|style="margin:left; width: 800px; background:#F0F0F0; padding:5px; border:2px solid #000000;" | |||
|valign="top" | | |||
|- | |||
|Select the Databases tab. | |||
{|style="margin:left;" | |||
|valign="top" | | |||
{|class="wikitable" style="background:white;" | |||
|- | |||
|[[File:3176_3.png|center|544px]] | |||
|} | |||
|} | |||
|} | |||
|} | |||
<br> | |||
---- | |||
<br> | |||
{|style="margin:left; width: 100px; background:#eaf3ff; padding:5px; border:2px solid #000000;" | |||
|- | |||
|<big>'''Step 3.'''</big> | |||
{|style="margin:left; width: 800px; background:#F0F0F0; padding:5px; border:2px solid #000000;" | |||
|valign="top" | | |||
|- | |||
|Icon Tools: | |||
{|style="margin:left;" | |||
|valign="top" | | |||
{|class="wikitable" style="background:white; align:center; width:775px;" | |||
|- | |||
|[[File:3176_4.png|center|35px]] || [[File:3176_5.png|center|35px]] || [[File:3176_6.png|center|35px]] || [[File:3176_7.png|center|35px]] || [[File:3176_8.png|center|35px]] || [[File:3176_9.png|center|35px]] | |||
|- | |||
|style="text-align:center" | '''Refresh''' ||style="text-align:center" | '''Delete''' || style="text-align:center" | '''Backup''' ||style="text-align:center" | '''Restore''' || style="text-align:center" | '''Export''' ||style="text-align:center" | '''Import''' | |||
|} | |||
|} | |||
|} | |||
|} | |||
<br> | |||
---- | |||
<br> | |||
{|style="margin:left; width: 100px; background:#eaf3ff; padding:5px; border:2px solid #000000;" | |||
|- | |||
|<big>'''Step 4.'''</big> | |||
{|style="margin:left; width: 800px; background:#F0F0F0; padding:5px; border:2px solid #000000;" | |||
|valign="top" | | |||
|- | |||
|Select the Backup icon. | |||
{|style="margin:left;" | |||
|valign="top" | | |||
{|class="wikitable" style="background:white; align:center;" | |||
|- | |||
|[[File:3176_10.png|center|341px]] | |||
|} | |||
|} | |||
|} | |||
|} | |||
<br> | |||
---- | |||
<br> | |||
{|style="margin:left; width: 100px; background:#eaf3ff; padding:5px; border:2px solid #000000;" | |||
|- | |||
|<big>'''Step 5.'''</big> | |||
{|style="margin:left; width: 800px; background:#F0F0F0; padding:5px; border:2px solid #000000;" | |||
|valign="top" | | |||
|- | |||
|Check the box for database(s) you want to Backup. | |||
{|style="margin:left;" | |||
|valign="top" | | |||
{|class="wikitable" style="background:white; align:center;" | |||
|- | |||
|[[File:3176_11.png|center|435px]] | |||
|} | |||
|} | |||
|} | |||
|} | |||
<br> | |||
---- | |||
<br> | |||
{|style="margin:left; width: 100px; background:#eaf3ff; padding:5px; border:2px solid #000000;" | |||
|- | |||
|<big>'''Step 6.'''</big> | |||
{|style="margin:left; width: 800px; background:#F0F0F0; padding:5px; border:2px solid #000000;" | |||
|valign="top" | | |||
|- | |||
|Enter a description (usually the date) - select Backup button. | |||
{|style="margin:left;" | |||
|valign="top" | | |||
{|class="wikitable" style="background:white; align:center;" | |||
|- | |||
|[[File:3176_12.png|center|435px]] | |||
|} | |||
|} | |||
|} | |||
|} | |||
<br> | |||
---- | |||
<br> | |||
{|style="margin:left; width: 100px; background:#eaf3ff; padding:5px; border:2px solid #000000;" | |||
|- | |||
|<big>'''Step 7.'''</big> | |||
{|style="margin:left; width: 800px; background:#F0F0F0; padding:5px; border:2px solid #000000;" | |||
|valign="top" | | |||
|- | |||
|Select X to close the Confirmation Window. | |||
{|style="margin:left;" | |||
|valign="top" | | |||
{|class="wikitable" style="background:white; align:center;" | |||
|- | |||
|[[File:3176_13.png|center|404px]] | |||
|} | |||
|} | |||
|} | |||
|} | |||
<br> | |||
---- | |||
<br> | |||
{|style="margin:left; width: 100px; background:#eaf3ff; padding:5px; border:2px solid #000000;" | |||
|- | |||
|<big>'''Step 8.'''</big> | |||
{|style="margin:left; width: 800px; background:#F0F0F0; padding:5px; border:2px solid #000000;" | |||
|valign="top" | | |||
|- | |||
|You now have a Local Backup of your databases that can be restored at anytime. [[VT3000 - Restore Database - VT3000 Core|'''Click Here''']] for instructions on Restoring databases. | |||
|} | |||
|} | |||
<br> | |||
---- | ---- | ||
---- | |||
<br> | |||
{|style="margin:auto;" | {|style="margin:auto;" | ||
| | |+ | ||
{| class=" | [[File:RelatedHowTos.png|center]] | ||
|align="center" | | |||
{| class="wikitable mw-collapsible mw-collapsed" width="400px;" | |||
|- | |||
|style="text-align: center;" | '''Select a Guide Here''' | |||
|- | |- | ||
|[[VT3000 - Back Up Database - SQL Server|Backup VersaCall Databases using SQL Server]] | |[[VT3000 - Back Up Database - SQL Server|Backup VersaCall Databases using SQL Server]] | ||
| Line 79: | Line 225: | ||
|[[VT3000 - Scripting SQL Databases|How to Script an SQL Database to an Earlier Version of SQL Server]] | |[[VT3000 - Scripting SQL Databases|How to Script an SQL Database to an Earlier Version of SQL Server]] | ||
|- | |- | ||
|[[VT3000 - Back Up Database | |[[VT3000 - Back Up Database Locally - VT3000 Core|Backup VersaCall Databases using VT3000 - Make a Local Backup]] | ||
|- | |- | ||
|[[VT3000 - Send a Back Up of Databases - VT3000 Core|Backup VersaCall Databases using VT3000 - Send the Backup to VersaCall]] | |[[VT3000 - Send a Back Up of Databases - VT3000 Core|Backup VersaCall Databases using VT3000 - Send the Backup to VersaCall]] | ||
| Line 88: | Line 234: | ||
|- | |- | ||
|[[VT3000 - Errors - Database Connection is Closed|How to Fix the "Database Connection Closed" Error]] | |[[VT3000 - Errors - Database Connection is Closed|How to Fix the "Database Connection Closed" Error]] | ||
|} | |} | ||
|} | |} | ||
<br> | |||
---- | ---- | ||
<br> | |||
{|style="margin:auto;" | {|style="margin:auto;" | ||
|+ | |||
[[File:SearchHeader.png|center]] | |||
|align="center" | | |align="center" | | ||
{|class="wikitable" | {|class="wikitable" | ||
|- | |- | ||
|<inputbox>type=search</inputbox> | |<inputbox>type=search</inputbox> | ||
|} | |} | ||
|} | |||
<br> | |||
---- | ---- | ||
<br> | |||
[[File:VC Footer.png|center]] | |||
{|style="background:transparent; color:black" border="0" height="200" align="center" valign="bottom" cellpadding=10px cellspacing=10px | |||
|+style="background:transparent| | |||
|-align="center" | |||
| | |||
|[[File:LinkedIn.png|Follow Us On LinkedIn|link=https://www.linkedin.com/company/versacall/]] | |||
| | |||
|[[File:BlogIcon.png|View our Blog|link=https://www.versacall.com/blog/]] | |||
|} | |||
<br> | |||
[[Category:VT3000 Core Software]] | [[Category:VT3000 Core Software]] | ||
[[Category:Administration]] | [[Category:Administration]] | ||
[[Category:Control Center]] | [[Category:Control Center]] | ||
[[Category:Database]] | [[Category:Database]] | ||
Latest revision as of 19:25, 20 April 2023

|

|

|
Overview
|
Requirements
|
| Video
|
Step 1.
|
Step 2.
|
Step 3.
|
Step 4.
|
Step 5.
|
Step 6.
|
Step 7.
|
Step 8.
|
|
|

|


