Difference between revisions of "VT3000 - Back Up Database for Download - VT3000 Core"
Jump to navigation
Jump to search
SupportAdmin (talk | contribs) |
SupportAdmin (talk | contribs) |
||
| Line 19: | Line 19: | ||
|} | |} | ||
<br> | <br> | ||
=Instructions= | =<big>'''Instructions'''</big>= | ||
<br> | |||
'''1.''' Open the VT3000 web interface – log in – select Administration – select Control Center. | {|style="margin:left; width: 100px; background:#eaf3ff; padding:5px; border:2px solid #000000;" | ||
|- | |||
|<big>'''Step 1.'''</big> | |||
File:3176_1.png| | {|style="margin:left; width: 800px; background:#F0F0F0; padding:5px; border:2px solid #000000;" | ||
File:3176_2.png|Control Center | |valign="top" | | ||
< | |- | ||
|Open the VT3000 web interface – select VT3000 Core Software - log in – select Administration – select Control Center. | |||
{|style="margin:left;" | |||
'''2.''' Select the Databases tab. | |valign="top" | | ||
{|class="wikitable" style="background:white; align:center;" | |||
|- | |||
File:3176_3.png | |[[File:3176_1.png|center|93px]] || [[File:3176_2.png|center|93px]] | ||
< | |- | ||
|style="text-align:center" | '''Administration''' ||style="text-align:center" | '''Control Center''' | |||
|} | |||
'''3.''' Icon Tools: | |} | ||
|} | |||
|} | |||
File:3176_4.png| | <br> | ||
File:3176_5.png| | ---- | ||
File:3176_6.png| | <br> | ||
File:3176_7.png| | {|style="margin:left; width: 100px; background:#eaf3ff; padding:5px; border:2px solid #000000;" | ||
File:3176_8.png| | |- | ||
File:3176_9.png|Import | |<big>'''Step 2.'''</big> | ||
< | {|style="margin:left; width: 800px; background:#F0F0F0; padding:5px; border:2px solid #000000;" | ||
|valign="top" | | |||
|- | |||
'''4.''' Select the Export icon. | |Select the Databases tab. | ||
{|style="margin:left;" | |||
|valign="top" | | |||
File:3176_14.png | {|class="wikitable" style="background:white;" | ||
< | |- | ||
|[[File:3176_3.png|center|544px]] | |||
|} | |||
'''5.''' | |} | ||
|} | |||
|} | |||
File:3176_15.png | <br> | ||
< | ---- | ||
<br> | |||
{|style="margin:left; width: 100px; background:#eaf3ff; padding:5px; border:2px solid #000000;" | |||
'''6.''' Select Download. | |- | ||
|<big>'''Step 3.'''</big> | |||
{|style="margin:left; width: 800px; background:#F0F0F0; padding:5px; border:2px solid #000000;" | |||
File:3176_16.png | |valign="top" | | ||
< | |- | ||
|Icon Tools: | |||
{|style="margin:left;" | |||
'''7.''' | |valign="top" | | ||
{|class="wikitable" style="background:white; align:center; width:775px;" | |||
|- | |||
File: | |[[File:3176_4.png|center|35px]] || [[File:3176_5.png|center|35px]] || [[File:3176_6.png|center|35px]] || [[File:3176_7.png|center|35px]] || [[File:3176_8.png|center|35px]] || [[File:3176_9.png|center|35px]] | ||
< | |- | ||
|style="text-align:center" | '''Refresh''' ||style="text-align:center" | '''Delete''' || style="text-align:center" | '''Backup''' ||style="text-align:center" | '''Restore''' || style="text-align:center" | '''Export''' ||style="text-align:center" | '''Import''' | |||
|} | |||
'''8.''' Select | |} | ||
|} | |||
|} | |||
File: | <br> | ||
---- | |||
<br> | |||
{|style="margin:left; width: 100px; background:#eaf3ff; padding:5px; border:2px solid #000000;" | |||
|- | |||
|<big>'''Step 4.'''</big> | |||
< | {|style="margin:left; width: 800px; background:#F0F0F0; padding:5px; border:2px solid #000000;" | ||
|valign="top" | | |||
< | |- | ||
|Select the Export icon. | |||
{|style="margin:left;" | |||
''' | |valign="top" | | ||
{|class="wikitable" style="background:white; align:center;" | |||
|- | |||
''' | |[[File:3176_14.png|center|343px]] | ||
|} | |||
|} | |||
|} | |||
< | |} | ||
<br> | |||
---- | |||
<br> | |||
{|style="margin:left; width: 100px; background:#eaf3ff; padding:5px; border:2px solid #000000;" | |||
|- | |||
|<big>'''Step 5.'''</big> | |||
{|style="margin:left; width: 800px; background:#F0F0F0; padding:5px; border:2px solid #000000;" | |||
|valign="top" | | |||
|- | |||
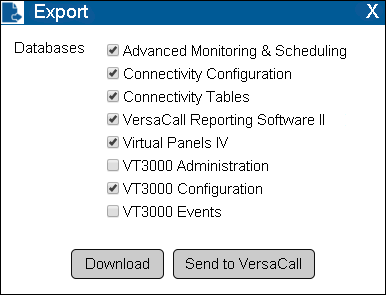
|Check the box for database(s) you want to include in the Export. | |||
{|style="margin:left;" | |||
|valign="top" | | |||
{|class="wikitable" style="background:white; align:center;" | |||
|- | |||
|[[File:3176_15.png|center|386px]] | |||
|} | |||
|} | |||
|} | |||
|} | |||
<br> | |||
---- | |||
<br> | |||
{|style="margin:left; width: 100px; background:#eaf3ff; padding:5px; border:2px solid #000000;" | |||
|- | |||
|<big>'''Step 6.'''</big> | |||
{|style="margin:left; width: 800px; background:#F0F0F0; padding:5px; border:2px solid #000000;" | |||
|valign="top" | | |||
|- | |||
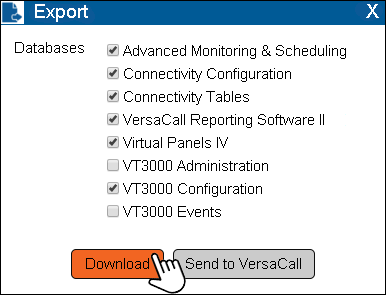
|Select Download. | |||
{|style="margin:left;" | |||
|valign="top" | | |||
{|class="wikitable" style="background:white; align:center;" | |||
|- | |||
|[[File:3176_16.png|center|386px]] | |||
|} | |||
|} | |||
|} | |||
|} | |||
<br> | |||
---- | |||
<br> | |||
{|style="margin:left; width: 100px; background:#eaf3ff; padding:5px; border:2px solid #000000;" | |||
|- | |||
|<big>'''Step 7.'''</big> | |||
{|style="margin:left; width: 800px; background:#F0F0F0; padding:5px; border:2px solid #000000;" | |||
|valign="top" | | |||
|- | |||
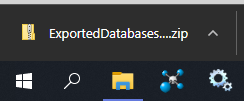
|Most browsers will save the file to your Downloads folder - you will see the download progress in the bottom right corner of your screen | |||
{|style="margin:left;" | |||
|valign="top" | | |||
{|class="wikitable" style="background:white; align:center;" | |||
|- | |||
|[[File:3176 33.png|center|244px]] | |||
|} | |||
|} | |||
|} | |||
|} | |||
<br> | |||
---- | |||
<br> | |||
{|style="margin:left; width: 100px; background:#eaf3ff; padding:5px; border:2px solid #000000;" | |||
|- | |||
|<big>'''Step 8.'''</big> | |||
{|style="margin:left; width: 800px; background:#F0F0F0; padding:5px; border:2px solid #000000;" | |||
|valign="top" | | |||
|- | |||
|Select X to close the Export Window. | |||
{|style="margin:left;" | |||
|valign="top" | | |||
{|class="wikitable" style="background:white; align:center;" | |||
|- | |||
|[[File:3176_15.png|center|386px]] | |||
|} | |||
|} | |||
|} | |||
|} | |||
<br> | |||
---- | |||
<br> | |||
{|style="margin:left; width: 100px; background:#eaf3ff; padding:5px; border:2px solid #000000;" | |||
|- | |||
|<big>'''Step 9.'''</big> | |||
{|style="margin:left; width: 800px; background:#F0F0F0; padding:5px; border:2px solid #000000;" | |||
|valign="top" | | |||
|- | |||
|You now have a Backup of your databases that can be restored at anytime. [[VT3000 - Update Database - VT3000 Core|'''Click Here''']] for instructions on Updating/Importing databases. | |||
|} | |||
|} | |||
<br> | |||
---- | ---- | ||
---- | ---- | ||
<br> | |||
{|style="margin: auto; background:#eaf3ff; border:1px solid #2a4b8d" | {|style="margin: auto; background:#eaf3ff; border:1px solid #2a4b8d" | ||
|valign="top" | | |valign="top" | | ||
| Line 137: | Line 225: | ||
</inputbox> | </inputbox> | ||
|} | |} | ||
<br> | |||
[[Category:VT3000 Core Software]] | [[Category:VT3000 Core Software]] | ||
[[Category:Administration]] | [[Category:Administration]] | ||
[[Category:Control Center]] | [[Category:Control Center]] | ||
[[Category:Database]] | [[Category:Database]] | ||
Revision as of 20:08, 15 December 2021
|
|
Instructions
Step 1.
|
Step 2.
|
Step 3.
|
Step 4.
|
Step 5.
|
Step 6.
|
Step 7.
|
Step 8.
|
Step 9.
|


