Difference between revisions of "VT3000 - Add Wireless Light Module"
SupportAdmin (talk | contribs) |
SupportAdmin (talk | contribs) |
||
| Line 1: | Line 1: | ||
=Overview= | =Overview= | ||
A wireless light module is | A wireless light module is a device with a light stack that can be placed any where in the plant. This module is independent of all other devices, but any input device can turn the stack light on, off or blink it. The instructions below explain how to setup the wireless light in the system. Once the device is setup in the system you can then setup actions/commands in other input devices to work the lights. | ||
=Instructions= | |||
'''1.''' Open the VT3000 web interface - log in - select Configuration – select Devices. | '''1.''' Open the VT3000 web interface - log in - select Configuration – select Devices. | ||
<gallery widths=93 heights=93> | |||
File:3141_1.png|Configuration | |||
File:3141_2.png|Devices | |||
</gallery> | |||
'''2.''' Select the I/O Module icon from the Add New list. | '''2.''' Select the I/O Module icon from the Add New list. | ||
<gallery widths=310 heights=117> | |||
File:3141_3.png | |||
</gallery> | |||
'''3.''' Enter a name for the device - select Mixed 4I/6O for I/O Module Type. | '''3.''' Enter a name for the device - select Mixed 4I/6O for I/O Module Type. | ||
<gallery widths=478 heights=217> | |||
File:3141_4.png | |||
</gallery> | |||
'''4.''' Select the Discrete Outputs tab. | '''4.''' Select the Discrete Outputs tab. | ||
<gallery widths=606 heights=80> | |||
File:3141_5.png | |||
</gallery> | |||
'''5.''' Select Discrete Output 1. | '''5.''' Select Discrete Output 1. | ||
<gallery widths=190 heights=208> | |||
File:3141_7.png | |||
</gallery> | |||
'''6.''' Discrete Output Properties: | '''6.''' Discrete Output Properties: | ||
<gallery widths=352 heights=320> | |||
File:3141_8.png|Normal | |||
</gallery> | |||
<gallery widths=418 heights=263> | |||
File:3141_9.png|Related | |||
</gallery> | |||
'''a. Description''' – enter a name for the output – light color. | '''a. Description''' – enter a name for the output – light color. | ||
| Line 48: | Line 63: | ||
'''i. Inverse''' – available when Related Type is selected. Explained in Step 8. | '''i. Inverse''' – available when Related Type is selected. Explained in Step 8. | ||
'''7.''' Red, Amber, Blue & White light setup. | |||
<gallery widths=347 heights=319> | |||
File:3141_10.png|Red Light | |||
File:3141_11.png|Amber Light | |||
File:3141_12.png|Blue Light | |||
File:3141_13.png|White Light | |||
</gallery> | |||
'''a. Description''' – enter the light color. | '''a. Description''' – enter the light color. | ||
| Line 63: | Line 83: | ||
'''8.''' | '''8.''' Green Light setup. | ||
<gallery widths=525 heights=257> | |||
File:3141_14.png|Green Light | |||
</gallery> | |||
'''a. Description''' – enter Green light. | '''a. Description''' – enter Green light. | ||
| Line 75: | Line 96: | ||
'''f. Direct''' – leave all unchecked. | '''f. Direct''' – leave all unchecked. | ||
'''g. Inverse''' – check mark DO1, DO2, DO3 and DO4. | '''g. Inverse''' – check mark DO1, DO2, DO3 and DO4. | ||
'''9.''' Select Save & Exit. | '''9.''' Select Save & Exit. | ||
<gallery widths=252 heights=76> | |||
File:3141_15.png | |||
</gallery> | |||
'''10.''' Update/Configure the IO Module, [[VT3000_-_Update_Configuration_-_TIM,_PSM,_BSC|'''CLICK HERE''']] for instructions. The instructions show a PSM - the steps are the same for an IO module. | |||
=Step by Step Guides= | |||
[[VT3000_-_Update_Configuration_-_TIM,_PSM,_BSC|Update Configuration]] | |||
[[VT3000_-_Use_Lights_on_Wireless_Device|Setup Actions/Commands to use a Wireless Light]] | |||
[[VT3000 - Install Wireless Light Module|Install a Wireless Light]] | |||
=Having Trouble?= | |||
<gallery widths=150px> | |||
File:ticketicon.png|Submit a Service Ticket|link=https://www.versacall.com/customer-support/service-ticket/ | |||
</gallery> | |||
Revision as of 15:28, 14 September 2018
Overview
A wireless light module is a device with a light stack that can be placed any where in the plant. This module is independent of all other devices, but any input device can turn the stack light on, off or blink it. The instructions below explain how to setup the wireless light in the system. Once the device is setup in the system you can then setup actions/commands in other input devices to work the lights.
Instructions
1. Open the VT3000 web interface - log in - select Configuration – select Devices.

Configuration

Devices


2. Select the I/O Module icon from the Add New list.

3. Enter a name for the device - select Mixed 4I/6O for I/O Module Type.

4. Select the Discrete Outputs tab.

5. Select Discrete Output 1.

6. Discrete Output Properties:

Normal


Related

    a. Description – enter a name for the output – light color.
    b. Type – 3 options:
         i. Normal – output will turn on/off when commanded.
         ii. Disabled – output will not turn on/off.
         iii. Related – output will turn on/off when another output is on/off.
    c. Inverted – output will do the opposite of normal.
    d. On Delay – number of milliseconds to elapse before the output turns on.
    e. Off Delay – number of milliseconds to elapse before the output turns off.
    f. Blink On – number of milliseconds to stay on during blink.
    g. Blink Off – number or milliseconds to stay off during blink.
    h. Direct – available when Related Type is selected. Not applicable.
    i. Inverse – available when Related Type is selected. Explained in Step 8.
7. Red, Amber, Blue & White light setup.
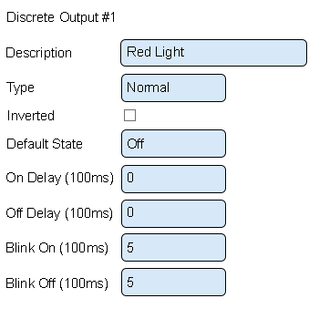
Red Light

Amber Light

Blue Light

White Light


    a. Description – enter the light color.
    b. Type – leave this as normal.
    c. Inverted – leave this unchecked.
    d. Default State – select Off.
    e. On Delay – enter Zero.
    f. Off Delay – enter Zero.
    g. Blink On – enter 5.
    h. Blink Off – enter 5.
8. Green Light setup.
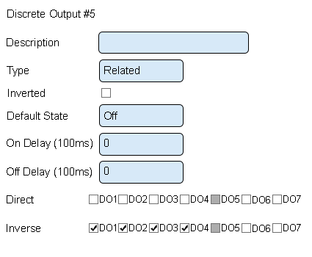
Green Light

    a. Description – enter Green light.
    b. Type – select related.
    c. Inverted – leave this unchecked.
    d. On Delay – leave this set to 0.
    e. Off Delay – leave this set to 0.
    f. Direct – leave all unchecked.
    g. Inverse – check mark DO1, DO2, DO3 and DO4.
9. Select Save & Exit.

10. Update/Configure the IO Module, CLICK HERE for instructions. The instructions show a PSM - the steps are the same for an IO module.
Step by Step Guides
Setup Actions/Commands to use a Wireless Light
Having Trouble?

Submit a Service Ticket