Difference between revisions of "VT3000 - Find 2-Way Radio Settings"

From Versacall Support
Jump to navigation Jump to search
Line 18: Line 18:
|}
|}
|}
|}
<br>
=<big>'''Video'''</big>=
<br>
[[File:2way Radio Settings.mkv|border|775px]]
<br>
<br>
=<big>'''Instructions'''</big>=

Revision as of 14:24, 7 September 2022

Overview
If you have a need to check the 2-Way Radio settings or if a VersaCall Technician asks you provide the settings, the instructions below will show you have to find them.
Requirements
1. The VT3000 Core Software installed and running on your system.
2. A 2-Way Radio Module setup, powered and communicating with the VT3000 Core Software.


Video


Instructions


Step 1.
Open the VT3000 web interface – select VT3000 Core Software - log in – select Administration – select System Settings - select Service.
HT3100 2.png
HT3100 3.png
HT3100 4.png
Administration System Settings Service


Step 2.
Select the Audio Out tab.
Radio9.png


Step 3.
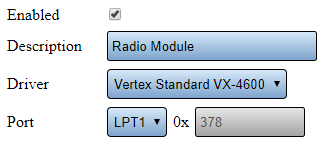
You will see the following settings:
Radio10.png
Enabled - check marked to indicate the device is being used.
Description - name of the device.
Driver - this will show one of the following - Vertex Standard VX-4600 or Motorola XPR 500.
Port - this will show one of the following - LPT1, LPT2 or DMA with port number.


Step 4.
After you have collected the information, ensure you select Discard & Exit so that no changes are made.


Related - Step by Step Guides
Install a 2-Way Radio Module
2-Way Radio Module Schematic of Components
2-Way Radio Wiring Schematic
Using a Phone Modem & 2-Way Radio Together
Test a the 2-Way Radio Module/Radio Channel
Add a Radio CHannel to Outputs in VT3000 Core Software
Additional Help
Submit a Ticket - https://www.versacall.com/customer-support/service-ticket
Training Videos - https://www.versacall.com/training