VT3000 - Attach/Wire a Light Stack to a BSC TIM PSM

From Versacall Support
Jump to navigation Jump to search
Call Now 858-677-6766 SubmitTckBtn.png EmailUsBtn.png


GeneralHeader.png

Overview
A light stack can be added to a BSC, TIM or PSM after the original purchase/installation. Specific wires must be attached to specific output connection on the circuit board. The Output connector can be found at the top of the circuit board.


Requirements
See Requirements Here
1. The VT3000 Core Software installed and running on your system.
2. A Coordinator must be setup, powered and communicating with the VT3000 Core Software.
3. A BSC, TIM or PSM IO Module, that can accept a Light Stack attachment, powered and communicating with the VT3000 Software.
4. The Light Stack attachment hardware.


Completion Steps
LightPart1A.png LightPart2.png LightPart3.png


InstructionHeader.png

Step 1.
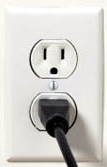
Unplug the power source of the I/O Module.
Radio12.png


Step 2.
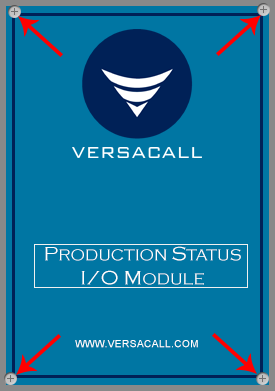
Loosen the 4 screws on each corner of the I/O Module.
Wired10.png


Step 3.
Remove the cover from the I/O Module.
Pre-Drilled Hole - if you have an existing 7/8 hole in the box - move on to the next step.
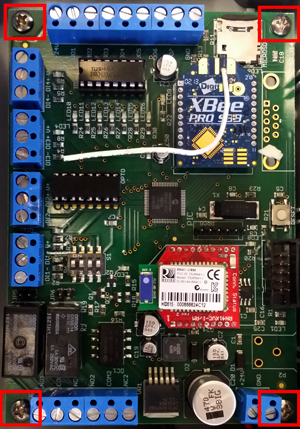
No Pre-Drilled Hole - If your I/O does not have a pre-drilled hole at the top you will need to drill one in the box. You will need to remove the circuit board in order to drill the hole without damaging it. Remove the 4 screws in each corner of the circuit board. Drill the hole in the opposite side of the power cord in. The hole must be 7/8" diameter.
Attach1.png


Step 4.
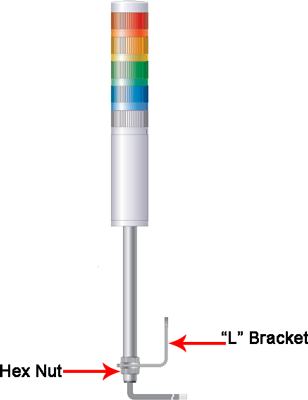
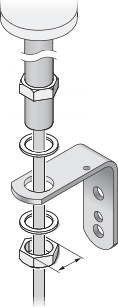
Once the 7/8" hole is drilled into the box you will need to attach the light stack. Remove the hex nut from the light stack pole and insert the threaded end into the box/hole. Attach and tighten the hex nut onto the threaded pole.
Wire3.png
Wire2.png


Step 5.
The wires coming out of the pole and into the box are different colors. Below is a list of colors and what the wire represents to the light stack.
Wire4.png
Yellow - provides power to the light stack.
Red - connected to the Red light.
Orange - connected to the Amber light.
Blue - connected to the Blue light.
White - connected to the White light.
Green - connected to the Green light.


Step 6.
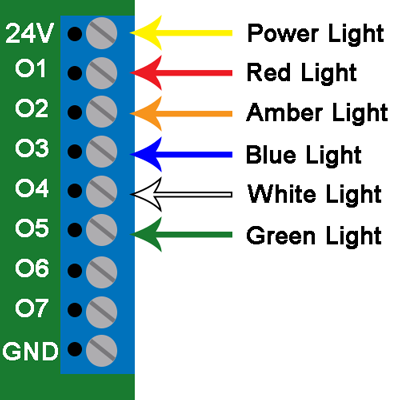
Each wire will need to be connected to the output bar at the top of the circuit board. To connect the wire, insert it into the hole on the front of the output bar and tighten the screw on top of the bar. Below is a chart on where each wire should be inserted. The light stack wiring order is (Red, Amber, Blue, White, Green) - the Yellow wire is Power.
Wire9.png
Yellow - connect to the 24V output.
Red - connect to the O1 output.
Orange - connect to the O2 output.
Blue - connect to the O3 output.
White - connect to the O4 output.
Green - connect to the O5 output.


Step 7.
Wrap the excess light stack wire to fit inside the I/O box. Preferably you would want the wire to go under the Circuit Board. If you removed the circuit board, attach it to the box with the 4 screws and mounts. Attach the front plate to the back plate and hand tighten the 4 screws.
Attach1.png
Wired10.png


Step 8.
Plug in the power cord for the I/O Module.
Radio12.png


Step 9.
If you have not configured the light stack for this device, move on to the next step in the process.
LightPart2.png


RelatedHowTos.png
Select a Guide Here
Setup/Configure an Attached Light Stack on a BSC, TIM or PSM I/O Module
Configure an Attached Light Stack to be used with a BSC, TIM or PSM


SearchHeader.png


VC Footer.png
Follow Us On LinkedIn View our Blog