VT3000 - Change Tones/Melodies - Audio Module

From Versacall Support
Jump to navigation Jump to search
Call Now 858-677-6766 SubmitTckBtn.png EmailUsBtn.png


GeneralHeader.png

Overview
Once you have a Tone Audio Module installed in your facility, you may want to change the Tones/Melodies being played.


Requirements
See Requirements Here
1. The VT3000 Core Software installed and running on your system.
2. A Coordinator must be setup, powered and communicating with the VT3000 Core Software.
3. A Tone Wireless Audio Module powered and communicating with the VT3000 Core Software.


InstructionHeader.png

Step 1.
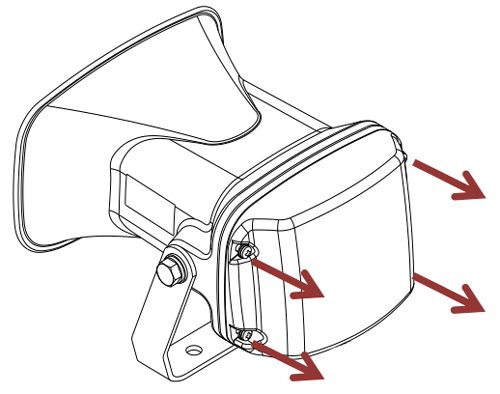
The Tone Audio Module contains 2 parts - Horn/Tone Player & Wireless Controls Module. On the Horn you will see 4 screws on the back - remove those 4 screws.
Horn1.png


Step 2.
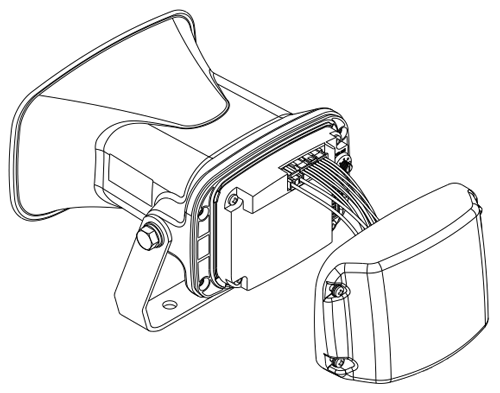
Once the screws are removed - slide the back cover off of the horn so to expose the interior.
Horn2.png


Step 3.
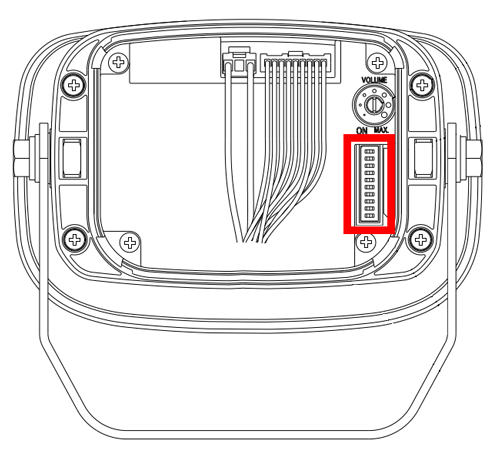
On the interior you will see a row of switches on the right side.
Horn4.png


Step 4.
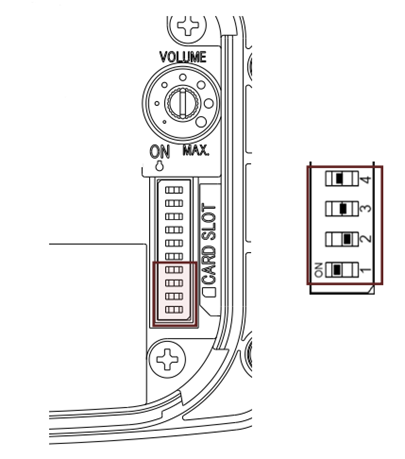
You will only be using the first 4 switches on the row (1 to 4). The switch has an ON & an Off position. ON is labeled above the # 1 switch.
Horn6.png


Group A Tones
Adjust the switches (1 to 4) to the patten shown below to play the Tones listed. This is the default setting for the device.
You can sample the different tones using the play buttons below.
Group A Switches.png
Plays on Output 1
Plays on Output 2
Plays on Output 3
Plays on Output 4
Plays on Output 5
Plays on Output 6
Plays on Output 7


Group B Tones
Adjust the switches (1 to 4) to the patten shown below to play the Tones listed.
You can sample the different tones using the play buttons below.
Group B Switches.png
Plays on Output 1
Plays on Output 2
Plays on Output 3
Plays on Output 4
Plays on Output 5
Plays on Output 6
Plays on Output 7


Group C Tones
Adjust the switches (1 to 4) to the patten shown below to play the Tones listed.
You can sample the different tones using the play buttons below.
Group C Switches.png
Plays on Output 1
Plays on Output 2
Plays on Output 3
Plays on Output 4
Plays on Output 5
Plays on Output 6
Plays on Output 7


Group D Tones
Adjust the switches (1 to 4) to the patten shown below to play the Tones listed.
You can sample the different tones using the play buttons below.
Group D Switches.png
Plays on Output 1
Plays on Output 2
Plays on Output 3
Plays on Output 4
Plays on Output 5
Plays on Output 6
Plays on Output 7


Group E Tones
Adjust the switches (1 to 4) to the patten shown below to play the Tones listed.
You can sample the different tones using the play buttons below.
Group E Switches.png
Plays on Output 1
Plays on Output 2
Plays on Output 3
Plays on Output 4
Plays on Output 5
Plays on Output 6
Plays on Output 7


Group F Tones
Adjust the switches (1 to 4) to the patten shown below to play the Tones listed.
You can sample the different tones using the play buttons below.
Group F Switches.png
Plays on Output 1
Plays on Output 2
Plays on Output 3
Plays on Output 4
Plays on Output 5
Plays on Output 6
Plays on Output 7


Group G Tones
Adjust the switches (1 to 4) to the patten shown below to play the Tones listed.
You can sample the different tones using the play buttons below.
Group G Switches.png
Plays on Output 1
Plays on Output 2
Plays on Output 3
Plays on Output 4
Plays on Output 5
Plays on Output 6
Plays on Output 7


Step 7.
Once you have picked and programmed in the Tones that work for your facility, simply reverse Steps 1 & 2 to replace the cover.


RelatedHowTos.png
Select a Guide Here
Instructions on Installing a Wireless Audio Module (MP3)
Add a Wireless Audio Module (MP3) Configuration to VT3000 Core Software]
Instructions on Replacing the MP3 Files/Songs on the Wireless Audio Module (MP3)
Instructions on Installing a Wireless Audio Module (Tone)
Add a Wireless Audio Module (Tone) Configuration to VT3000 Core Software
Instructions on Adjusting the Tone/Melody Volume
Instructions on Configuring Devices to Play a Melody on a Wireless Audio Module (Tone/MP3)


SearchHeader.png


VC Footer.png
Follow Us On LinkedIn View our Blog