Difference between revisions of "VT3000 - Add a Tone Wireless Audio Module"
Jump to navigation
Jump to search
SupportAdmin (talk | contribs) |
SupportAdmin (talk | contribs) |
||
| Line 1: | Line 1: | ||
{|style="margin: | {|style="margin:auto;" | ||
|valign="top" | | |valign="top" | | ||
{|class="wikitable" style="background:#eaf3ff;" | {|class="wikitable" style="background:#eaf3ff; width:800px;" | ||
|- | |- | ||
!style="text-align: left;"|<big>'''Overview'''</big> | !style="text-align: left;"|<big>'''Overview'''</big> | ||
| Line 8: | Line 8: | ||
|} | |} | ||
|} | |} | ||
{|style="margin: | {|style="margin:auto;" | ||
|valign="top" | | |valign="top" | | ||
{|class="wikitable mw-collapsible mw-collapsed" style="background:#eaf3ff; width: 800px;" | {|class="wikitable mw-collapsible mw-collapsed" style="background:#eaf3ff; width: 800px;" | ||
| Line 19: | Line 19: | ||
|'''3.''' A Tone Wireless Audio Module powered and communicating with the VT3000 Core Software. | |'''3.''' A Tone Wireless Audio Module powered and communicating with the VT3000 Core Software. | ||
|} | |} | ||
|} | |||
=Instructions= | <br> | ||
=<big>'''Instructions - Indicator Setup'''</big>= | |||
'''1.''' Open the VT3000 | <br> | ||
{|style="margin:left; width: 100px; background:#eaf3ff; padding:5px; border:2px solid #000000;" | |||
|- | |||
|<big>'''Step 1.'''</big> | |||
{|style="margin:left; width: 800px; background:#F0F0F0; padding:5px; border:2px solid #000000;" | |||
File: | |valign="top" | | ||
File: | |- | ||
< | |Open the VT3000 web interface – select VT3000 Core Software - log in – select Configuration – select Devices. | ||
{|style="margin:left;" | |||
|valign="top" | | |||
''' | {|class="wikitable" style="background:white; align:center;" | ||
|- | |||
|[[File:3177_1.png|center|93px]] || [[File:3177_2.png|center|93px]] | |||
File:AddTone1.png | |- | ||
< | |style="text-align:center" | '''Configuration''' ||style="text-align:center" | '''Devices''' | ||
|} | |||
|} | |||
''' | |} | ||
|} | |||
<br> | |||
File:AddTone2.png | ---- | ||
< | <br> | ||
{|style="margin:left; width: 100px; background:#eaf3ff; padding:5px; border:2px solid #000000;" | |||
|- | |||
''' | |<big>'''Step 2.'''</big> | ||
{|style="margin:left; width: 800px; background:#F0F0F0; padding:5px; border:2px solid #000000;" | |||
|valign="top" | | |||
File:AddTone3.png | |- | ||
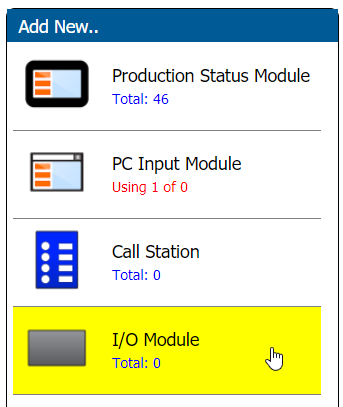
< | |Select the IO Module icon from the Add New menu. | ||
{|style="margin:left;" | |||
|valign="top" | | |||
''' | {|class="wikitable" style="background:white; align:center;" | ||
|- | |||
|[[File:AddTone1.png|center|343px]] | |||
File:AddTone8.png | |} | ||
< | |} | ||
|} | |||
|} | |||
''' | <br> | ||
---- | |||
<br> | |||
File:AddTone4.png | {|style="margin:left; width: 100px; background:#eaf3ff; padding:5px; border:2px solid #000000;" | ||
< | |- | ||
|<big>'''Step 3.'''</big> | |||
{|style="margin:left; width: 800px; background:#F0F0F0; padding:5px; border:2px solid #000000;" | |||
''' | |valign="top" | | ||
|- | |||
|On the Properties tab enter a name for the device. Ensure the name is something that can be recognized easily as you will be selecting at a later date. | |||
File: | {|style="margin:left;" | ||
|valign="top" | | |||
{|class="wikitable" style="background:white; align:center;" | |||
|- | |||
''' | |[[File:AddTone2.png|center|522px]] | ||
|} | |||
< | |} | ||
File: | |} | ||
< | |} | ||
<br> | |||
---- | |||
''' | <br> | ||
{|style="margin:left; width: 100px; background:#eaf3ff; padding:5px; border:2px solid #000000;" | |||
|- | |||
File: | |<big>'''Step 4.'''</big> | ||
< | {|style="margin:left; width: 800px; background:#F0F0F0; padding:5px; border:2px solid #000000;" | ||
|valign="top" | | |||
|- | |||
''' | |Select the Discrete Outputs tab. | ||
{|style="margin:left;" | |||
|valign="top" | | |||
File:3104_14.png | {|class="wikitable" style="background:white; align:center;" | ||
< | |- | ||
|[[File:AddTone3.png|center|551px]] | |||
|} | |||
''' | |} | ||
|} | |||
''' | |} | ||
<br> | |||
---- | |||
<br> | |||
{|style="margin:left; width: 100px; background:#eaf3ff; padding:5px; border:2px solid #000000;" | |||
|- | |||
|<big>'''Step 5.'''</big> | |||
{|style="margin:left; width: 800px; background:#F0F0F0; padding:5px; border:2px solid #000000;" | |||
|valign="top" | | |||
|- | |||
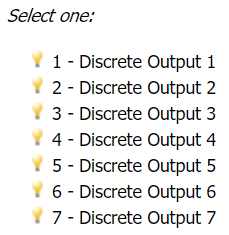
|By default, there will be 7 Outputs shown. With a Tone Audio Module you can use all 7 outputs for 7 different Melodies. | |||
{|style="margin:left;" | |||
|valign="top" | | |||
{|class="wikitable" style="background:white; align:center;" | |||
|- | |||
|[[File:AddTone8.png|center|229px]] | |||
|} | |||
|} | |||
|} | |||
|} | |||
<br> | |||
---- | |||
<br> | |||
{|style="margin:left; width: 100px; background:#eaf3ff; padding:5px; border:2px solid #000000;" | |||
|- | |||
|<big>'''Step 6.'''</big> | |||
{|style="margin:left; width: 800px; background:#F0F0F0; padding:5px; border:2px solid #000000;" | |||
|valign="top" | | |||
|- | |||
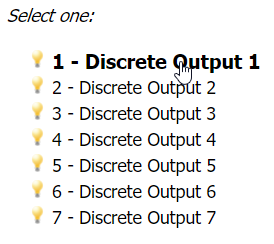
|Select Discrete Output 1 from the list so that it is highlighted. | |||
{|style="margin:left;" | |||
|valign="top" | | |||
{|class="wikitable" style="background:white; align:center;" | |||
|- | |||
|[[File:AddTone4.png|center|274px]] | |||
|} | |||
|} | |||
|} | |||
|} | |||
<br> | |||
---- | |||
<br> | |||
{|style="margin:left; width: 100px; background:#eaf3ff; padding:5px; border:2px solid #000000;" | |||
|- | |||
|<big>'''Step 7.'''</big> | |||
{|style="margin:left; width: 800px; background:#F0F0F0; padding:5px; border:2px solid #000000;" | |||
|valign="top" | | |||
|- | |||
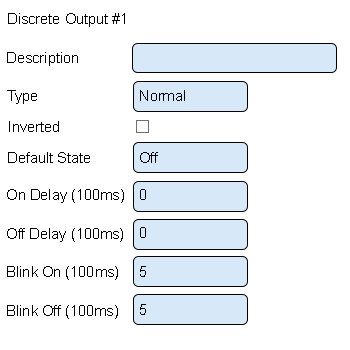
|Discrete Output Properties. | |||
{|style="margin:left;" | |||
|valign="top" | | |||
{|class="wikitable" style="background:white; align:center; width:775px;" | |||
|- | |||
|[[File:3141 8.png|border|center|350px]] | |||
|} | |||
{|class="wikitable" style="background:white; align:center; width:775px;" | |||
|- | |||
|'''Description''' – enter a name for the output – light color. | |||
|- | |||
|'''Type''' – there are 3 options available - Disabled, Normal, Related. Tone Audio Modules only use the Normal type. | |||
|- | |||
|'''Inverted''' – output will do the opposite of normal. | |||
|- | |||
|'''Default State''' – what the output will do when no commands/actions have been received. | |||
|- | |||
|'''On Delay''' – number of milliseconds to elapse before the output turns on. | |||
|- | |||
|'''Off Delay''' – number of milliseconds to elapse before the output turns off. | |||
|- | |||
|'''Blink On''' – number of milliseconds to stay on during blink - not used with an Audio Module. | |||
|- | |||
|'''Blink Off''' – number or milliseconds to stay off during blink - not used with an Audio Module. | |||
|} | |||
|} | |||
|} | |||
|} | |||
<br> | |||
---- | |||
<br> | |||
{|style="margin:left; width: 100px; background:#eaf3ff; padding:5px; border:2px solid #000000;" | |||
|- | |||
|<big>'''Step 8.'''</big> | |||
{|style="margin:left; width: 800px; background:#F0F0F0; padding:5px; border:2px solid #000000;" | |||
|valign="top" | | |||
|- | |||
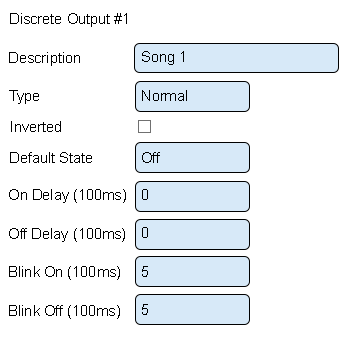
|The setup for each song is exactly the same. Below is how to setup Song 1. | |||
{|style="margin:left;" | |||
|valign="top" | | |||
{|class="wikitable" style="background:white; align:center; width:775px;" | |||
|- | |||
|[[File:3175 10.png|border|center|350px]] | |||
|} | |||
{|class="wikitable" style="background:white; align:center; width:775px;" | |||
|- | |||
|'''Description''' – enter a name - Song 1 or Tone 1 will work best. | |||
|- | |||
|'''Type''' – select Normal. | |||
|- | |||
|'''Inverted''' – leave unchecked. | |||
|- | |||
|'''Default State''' – leave as Off. | |||
|- | |||
|'''On Delay''' – leave as zero. | |||
|- | |||
|'''Off Delay''' – leave as zero. | |||
|- | |||
|'''Blink On''' – leave as five - not used with an Audio Module. | |||
|- | |||
|'''Blink Off''' – leave as five - not used with an Audio Module | |||
|} | |||
|} | |||
|} | |||
|} | |||
<br> | |||
---- | |||
<br> | |||
{|style="margin:left; width: 100px; background:#eaf3ff; padding:5px; border:2px solid #000000;" | |||
|- | |||
|<big>'''Step 9.'''</big> | |||
{|style="margin:left; width: 800px; background:#F0F0F0; padding:5px; border:2px solid #000000;" | |||
|valign="top" | | |||
|- | |||
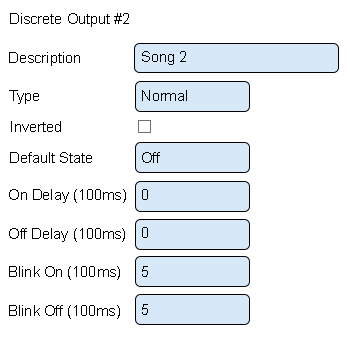
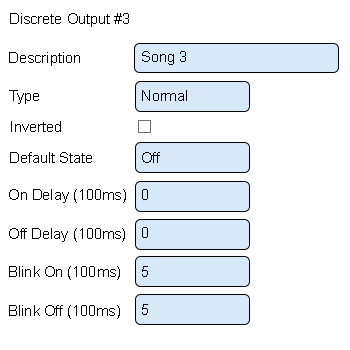
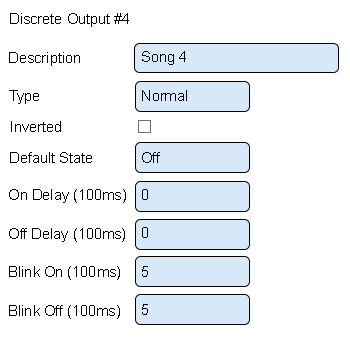
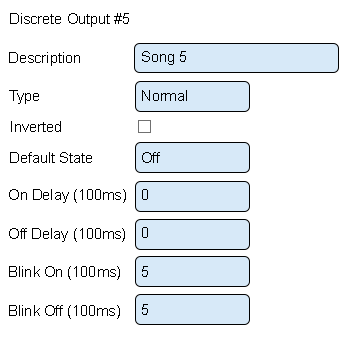
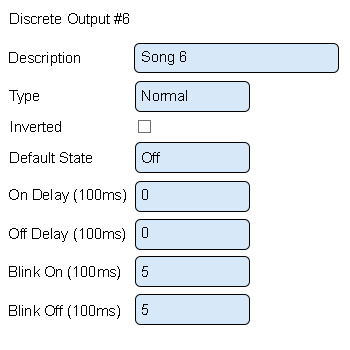
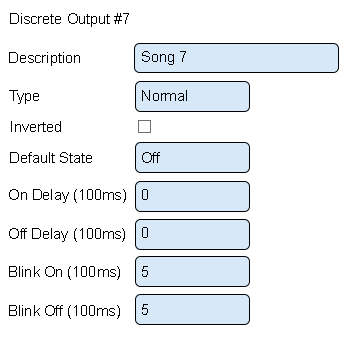
|The setup for each of the songs is the same. Below is an example of the remaining 7 songs. Setup as many songs as is appropriate for your needs. | |||
{|style="margin:left;" | |||
|valign="top" | | |||
{|class="wikitable" style="background:white; align:center; width:775px;" | |||
|- | |||
|[[File:3175_11.png|center|350px]] || [[File:3175_12.png|center|350px]] | |||
|- | |||
|style="text-align:center" | '''Discrete Output 2 - Song 2''' ||style="text-align:center" | '''Discrete Output 3 - Song 3''' | |||
|} | |||
{|class="wikitable" style="background:white; align:center; width:775px;" | |||
|- | |||
|[[File:3175_13.png|center|350px]] || [[File:3175_14.png|center|350px]] | |||
|- | |||
|style="text-align:center" | '''Discrete Output 4 - Song 4''' ||style="text-align:center" | '''Discrete Output 5 - Song 5''' | |||
|} | |||
{|class="wikitable" style="background:white; align:center; width:775px;" | |||
|- | |||
|[[File:AddTone10.png|border|center|350px]] || [[File:AddTone11.png|border|center|350px]] | |||
|- | |||
|style="text-align:center" | '''Discrete Output 6 - Song 6''' ||style="text-align:center" | '''Discrete Output 7 - Song 7''' | |||
|} | |||
|} | |||
|} | |||
|} | |||
<br> | |||
---- | |||
<br> | |||
{|style="margin:left; width: 100px; background:#eaf3ff; padding:5px; border:2px solid #000000;" | |||
|- | |||
|<big>'''Step 10.'''</big> | |||
{|style="margin:left; width: 800px; background:#F0F0F0; padding:5px; border:2px solid #000000;" | |||
|valign="top" | | |||
|- | |||
|Once all of the Outputs/Songs have been added - select the Save & Exit button.. | |||
{|style="margin:left;" | |||
|valign="top" | | |||
{|class="wikitable" style="background:white; align:center;" | |||
|- | |||
|[[File:3104_14.png|center|240px]] | |||
|} | |||
|} | |||
|} | |||
|} | |||
<br> | |||
---- | |||
<br> | |||
{|style="margin:left; width: 100px; background:#eaf3ff; padding:5px; border:2px solid #000000;" | |||
|- | |||
|<big>'''Step 11.'''</big> | |||
{|style="margin:left; width: 800px; background:#F0F0F0; padding:5px; border:2px solid #000000;" | |||
|valign="top" | | |||
|- | |||
|The configuration will need to be sent to the device. | |||
{|style="margin:left;" | |||
|valign="top" | | |||
{|class="wikitable" style="background:white; align:center;" | |||
|- | |||
|[[VT3000_-_Update_Configuration_-_TIM,_PSM,_BSC|'''CLICK HERE''']] for instructions. The instructions show a PSM - the steps are the same for an IO module. | |||
|} | |||
|} | |||
|} | |||
|} | |||
<br> | |||
---- | ---- | ||
---- | ---- | ||
<br> | |||
{|style="margin: auto; background:#eaf3ff; border:1px solid #2a4b8d" | {|style="margin: auto; background:#eaf3ff; border:1px solid #2a4b8d" | ||
|valign="top" | | |valign="top" | | ||
| Line 135: | Line 318: | ||
</inputbox> | </inputbox> | ||
|} | |} | ||
<br> | |||
[[Category:VT3000 Core Software]] | [[Category:VT3000 Core Software]] | ||
[[Category:Device Hardware]] | [[Category:Device Hardware]] | ||
[[Category:Wireless Audio - Tone]] | [[Category:Wireless Audio - Tone]] | ||
Revision as of 22:44, 3 January 2022
|
|
Instructions - Indicator Setup
Step 1.
|
Step 2.
|
Step 3.
|
Step 4.
|
Step 5.
|
Step 6.
|
Step 7.
|
Step 8.
|
Step 9.
|
Step 10.
|
Step 11.
|


