Difference between revisions of "VT3000 Outputs"
Jump to navigation
Jump to search

SupportAdmin (talk | contribs) |
SupportAdmin (talk | contribs) |
||
| (22 intermediate revisions by the same user not shown) | |||
| Line 1: | Line 1: | ||
== | {|style="background:transparent; color:black" border="0" height="230" align="center" valign="bottom" | ||
Any device the VT3000 system has access to notify when an alarm/call is made from a device/module is considered an Output. All outputs must be setup before | |+style="background:transparent| | ||
|-align="center" | |||
== | | | ||
|[[Image:CallUsBtn.png|Call Now 858-677-6766]] | |||
<gallery> | | | ||
|[[Image:SubmitTckBtn.png|link=https://www.versacall.com/customer-support/service-ticket]] | |||
| | |||
|[[Image:EmailUsBtn.png|link=mailto:[email protected]?Subject=Help%20Needed%20Wiki&body=Type%20Message%20Here]] | |||
|} | |||
<BR> | |||
<div style="box-shadow: 0 0 10px 0 #b1d5ee inset; border-radius:5px; padding:10px; padding-left:20px; background:#ebf4fa;"> | |||
<span style="color:#00719e; font-family: Helvetica; font-size:150%; font-variant: small-caps; padding-left:20px;">'''General Information'''</span> | |||
:*Any device the VT3000 system has access to notify when an alarm/call is made from a device/module is considered an Output. | |||
:*All outputs must be setup before they can be added to a Route. | |||
:*Outputs are limited to Pagers, Emails, Text Messages, Radio Channels, Phone Numbers, Microsoft Teams and Output Groups. | |||
</div> | |||
<BR> | |||
<div style="box-shadow: 0 0 10px 0 #b1d5ee inset; border-radius:5px; padding:10px; padding-left:20px; background:#ebf4fa;"> | |||
<span style="color:#00719e; font-family: Helvetica; font-size:150%; font-variant: small-caps; padding-left:20px;">'''Basic Functionality'''</span> | |||
:<span style="color:#90A4AE; font-size:130%">'''Add an Output'''</span> | |||
<gallery widths=100px perrow="4"> | |||
Image:Pager icon.png|<div style="text-align: center; color:#00719e">'''Pager'''</div>|link=VT3000 - Add Pager | |||
Image:Email icon.png|<div style="text-align: center; color:#00719e">'''Email'''</div>|link=VT3000 - Add Email | |||
Image:Text icon.png|<div style="text-align: center; color:#00719e">'''Text Message'''</div>|link=VT3000 - Add Cell Phone (Text Message) | |||
Image:Radio icon.png|<div style="text-align: center; color:#00719e">'''Radio Channel'''</div>|link=VT3000 - Add Radio Channel | |||
Image:Phone icon.png|<div style="text-align: center; color:#00719e">'''Phone Number'''</div>|link=VT3000 - Add Phone Number | |||
Image:TeamLogo.png|<div style="text-align: center; color:#00719e">'''Teams Channel'''</div>|link=VT3000 - Add a Teams Channel | |||
Image:OutputGroupIcon.png|<div style="text-align: center; color:#00719e">'''Output Group'''</div>|link=VT3000 - Add an Output Group | |||
</gallery> | </gallery> | ||
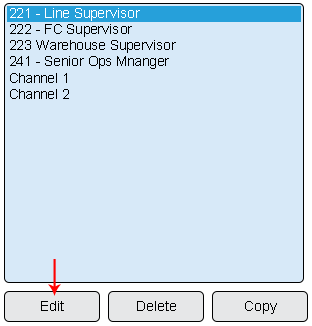
:<span style="color:#90A4AE; font-size:130%">'''Edit an Output''' - Select an existing Output from the list. Select thee '''Edit''' button.</span> | |||
<gallery widths=312px heights=326px> | |||
< | Image:Output Edit.png|link=VT3000 Outputs | ||
</gallery> | </gallery> | ||
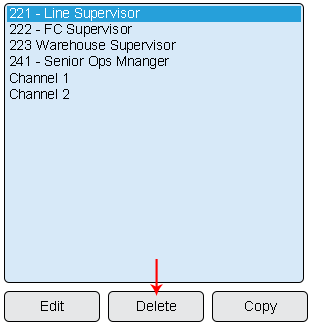
:<span style="color:#90A4AE; font-size:130%">'''Delete an Output''' - Select an existing Output from the list. Select thee '''Delete''' button.</span> | |||
<gallery widths=312px heights=326px> | |||
Image:Output Delete.png|link=VT3000 Outputs | |||
</gallery> | |||
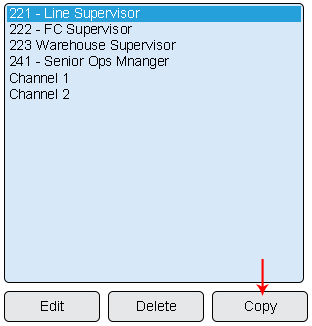
:<span style="color:#90A4AE; font-size:130%">'''Copy an Output''' - Select an existing Output from the list. Select thee '''Copy''' button.</span> | |||
<gallery widths=312px heights=326px> | |||
Image:Output Copy.png|link=VT3000 Outputs | |||
==== | </gallery> | ||
</div> | |||
<BR> | |||
<div style="box-shadow: 0 0 10px 0 #b1d5ee inset; border-radius:5px; padding:10px; padding-left:20px; background:#ebf4fa;"> | |||
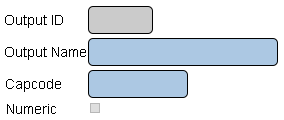
''' | <span style="color:#00719e; font-family: Helvetica; font-size:150%; font-variant: small-caps; padding-left:20px;">'''Pager Properties'''</span> | ||
:*'''Output ID''' - created/generated by the VersaCall software. | |||
''' | :*'''Output Name''' - enter a name for the output. | ||
:*'''Cap Code''' - enter 7 digit Cap Code for the pager. | |||
''' | :*'''Numeric''' - select to only send numbers - no characters. | ||
<gallery widths=284px heights=120px> | |||
''' | Image:Pager Settings.png|link=VT3000 Outputs | ||
</gallery> | |||
</div> | |||
<BR> | |||
<div style="box-shadow: 0 0 10px 0 #b1d5ee inset; border-radius:5px; padding:10px; padding-left:20px; background:#ebf4fa;"> | |||
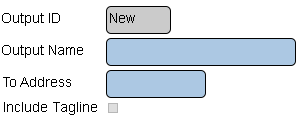
<span style="color:#00719e; font-family: Helvetica; font-size:150%; font-variant: small-caps; padding-left:20px;">'''Email Properties'''</span> | |||
:*'''Output ID''' - created/generated by the VersaCall software. | |||
:*'''Output Name''' - enter a name for the output. | |||
:*'''To Address''' - enter the recipients email address. | |||
:*'''Include Tagline''' - select to show date & time on email. | |||
<gallery widths=300px heights=120px> | |||
Image:Email Settings.png|link=VT3000 Outputs | |||
</gallery> | |||
--- | </div> | ||
<BR> | |||
<div style="box-shadow: 0 0 10px 0 #b1d5ee inset; border-radius:5px; padding:10px; padding-left:20px; background:#ebf4fa;"> | |||
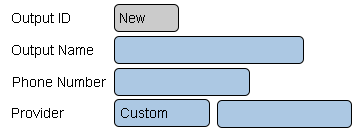
= | <span style="color:#00719e; font-family: Helvetica; font-size:150%; font-variant: small-caps; padding-left:20px;">'''Text Message Properties'''</span> | ||
:*'''Output ID''' - created/generated by the VersaCall software. | |||
:*'''Output Name''' - enter a name for the output. | |||
:*'''Phone Number''' - enter the recipients phone number. | |||
:*'''Provider''' - select the recipients cell phone provider. | |||
<gallery widths=361px heights=132px> | |||
Image:Text Settings.png||link=VT3000 Outputs | |||
''' | </gallery> | ||
</div> | |||
''' | <BR> | ||
<div style="box-shadow: 0 0 10px 0 #b1d5ee inset; border-radius:5px; padding:10px; padding-left:20px; background:#ebf4fa;"> | |||
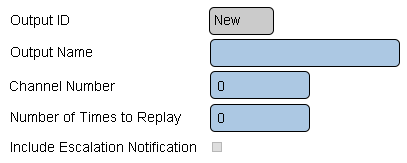
''' | <span style="color:#00719e; font-family: Helvetica; font-size:150%; font-variant: small-caps; padding-left:20px;">'''Radio Channel Properties'''</span> | ||
:*'''Output ID''' - created/generated by the VersaCall software. | |||
''' | :*'''Output Name''' - enter a name for the output. | ||
:*'''Channel Number''' - enter the radio channel number. | |||
:*'''Number of Times to Replay''' - enter number for times message is to be repeated. | |||
:*'''Include Escalation Notification''' - select to broadcast escalation (level reached) messages. | |||
<gallery widths=407px heights=163px> | |||
Image:Radio Settings.png||link=VT3000 Outputs | |||
</gallery> | |||
</div> | |||
<BR> | |||
<div style="box-shadow: 0 0 10px 0 #b1d5ee inset; border-radius:5px; padding:10px; padding-left:20px; background:#ebf4fa;"> | |||
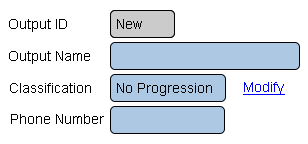
<span style="color:#00719e; font-family: Helvetica; font-size:150%; font-variant: small-caps; padding-left:20px;">'''Phone Number Properties'''</span> | |||
:*'''Output ID''' - created/generated by the VersaCall software. | |||
:*'''Output Name''' - enter a name for the output. | |||
--- | :*'''Classification''' - select the Modify link to access the phone type setup. The step by step guide has information regarding what type of classification is required. | ||
:*'''Phone Number''' - enter the area code and phone number of the recipient. | |||
<gallery widths=308px heights=144px> | |||
= | Image:Phone Settings.png||link=VT3000 Outputs | ||
</gallery> | |||
</div> | |||
<BR> | |||
<div style="box-shadow: 0 0 10px 0 #b1d5ee inset; border-radius:5px; padding:10px; padding-left:20px; background:#ebf4fa;"> | |||
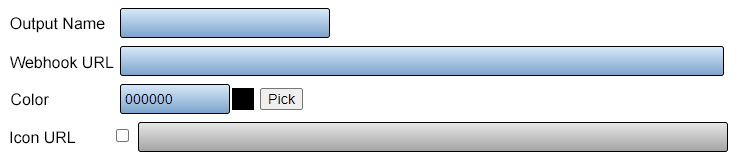
<span style="color:#00719e; font-family: Helvetica; font-size:150%; font-variant: small-caps; padding-left:20px;">'''Teams Channel Properties'''</span> | |||
:*'''Output ID''' - created/generated by the VersaCall software. | |||
''' | :*'''Output Name''' - enter a name for the output. | ||
:*'''Webhook URL''' – enter the Incoming Webhook provided by IT. | |||
''' | :*'''Color''' - enter a Web Color Hex or select the Pick button to select a color from a pallet. This is an optional field (Not Required). | ||
:*'''Icon URL''' - enter a location of a publicly available image/icon. This is an optional field (Not Required). | |||
''' | <gallery widths=738px heights=158px> | ||
Image:Teams-Color-1.png||link=VT3000 Outputs | |||
''' | </gallery> | ||
</div> | |||
<BR> | |||
<div style="box-shadow: 0 0 10px 0 #b1d5ee inset; border-radius:5px; padding:10px; padding-left:20px; background:#ebf4fa;"> | |||
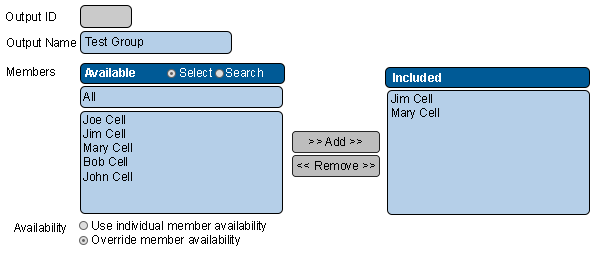
<span style="color:#00719e; font-family: Helvetica; font-size:150%; font-variant: small-caps; padding-left:20px;">'''Output Group Properties'''</span> | |||
:*'''Output ID''' - created/generated by the VersaCall software. | |||
:*'''Output Name''' - enter a name for the output. | |||
:*'''Members''' - select output(s) from the Available list - select the Add button. | |||
:*'''Availability - Use Member Availability''' - use the outputs current availability. | |||
:*'''Availability - Override Member Availability''' - ignore the outputs current availability - set up a new availability for the group. | |||
<gallery widths=600px heights=253px> | |||
Image:OutGroup1.png||link=VT3000 Outputs | |||
</gallery> | |||
--- | </div> | ||
<BR> | |||
<div style="box-shadow: 0 0 10px 0 #b1d5ee inset; border-radius:5px; padding:10px; padding-left:20px; background:#ebf4fa;"> | |||
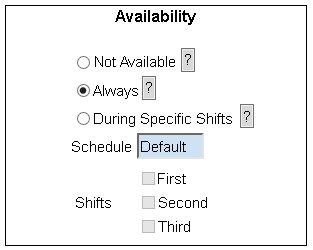
<span style="color:#00719e; font-family: Helvetica; font-size:150%; font-variant: small-caps; padding-left:20px;">'''Availability Properties'''</span> | |||
:*'''Not Available''' - system will not activate the output at anytime. | |||
:*'''Always''' - system will activate the output at all times without regard to day or time. | |||
:*'''During Specific Shifts''' - system will activate the output based on schedule & shifts selected. | |||
<gallery widths=313px heights=250px> | |||
''' | Image:3108 5.png||link=VT3000 Outputs | ||
</gallery> | |||
''' | </div> | ||
<BR> | |||
''' | <div style="box-shadow: 0 0 10px 0 #b1d5ee inset; border-radius:5px; padding:10px; padding-left:20px; background:#ebf4fa;"> | ||
<span style="color:#00719e; font-family: Helvetica; font-size:150%; font-variant: small-caps; padding-left:10px;">'''Keyword Search'''</span> | |||
''' | {|style="margin:auto;" | ||
{|class="wikitable" style="align:center; width:600px;" | |||
''' | |- | ||
!<span style="color:#0054a6; font-size:120%"><big>Type Subject or Key Word to Query Archives</big></span> | |||
|- | |||
|<inputbox>type=search</inputbox> | |||
|} | |||
|} | |||
</div> | |||
<br> | |||
''' | [[File:VC Footer.png|center|link=Main Page]] | ||
{|style="background:transparent; color:black" border="0" height="200" align="center" valign="bottom" cellpadding=10px cellspacing=10px | |||
''' | |+style="background:transparent| | ||
|-align="center" | |||
- | | | ||
|[[File:LinkedIn.png|Follow Us On LinkedIn|link=https://www.linkedin.com/company/versacall/]] | |||
| | |||
|[[File:BlogIcon.png|View our Blog|link=https://www.versacall.com/blog/]] | |||
|} | |||
''' | |||
''' | |||
''' | |||
''' | |||
''' | |||
''' | |||
''' | |||
--- | |||
= | |||
''' | |||
''' | |||
''' | |||
---- | |||
=== | |||
Latest revision as of 14:47, 21 November 2023

|

|

|
General Information
- Any device the VT3000 system has access to notify when an alarm/call is made from a device/module is considered an Output.
- All outputs must be setup before they can be added to a Route.
- Outputs are limited to Pagers, Emails, Text Messages, Radio Channels, Phone Numbers, Microsoft Teams and Output Groups.
Basic Functionality
- Add an Output
 Pager
Pager Email
Email Text Message
 Radio Channel
 Phone Number
 Teams Channel
 Output Group
- Edit an Output - Select an existing Output from the list. Select thee Edit button.
- Delete an Output - Select an existing Output from the list. Select thee Delete button.
- Copy an Output - Select an existing Output from the list. Select thee Copy button.
Pager Properties
- Output ID - created/generated by the VersaCall software.
- Output Name - enter a name for the output.
- Cap Code - enter 7 digit Cap Code for the pager.
- Numeric - select to only send numbers - no characters.
Email Properties
- Output ID - created/generated by the VersaCall software.
- Output Name - enter a name for the output.
- To Address - enter the recipients email address.
- Include Tagline - select to show date & time on email.
Text Message Properties
- Output ID - created/generated by the VersaCall software.
- Output Name - enter a name for the output.
- Phone Number - enter the recipients phone number.
- Provider - select the recipients cell phone provider.
Radio Channel Properties
- Output ID - created/generated by the VersaCall software.
- Output Name - enter a name for the output.
- Channel Number - enter the radio channel number.
- Number of Times to Replay - enter number for times message is to be repeated.
- Include Escalation Notification - select to broadcast escalation (level reached) messages.
Phone Number Properties
- Output ID - created/generated by the VersaCall software.
- Output Name - enter a name for the output.
- Classification - select the Modify link to access the phone type setup. The step by step guide has information regarding what type of classification is required.
- Phone Number - enter the area code and phone number of the recipient.
Teams Channel Properties
- Output ID - created/generated by the VersaCall software.
- Output Name - enter a name for the output.
- Webhook URL – enter the Incoming Webhook provided by IT.
- Color - enter a Web Color Hex or select the Pick button to select a color from a pallet. This is an optional field (Not Required).
- Icon URL - enter a location of a publicly available image/icon. This is an optional field (Not Required).
Output Group Properties
- Output ID - created/generated by the VersaCall software.
- Output Name - enter a name for the output.
- Members - select output(s) from the Available list - select the Add button.
- Availability - Use Member Availability - use the outputs current availability.
- Availability - Override Member Availability - ignore the outputs current availability - set up a new availability for the group.
Availability Properties
- Not Available - system will not activate the output at anytime.
- Always - system will activate the output at all times without regard to day or time.
- During Specific Shifts - system will activate the output based on schedule & shifts selected.
Keyword Search
| Type Subject or Key Word to Query Archives |
|---|

|