Difference between revisions of "VT3000 - Print Out - Route"
Jump to navigation
Jump to search
SupportAdmin (talk | contribs) |
SupportAdmin (talk | contribs) |
||
| (2 intermediate revisions by the same user not shown) | |||
| Line 9: | Line 9: | ||
|[[Image:EmailUsBtn.png|link=mailto:[email protected]?Subject=Help%20Needed%20Wiki&body=Type%20Message%20Here]] | |[[Image:EmailUsBtn.png|link=mailto:[email protected]?Subject=Help%20Needed%20Wiki&body=Type%20Message%20Here]] | ||
|} | |} | ||
[[File:GenInfot-Head.png|300px|link=VT3000 - Print Out - Route]] | |||
<div style="box-shadow:2px 2px 15px #90A4AE; border-radius:5px; padding:10px; width:800px"> | |||
*A Route is a collection of Escalations with specific timing and contacts. | |||
*Routes are created by adding escalations of time with outputs (contacts). | |||
[[File: | *Users can specify what output (contact) is to be alerted based on the alarm and module. | ||
< | *After a Route has been Setup in the System, a Print Out can be created to check accuracy and to view details. | ||
</div> | |||
<BR> | |||
<BR> | |||
[[File:Require-Head.png|300px|link=VT3000 - Print Out - Route]] | |||
<div style="box-shadow:2px 2px 15px #90A4AE; border-radius:5px; padding:10px; width:800px"> | |||
*The VT3000 Core Software installed and running on your system. | |||
*Permission to Print Routes. | |||
*At least one Route Setup on the system. | |||
</div> | |||
< | <BR> | ||
<BR> | |||
[[File:Video-Head.png|300px|link=VT3000 - Print Out - Route]] | |||
<div style="box-shadow:2px 2px 15px #90A4AE; border-radius:5px; padding:10px; width:800px"> | |||
<BR> | |||
<embedvideo service="youtube">https://www.youtube.com/watch?v=ED2vOK2dVgI</embedvideo> | |||
<BR> | |||
</div> | |||
<BR> | |||
<BR> | |||
[[File:Instruction-Head.png|300px|link=VT3000 - Print Out - Route]] | |||
<div style="box-shadow:2px 2px 15px #90A4AE; border-radius:5px; padding:10px; width:800px"> | |||
<BR> | |||
<span style="color:#90A4AE; font-size:130%">'''Step 1'''</span> | |||
<BR> | |||
Open the VT3000 web interface – select VT3000 Core Software - log in – select Configuration – select Routing. | |||
< | <gallery widths=100px> | ||
File:3110_1.png | |||
File:3110_2.png | |||
< | </gallery> | ||
[[File: | </div> | ||
< | <BR> | ||
<div style="box-shadow:2px 2px 15px #90A4AE; border-radius:5px; padding:10px; width:800px"> | |||
<span style="color:#90A4AE; font-size:130%">'''Step 2'''</span> | |||
<BR> | |||
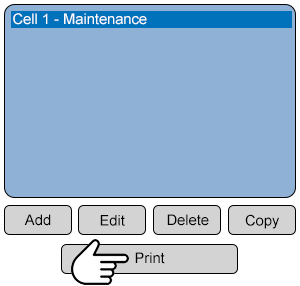
Select a Route on the list - Select the Print button. | |||
<gallery widths=300px heights=286px> | |||
File:PrintRoute-1.png | |||
</gallery> | |||
</div> | |||
<BR> | |||
< | <div style="box-shadow:2px 2px 15px #90A4AE; border-radius:5px; padding:10px; width:800px"> | ||
<span style="color:#90A4AE; font-size:130%">'''Step 3'''</span> | |||
<BR> | |||
< | A new tab will open on the browser - the printout will be similar to the image below. | ||
[[File: | <gallery widths=700px heights=200px> | ||
< | File:PrintRoute-2.png | ||
</gallery> | |||
</div> | |||
<BR> | |||
<div style="box-shadow:2px 2px 15px #90A4AE; border-radius:5px; padding:10px; width:800px"> | |||
<span style="color:#90A4AE; font-size:130%">'''ICON Functionality'''</span> | |||
<BR> | |||
[[File:3127_6.png|border]] - '''Print''' | |||
<BR> | |||
<BR> | |||
[[File:3127_7.png|border]] - '''Download''' | |||
<BR> | |||
<BR> | |||
[[File:3127_8.png|border]] - '''Email VersaCall''' | |||
<BR> | |||
</div> | |||
<BR> | |||
<BR> | |||
[[File:Related-Head.png|300px|link=VT3000 - Print Out - Route]] | |||
< | <div style="box-shadow:2px 2px 15px #90A4AE; border-radius:5px; padding:10px; width:800px"> | ||
< | |||
< | |||
< | |||
< | |||
< | |||
--- | |||
-- | |||
{|style="margin:auto;" | {|style="margin:auto;" | ||
{| class="wikitable mw-collapsible mw-collapsed" width="600px;" | |||
{| class="wikitable mw-collapsible mw-collapsed" width=" | |||
|- | |- | ||
| | |Select a Guide Here | ||
|- | |- | ||
|[[VT3000 - Do Not Send Messages for Breaks|No Communications on Breaks]] | |[[VT3000 - Do Not Send Messages for Breaks|No Communications on Breaks]] | ||
| Line 169: | Line 98: | ||
|} | |} | ||
|} | |} | ||
< | </div> | ||
--- | <BR> | ||
< | <BR> | ||
[[File:Search-Head.png|300px|link=VT3000 - Print Out - Route]] | |||
<div style="box-shadow:2px 2px 15px #90A4AE; border-radius:5px; padding:10px; width:800px"> | |||
{|style="margin:auto;" | {|style="margin:auto;" | ||
| | {|class="wikitable" style="align:center; width:600px;" | ||
|- | |||
!<span style="color:#0054a6; font-size:120%"><big>Type Subject or Key Word to Query Archives</big></span> | |||
|- | |- | ||
|<inputbox>type=search</inputbox> | |<inputbox>type=search</inputbox> | ||
|} | |} | ||
|} | |} | ||
</div> | |||
<br> | <br> | ||
---- | ---- | ||
| Line 189: | Line 120: | ||
|-align="center" | |-align="center" | ||
| | | | ||
|[[File:LinkedIn.png|Follow Us On LinkedIn|link=https://www.linkedin.com/company/versacall | |[[File:LinkedIn.png|Follow Us On LinkedIn|link=https://www.linkedin.com/company/versacall/]] | ||
| | | | ||
|[[File:BlogIcon.png|View our Blog|link=https://www.versacall.com/blog/]] | |[[File:BlogIcon.png|View our Blog|link=https://www.versacall.com/blog/]] | ||
Latest revision as of 20:18, 9 October 2023

|

|

|
- A Route is a collection of Escalations with specific timing and contacts.
- Routes are created by adding escalations of time with outputs (contacts).
- Users can specify what output (contact) is to be alerted based on the alarm and module.
- After a Route has been Setup in the System, a Print Out can be created to check accuracy and to view details.
- The VT3000 Core Software installed and running on your system.
- Permission to Print Routes.
- At least one Route Setup on the system.
Step 1
Open the VT3000 web interface – select VT3000 Core Software - log in – select Configuration – select Routing.
| Select a Guide Here |
| No Communications on Breaks |
| Add a Route |
| Create a Device Configuration Print Out |
| Create a Outputs Print Out |
| Create a Schedule Print Out |
| Create a Shared List Print Out |
| Type Subject or Key Word to Query Archives |
|---|

|


