Difference between revisions of "VT3000 - Add an Alarm to a Process"
Jump to navigation
Jump to search
SupportAdmin (talk | contribs) |
SupportAdmin (talk | contribs) |
||
| Line 1: | Line 1: | ||
{|style="margin:left;" | {|style="margin:left;" | ||
|valign="top" | | |valign="top" | | ||
{|class="wikitable" style="background:#eaf3ff;" | {|class="wikitable" style="background:#eaf3ff; width: 800px;" | ||
|- | |- | ||
!style="text-align: left;"|<big>'''Overview'''</big> | !style="text-align: left;"|<big>'''Overview'''</big> | ||
|- | |- | ||
| | |An Alarm can be added as a subordinate of a Process. This would mean that the Alarm button will not show on the touch screen until after the Process has been started. When the Process is ended the button will be hidden. This guide will only show how to add the alarm to an existing Process. If you need instructions on how to add a process [[VT3000 - Add Process|'''CLICK HERE''']]. Processes with Alarms can be added to the following device types BSC, TIM, PSM, PC BSC, & PC Input Module. | ||
|} | |} | ||
|} | |} | ||
| Line 22: | Line 22: | ||
|- | |- | ||
|'''5.''' Hardware - BSC, TIM or PSM must be powered & communicating with the system. | |'''5.''' Hardware - BSC, TIM or PSM must be powered & communicating with the system. | ||
|- | |||
|'''6.''' A Process must already exist in the device configuration. | |||
|} | |||
|} | |||
<br> | |||
=<big>'''Instructions'''</big>= | |||
<br> | |||
{|style="margin:left; width: 100px; background:#eaf3ff; padding:5px; border:2px solid #000000;" | |||
|- | |||
|<big>'''Step 1.'''</big> | |||
{|style="margin:left; width: 800px; background:#F0F0F0; padding:5px; border:2px solid #000000;" | |||
|valign="top" | | |||
|- | |||
|Open the VT3000 web interface – select VT3000 Core Software - log in – select Configuration – select Routing. | |||
{|style="margin:left;" | |||
|valign="top" | | |||
{|class="wikitable" style=" align="center; " background:white;" | |||
|- | |||
|[[File:3110_1.png|center|93px]] || [[File:3139 2.png|center|93px]] | |||
|- | |||
|style="text-align:center" | '''Configuration''' ||style="text-align:center" | '''Devices''' | |||
|} | |||
|} | |||
|} | |||
|} | |||
<br> | |||
---- | |||
<br> | |||
{|style="margin:left; width: 100px; background:#eaf3ff; padding:5px; border:2px solid #000000;" | |||
|- | |||
|<big>'''Step 2.'''</big> | |||
{|style="margin:left; width: 800px; background:#F0F0F0; padding:5px; border:2px solid #000000;" | |||
|valign="top" | | |||
|- | |||
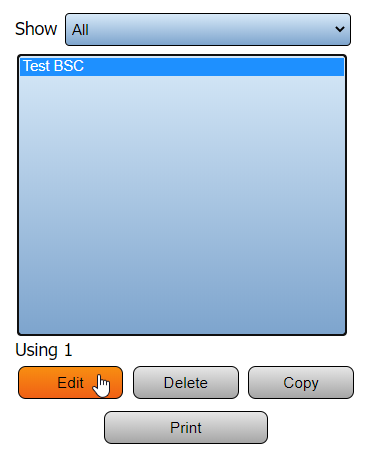
|Select the Device that you want to add the Alarm to from the list - select Edit. | |||
{|style="margin:left;" | |||
|valign="top" | | |||
{|class="wikitable" style=" align="center; " background:white;" | |||
|- | |||
|[[File:BSCCount3.png|center|368px]] | |||
|} | |||
|} | |||
|} | |||
|} | |||
<br> | |||
---- | |||
<br> | |||
{|style="margin:left; width: 100px; background:#eaf3ff; padding:5px; border:2px solid #000000;" | |||
|- | |||
|<big>'''Step 3.'''</big> | |||
{|style="margin:left; width: 800px; background:#F0F0F0; padding:5px; border:2px solid #000000;" | |||
|valign="top" | | |||
|- | |||
|Select the Monitoring Points tab. | |||
{|style="margin:left;" | |||
|valign="top" | | |||
{|class="wikitable" style="background:white;" | |||
|- | |||
|[[File:Reason1.png|center|325px]] | |||
|} | |||
|} | |||
|} | |||
|} | |||
<br> | |||
---- | |||
<br> | |||
{|style="margin:left; width: 100px; background:#eaf3ff; padding:5px; border:2px solid #000000;" | |||
|- | |||
|<big>'''Step 4.'''</big> | |||
{|style="margin:left; width: 800px; background:#F0F0F0; padding:5px; border:2px solid #000000;" | |||
|valign="top" | | |||
|- | |||
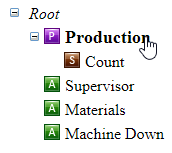
|Select Process that you want to add the Alarm to from the Root. | |||
{|style="margin:left;" | |||
|valign="top" | | |||
{|class="wikitable" style="background:white;" | |||
|- | |||
|[[File:PSM Alarm 3.png|center|172px]] | |||
|} | |||
|} | |||
|} | |||
|} | |||
<br> | |||
---- | |||
<br> | |||
{|style="margin:left; width: 100px; background:#eaf3ff; padding:5px; border:2px solid #000000;" | |||
|- | |||
|<big>'''Step 5.'''</big> | |||
{|style="margin:left; width: 800px; background:#F0F0F0; padding:5px; border:2px solid #000000;" | |||
|valign="top" | | |||
|- | |||
|Select the Add Alarm icon from the toolbox. | |||
{|style="margin:left;" | |||
|valign="top" | | |||
{|class="wikitable" style="background:white;" | |||
|- | |||
|[[File:Reason2.png|center|379px]] | |||
|} | |||
|} | |||
|} | |||
|} | |||
<br> | |||
---- | |||
<br> | |||
{|style="margin:left; width: 100px; background:#eaf3ff; padding:5px; border:2px solid #000000; " | |||
|- | |||
|<big>'''Step 6.'''</big> | |||
{|style="margin:left; width: 800px; background:#F0F0F0; padding:5px; border:2px solid #000000; " | |||
|valign="top" | | |||
|- | |||
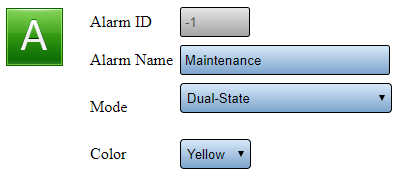
|Alarm Properties - the instructions will only cover alarm modes for buttons. If you are looking for a Label Alarm [[VT3000 - Add Alarm Label|'''CLICK HERE''']] or Contact Alarm [[VT3000 - Add Wired Contact (Alarm)|'''CLICK HERE''']] | |||
{|style="margin:left;" | |||
|valign="top" | | |||
{|class="wikitable" style="background:white; width: 775px;" | |||
|- | |||
|[[File:PSM Alarm 5.png|center|396px]] | |||
|} | |||
{|class="wikitable" style="background:white; width: 775px;" | |||
|- | |||
|'''Alarm ID''' - this is generated by the VT3000 software. | |||
|- | |||
|'''Alarm Name''' – enter a name for the Alarm/button. | |||
|- | |||
|'''MODE - Dual State''' – press the button to set alarm - press the button to clear alarm. | |||
|- | |||
|'''MODE - Dual State with Reason on Clear''' – press the button to set the alarm - press the button to clear the alarm with a list of Reasons. | |||
|- | |||
|'''MODE - Tri-State''' - press the button to set the alarm - press the button to acknowledge the alarm - press the button to clear the alarm. | |||
|- | |||
|'''MODE - Tri-State with Reason on Acknowledge''' - press the button to set the alarm - press the button to acknowledge the alarm with a list of Reasons - press the button to clear the alarm. | |||
|- | |||
|'''MODE - Tri-State with Reason on Clear''' - press the button to set the alarm - press the button to acknowledge the alarm - press the button to clear the alarm with a list of Reasons. | |||
|- | |||
|'''MODE - Mono State''' - press the button once to set & clear the alarm | |||
|- | |||
|'''Color''' - select a color for the button to show as on the touch screen. | |||
|} | |||
|} | |||
|} | |||
|} | |||
<br> | |||
---- | |||
<br> | |||
{|style="margin:left; width: 100px; background:#eaf3ff; padding:5px; border:2px solid #000000;" | |||
|- | |||
|<big>'''Step 7.'''</big> | |||
{|style="margin:left; width: 800px; background:#F0F0F0; padding:5px; border:2px solid #000000;" | |||
|valign="top" | | |||
|- | |||
|After the alarm is setup - select the Process again. The alarm will show as the name entered in Step # 6. | |||
{|style="margin:left;" | |||
|valign="top" | | |||
{|class="wikitable" style="background:white;" | |||
|- | |||
|[[File:PSM Alarm 6.png|center|171px]] | |||
|} | |||
|} | |||
|} | |||
|} | |||
<br> | |||
---- | |||
<br> | |||
{|style="margin:left; width: 100px; background:#eaf3ff; padding:5px; border:2px solid #000000;" | |||
|- | |||
|<big>'''Step 8.'''</big> | |||
{|style="margin:left; width: 800px; background:#F0F0F0; padding:5px; border:2px solid #000000;" | |||
|valign="top" | | |||
|- | |||
|Add additional Alarms by repeating the steps above. Once you have added all Alarms Select Save & Exit. | |||
{|style="margin:left;" | |||
|valign="top" | | |||
{|class="wikitable" style="background:white; width;" | |||
|- | |||
|[[File:3141 15.png|center|252px]] | |||
|} | |||
|} | |||
|} | |} | ||
|} | |} | ||
<br> | |||
< | |||
---- | ---- | ||
---- | ---- | ||
<br> | |||
{|style="margin: auto; background:#eaf3ff; border:1px solid #2a4b8d" | {|style="margin: auto; background:#eaf3ff; border:1px solid #2a4b8d" | ||
|valign="top" | | |valign="top" | | ||
| Line 168: | Line 231: | ||
</inputbox> | </inputbox> | ||
|} | |} | ||
<br> | |||
[[Category:VT3000 Core Software]] | [[Category:VT3000 Core Software]] | ||
[[Category:Configuration]] | [[Category:Configuration]] | ||
Revision as of 20:22, 16 November 2021
|
|
Instructions
Step 1.
|
Step 2.
|
Step 3.
|
Step 4.
|
Step 5.
|
Step 6.
|
Step 7.
|
Step 8.
|
|
| ||||||||


