Difference between revisions of "VT3000 - Add a Static List Data Field - PSM, TIM"
Jump to navigation
Jump to search
SupportAdmin (talk | contribs) |
SupportAdmin (talk | contribs) |
||
| Line 1: | Line 1: | ||
{|style="margin:left;" | {|style="margin:left;" | ||
|valign="top" | | |valign="top" | | ||
{|class="wikitable" style="background:#eaf3ff;" | {|class="wikitable" style="background:#eaf3ff; width: 800px;" | ||
|- | |- | ||
!style="text-align: left;"|<big>'''Overview'''</big> | !style="text-align: left;"|<big>'''Overview'''</big> | ||
| Line 26: | Line 26: | ||
|} | |} | ||
|} | |} | ||
<br> | |||
=Instructions= | =<big>'''Instructions'''</big>= | ||
<br> | |||
'''1.''' Open the VT3000 web interface | {|style="margin:left; width: 100px; background:#eaf3ff; padding:5px; border:2px solid #000000;" | ||
|- | |||
|<big>'''Step 1.'''</big> | |||
{|style="margin:left; width: 800px; background:#F0F0F0; padding:5px; border:2px solid #000000;" | |||
|valign="top" | | |||
|- | |||
File: | |Open the VT3000 web interface – select VT3000 Core Software - log in – select Configuration – select Devices. | ||
File: | {|style="margin:left;" | ||
< | |valign="top" | | ||
{|class="wikitable" style=" align="center; " background:white;" | |||
|- | |||
''' | |[[File:3110_1.png|center|93px]] || [[File:3139 2.png|center|93px]] | ||
|- | |||
|style="text-align:center" | '''Configuration''' ||style="text-align:center" | '''Devices''' | |||
File: | |} | ||
< | |} | ||
|} | |||
|} | |||
''' | <br> | ||
---- | |||
<br> | |||
File: | {|style="margin:left; width: 100px; background:#eaf3ff; padding:5px; border:2px solid #000000;" | ||
< | |- | ||
|<big>'''Step 2.'''</big> | |||
{|style="margin:left; width: 800px; background:#F0F0F0; padding:5px; border:2px solid #000000;" | |||
''' | |valign="top" | | ||
|- | |||
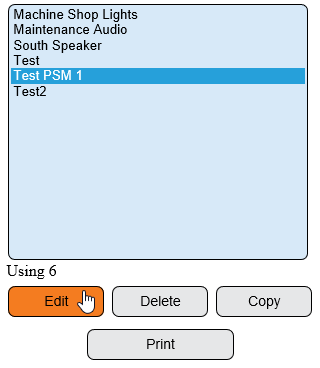
|Select the PSM, TIM or PC Input Device that you want to add the Data Field to from the list - select the Edit button. | |||
File:BSCList7.png | {|style="margin:left;" | ||
< | |valign="top" | | ||
{|class="wikitable" style=" align="center; " background:white;" | |||
|- | |||
''' | |[[File:3139 4.png|center|320px]] | ||
|} | |||
|} | |||
File: | |} | ||
< | |} | ||
<br> | |||
---- | |||
''' | <br> | ||
{|style="margin:left; width: 100px; background:#eaf3ff; padding:5px; border:2px solid #000000;" | |||
|- | |||
File:BSCList1.png | |<big>'''Step 3.'''</big> | ||
{|style="margin:left; width: 800px; background:#F0F0F0; padding:5px; border:2px solid #000000;" | |||
|valign="top" | | |||
|- | |||
|Select the Monitoring Points tab. | |||
{|style="margin:left;" | |||
|valign="top" | | |||
{|class="wikitable" style="background:white;" | |||
|- | |||
|[[File:Reason1.png|center|325px]] | |||
|} | |||
|} | |||
|} | |||
|} | |||
<br> | |||
---- | |||
<br> | |||
{|style="margin:left; width: 100px; background:#eaf3ff; padding:5px; border:2px solid #000000;" | |||
|- | |||
|<big>'''Step 4.'''</big> | |||
{|style="margin:left; width: 800px; background:#F0F0F0; padding:5px; border:2px solid #000000;" | |||
File:BSCList2.png | |valign="top" | | ||
< | |- | ||
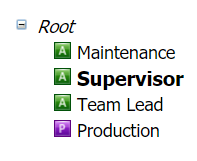
|Select the Alarm or Process that you want to add a Data Field to. Our example will use the Supervisor Alarm. | |||
{|style="margin:left;" | |||
''' | |valign="top" | | ||
{|class="wikitable" style=" align="center; " background:white;" | |||
|- | |||
File:BSCList3.png | |[[File:BSCList7.png|center|197px]] | ||
< | |} | ||
|} | |||
|} | |||
''' | |} | ||
<br> | |||
---- | |||
File:BSCList4.png | <br> | ||
< | {|style="margin:left; width: 100px; background:#eaf3ff; padding:5px; border:2px solid #000000;" | ||
|- | |||
|<big>'''Step 5.'''</big> | |||
''' | {|style="margin:left; width: 800px; background:#F0F0F0; padding:5px; border:2px solid #000000;" | ||
|valign="top" | | |||
|- | |||
File:BSCList8.png | |Select the Add Data Field icon in the Monitoring Points tool box. | ||
{|style="margin:left;" | |||
|valign="top" | | |||
{|class="wikitable" style="background:white;" | |||
|- | |||
|[[File:3163 6.png|center|431px]] | |||
< | |} | ||
|} | |||
< | |} | ||
|} | |||
<br> | |||
''' | ---- | ||
<br> | |||
{|style="margin:left; width: 100px; background:#eaf3ff; padding:5px; border:2px solid #000000;" | |||
File: | |- | ||
|<big>'''Step 6.'''</big> | |||
{|style="margin:left; width: 800px; background:#F0F0F0; padding:5px; border:2px solid #000000;" | |||
|valign="top" | | |||
|- | |||
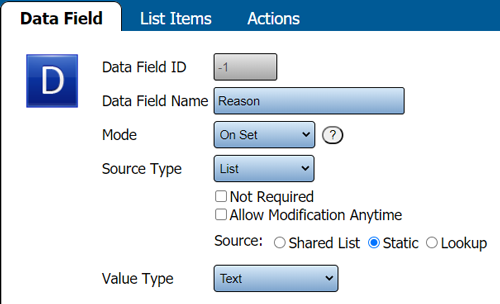
|Data Field Properties - each field is explained below: | |||
< | {|style="margin:left;" | ||
|valign="top" | | |||
< | {|class="wikitable" style="background:white; width: 775px;" | ||
|- | |||
|[[File:BSCList1.png|center|500px]] | |||
|} | |||
{|class="wikitable" style="background:white; width: 775px;" | |||
|- | |||
|'''Data Field Name''' - enter a name, this will show on the device when the field is active. | |||
|- | |||
|'''Mode''' - Processes will have At Start & At End. Alarms will have Set, Acknowledge & Clear depending on the type of alarm. Select the appropriate setting for your configuration. | |||
|- | |||
|'''Source Type''' – select List. | |||
|- | |||
|'''Not Required''' – allows the operator to leave the field blank (no data). | |||
|- | |||
|'''Allow Modification Anytime''' – allows the operator to change the data at any time while the Process/Alarm is active. | |||
|- | |||
|'''Source''' - select Static | |||
|- | |||
|'''VALUE TYPE - Text''' - select Text - this is the only option available for a List. | |||
|} | |||
|} | |||
|} | |||
|} | |||
<br> | |||
---- | |||
<br> | |||
{|style="margin:left; width: 100px; background:#eaf3ff; padding:5px; border:2px solid #000000;" | |||
|- | |||
|<big>'''Step 7.'''</big> | |||
{|style="margin:left; width: 800px; background:#F0F0F0; padding:5px; border:2px solid #000000;" | |||
|valign="top" | | |||
|- | |||
|Select the Items Tab that is now visible in Data Field Properties. | |||
{|style="margin:left;" | |||
|valign="top" | | |||
{|class="wikitable" style="background:white;" | |||
|- | |||
|[[File:BSCList2.png|center|287px]] | |||
|} | |||
|} | |||
|} | |||
|} | |||
<br> | |||
---- | |||
<br> | |||
{|style="margin:left; width: 100px; background:#eaf3ff; padding:5px; border:2px solid #000000;" | |||
|- | |||
|<big>'''Step 8.'''</big> | |||
{|style="margin:left; width: 800px; background:#F0F0F0; padding:5px; border:2px solid #000000;" | |||
|valign="top" | | |||
|- | |||
|Select the Add Item icon in the List Items toolbox. | |||
{|style="margin:left;" | |||
|valign="top" | | |||
{|class="wikitable" style="background:white;" | |||
|- | |||
|[[File:BSCList3.png|center|301px]] | |||
|} | |||
|} | |||
|} | |||
|} | |||
<br> | |||
---- | |||
<br> | |||
{|style="margin:left; width: 100px; background:#eaf3ff; padding:5px; border:2px solid #000000;" | |||
|- | |||
|<big>'''Step 9.'''</big> | |||
{|style="margin:left; width: 800px; background:#F0F0F0; padding:5px; border:2px solid #000000;" | |||
|valign="top" | | |||
|- | |||
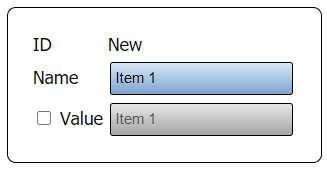
|Enter an description for the item in the Name Field, this will show in the selection list on the touch screen. | |||
{|style="margin:left;" | |||
|valign="top" | | |||
{|class="wikitable" style="background:white;" | |||
|- | |||
|[[File:BSCList4.png|center|327px]] | |||
|} | |||
|} | |||
|} | |||
|} | |||
<br> | |||
---- | |||
<br> | |||
{|style="margin:left; width: 100px; background:#eaf3ff; padding:5px; border:2px solid #000000;" | |||
|- | |||
|<big>'''Step 10.'''</big> | |||
{|style="margin:left; width: 800px; background:#F0F0F0; padding:5px; border:2px solid #000000;" | |||
|valign="top" | | |||
|- | |||
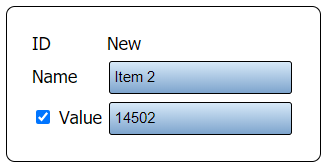
|If you want to have a different name stored in the database, check the box for Value and enter the Name you want recorded in the database. The text you entered in the Name Field will still show on the selection list on the touch screen. | |||
{|style="margin:left;" | |||
|valign="top" | | |||
{|class="wikitable" style="background:white;" | |||
|- | |||
|[[File:BSCList8.png|center|325px]] | |||
|} | |||
|} | |||
|} | |||
|} | |||
<br> | |||
---- | |||
<br> | |||
{|style="margin:left; width: 100px; background:#eaf3ff; padding:5px; border:2px solid #000000;" | |||
|- | |||
|<big>'''Step 11.'''</big> | |||
{|style="margin:left; width: 800px; background:#F0F0F0; padding:5px; border:2px solid #000000;" | |||
|valign="top" | | |||
|- | |||
|Once the Data Field(s) have been setup - select the Save & Exit button to save the changes. | |||
{|style="margin:left;" | |||
|valign="top" | | |||
{|class="wikitable" style="background:white;" | |||
|- | |||
|[[File:VCount4.png|center|225px]] | |||
|} | |||
|} | |||
|} | |||
|} | |||
<br> | |||
---- | |||
<br> | |||
{|style="margin:left; width: 100px; background:#eaf3ff; padding:5px; border:2px solid #000000;" | |||
|- | |||
|<big>'''Step 12.'''</big> | |||
{|style="margin:left; width: 800px; background:#F0F0F0; padding:5px; border:2px solid #000000;" | |||
|valign="top" | | |||
|- | |||
|The PSM & TIM module will have to be updated before the Data Field will appear on the screen. [[VT3000_-_Update_Configuration_-_TIM,_PSM,_BSC|'''Click Here''']] for instructions on updating the module. | |||
|} | |||
|} | |||
<br> | |||
---- | ---- | ||
---- | ---- | ||
<br> | |||
{|style="margin: auto; background:#eaf3ff; border:1px solid #2a4b8d" | {|style="margin: auto; background:#eaf3ff; border:1px solid #2a4b8d" | ||
|valign="top" | | |valign="top" | | ||
| Line 181: | Line 302: | ||
</inputbox> | </inputbox> | ||
|} | |} | ||
<br> | |||
[[Category:VT3000 Core Software]] | [[Category:VT3000 Core Software]] | ||
[[Category:Configuration]] | [[Category:Configuration]] | ||
Revision as of 16:15, 19 November 2021
|
|
Instructions
Step 1.
|
Step 2.
|
Step 3.
|
Step 4.
|
Step 5.
|
Step 6.
|
Step 7.
|
Step 8.
|
Step 9.
|
Step 10.
|
Step 11.
|
Step 12.
|
| ||||


