Difference between revisions of "VT3000 - Find Database Locations - VT3000 Core"
Jump to navigation
Jump to search
SupportAdmin (talk | contribs) |
SupportAdmin (talk | contribs) |
||
| Line 1: | Line 1: | ||
{|style="margin:left;" | {|style="margin:left;" | ||
|valign="top" | | |valign="top" | | ||
{|class="wikitable" style="background:#eaf3ff;" | {|class="wikitable" style="background:#eaf3ff; width:800px;" | ||
|- | |- | ||
!style="text-align: left;"|<big>'''Overview'''</big> | !style="text-align: left;"|<big>'''Overview'''</big> | ||
| Line 10: | Line 10: | ||
{|style="margin:left;" | {|style="margin:left;" | ||
|valign="top" | | |valign="top" | | ||
{|class="wikitable mw-collapsible mw-collapsed" style="background:#eaf3ff; width: 800px;" | {|class="wikitable mw-collapsible mw-collapsed" style="background:#eaf3ff; width:800px;" | ||
!style="text-align: left;"|<big>'''Requirements'''</big> | !style="text-align: left;"|<big>'''Requirements'''</big> | ||
|- | |- | ||
| Line 18: | Line 18: | ||
|} | |} | ||
|} | |} | ||
<br> | |||
=Instructions= | =<big>'''Instructions'''</big>= | ||
<br> | |||
'''1.''' Open the VT3000 web interface - log in | {|style="margin:left; width: 100px; background:#eaf3ff; padding:5px; border:2px solid #000000;" | ||
|- | |||
|<big>'''Step 1.'''</big> | |||
File: | {|style="margin:left; width: 800px; background:#F0F0F0; padding:5px; border:2px solid #000000;" | ||
File: | |valign="top" | | ||
File: | |- | ||
< | |Open the VT3000 web interface – select VT3000 Core Software - log in – select Administration - System Settings - Global. | ||
{|style="margin:left;" | |||
|valign="top" | | |||
'''2.''' Scroll down to the Database | {|class="wikitable" style="background:white; align:center;" | ||
|- | |||
|[[File:3180 1.png|center|93px]] || [[File:3180 2.png|center|93px]] || [[File:3180 3.png|center|93px]] | |||
File:DataGlobal5.png | |- | ||
< | |style="text-align:center" | '''Administration''' ||style="text-align:center" | '''System Settings''' ||style="text-align:center" | '''Global''' | ||
|} | |||
|} | |||
'''3.''' For the VT3000 Core Software, there will be 3 databases shown. Each of these databases is needed to allow the software to function properly | |} | ||
|} | |||
<br> | |||
File:DataGlobal1.png | ---- | ||
< | <br> | ||
{|style="margin:left; width: 100px; background:#eaf3ff; padding:5px; border:2px solid #000000;" | |||
|- | |||
'''4.''' Click on the expand icon for one or more of the databases listed. | |<big>'''Step 2.'''</big> | ||
{|style="margin:left; width: 800px; background:#F0F0F0; padding:5px; border:2px solid #000000;" | |||
|valign="top" | | |||
File:DataGlobal2.png | |- | ||
< | |Scroll down to the Database Location section under the General Information/Settings section. | ||
{|style="margin:left;" | |||
|valign="top" | | |||
'''5.''' | {|class="wikitable" style="background:white; align:center;" | ||
|- | |||
|[[File:DataGlobal5.png|center|178px]] | |||
File:DataGlobal3.png | |} | ||
|} | |||
|} | |||
|} | |||
<br> | |||
---- | |||
<br> | |||
{|style="margin:left; width: 100px; background:#eaf3ff; padding:5px; border:2px solid #000000;" | |||
|- | |||
|<big>'''Step 3.'''</big> | |||
'''6.''' You can expand other databases to find their specific information. Once you have the information that you need, select the Discard & Exit button at the top right corner of the page. | {|style="margin:left; width: 800px; background:#F0F0F0; padding:5px; border:2px solid #000000;" | ||
|valign="top" | | |||
|- | |||
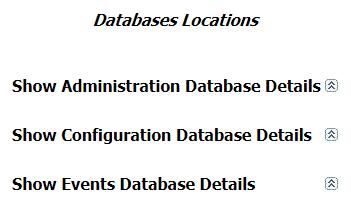
File:DataGlobal4.png | |For the VT3000 Core Software, there will be 3 databases shown. Each of these databases is needed to allow the software to function properly. | ||
< | {|style="margin:left;" | ||
|valign="top" | | |||
{|class="wikitable" style="background:white; align:center;" | |||
|- | |||
|[[File:DataGlobal1.png|center|351px]] | |||
|} | |||
|} | |||
|} | |||
|} | |||
<br> | |||
---- | |||
<br> | |||
{|style="margin:left; width: 100px; background:#eaf3ff; padding:5px; border:2px solid #000000;" | |||
|- | |||
|<big>'''Step 4.'''</big> | |||
{|style="margin:left; width: 800px; background:#F0F0F0; padding:5px; border:2px solid #000000;" | |||
|valign="top" | | |||
|- | |||
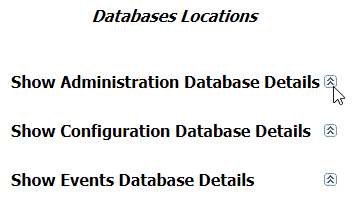
|Click on the expand icon for one or more of the databases listed. | |||
{|style="margin:left;" | |||
|valign="top" | | |||
{|class="wikitable" style="background:white; align:center;" | |||
|- | |||
|[[File:DataGlobal2.png|center|354px]] | |||
|} | |||
|} | |||
|} | |||
|} | |||
<br> | |||
---- | |||
<br> | |||
{|style="margin:left; width: 100px; background:#eaf3ff; padding:5px; border:2px solid #000000;" | |||
|- | |||
|<big>'''Step 5.'''</big> | |||
{|style="margin:left; width: 800px; background:#F0F0F0; padding:5px; border:2px solid #000000;" | |||
|valign="top" | | |||
|- | |||
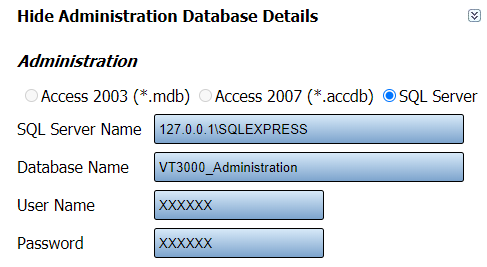
|Database Details: | |||
{|style="margin:left;" | |||
|valign="top" | | |||
{|class="wikitable" style="background:white; align:center;" | |||
|- | |||
|[[File:DataGlobal3.png|center|487px]] | |||
|} | |||
{|class="wikitable" style="background:white; align:center;" | |||
|- | |||
|'''Database Type''' - radio button for the type being used will be in blue. By default, all databases will be SQL Server. | |||
|- | |||
|'''SQL Server Name''' - the IP Address of the SQL Server and the Instance name. | |||
|- | |||
|'''Database Name''' - name of the database in SQL Server. | |||
|- | |||
|'''User Name''' - user name being used in SQL Server. | |||
|- | |||
|'''Password''' - password being used in SQL Server. | |||
|} | |||
|} | |||
|} | |||
|} | |||
<br> | |||
---- | |||
<br> | |||
{|style="margin:left; width: 100px; background:#eaf3ff; padding:5px; border:2px solid #000000;" | |||
|- | |||
|<big>'''Step 6.'''</big> | |||
{|style="margin:left; width: 800px; background:#F0F0F0; padding:5px; border:2px solid #000000;" | |||
|valign="top" | | |||
|- | |||
|You can expand other databases to find their specific information. Once you have the information that you need, select the Discard & Exit button at the top right corner of the page. | |||
{|style="margin:left;" | |||
|valign="top" | | |||
{|class="wikitable" style="background:white; align:center;" | |||
|- | |||
|[[File:DataGlobal4.png|center|127px]] | |||
|} | |||
|} | |||
|} | |||
|} | |||
<br> | |||
---- | ---- | ||
---- | ---- | ||
<br> | |||
{|style="margin: auto; background:#eaf3ff; border:1px solid #2a4b8d" | {|style="margin: auto; background:#eaf3ff; border:1px solid #2a4b8d" | ||
|valign="top" | | |valign="top" | | ||
| Line 120: | Line 197: | ||
</inputbox> | </inputbox> | ||
|} | |} | ||
<br> | |||
[[Category:VT3000 Core Software]] | [[Category:VT3000 Core Software]] | ||
[[Category:Administration]] | [[Category:Administration]] | ||
[[Category:System Settings]] | [[Category:System Settings]] | ||
Revision as of 22:42, 10 December 2021
|
|
Instructions
Step 1.
|
Step 2.
|
Step 3.
|
Step 4.
|
Step 5.
|
Step 6.
|


