Difference between revisions of "VT3000 Outputs"
SupportAdmin (talk | contribs) |
SupportAdmin (talk | contribs) |
||
| Line 14: | Line 14: | ||
<gallery> | <gallery widths=250 heights=250> | ||
File:Output Edit.png|'''Edit Output''' - select an output - select Edit. See specific output about settings. | File:Output Edit.png|'''Edit Output''' - select an output - select Edit. See specific output about settings. | ||
File:Output Delete.png|'''Delete Output''' - select an output - select Delete. Select OK on confirmation screen. | File:Output Delete.png|'''Delete Output''' - select an output - select Delete. Select OK on confirmation screen. | ||
| Line 26: | Line 26: | ||
==Pager Settings== | ==Pager Settings== | ||
<gallery widths=300> | |||
File:Pager Settings.png | |||
</gallery> | |||
'''1. Output ID''' - assigned by VT3000 software. | '''1. Output ID''' - assigned by VT3000 software. | ||
| Line 38: | Line 42: | ||
==Save Pager== | ==Save Pager== | ||
<gallery widths=300 heights=100> | |||
File:Output Save.png | |||
</gallery> | |||
'''1. Save & Add New''' - save current pager - loads empty page to add another. | '''1. Save & Add New''' - save current pager - loads empty page to add another. | ||
| Line 52: | Line 60: | ||
==Email Settings== | ==Email Settings== | ||
<gallery widths=300> | |||
File:Email Settings.png | |||
</gallery> | |||
'''1. Output ID''' - assigned by VT3000 software. | '''1. Output ID''' - assigned by VT3000 software. | ||
| Line 64: | Line 76: | ||
==Save Email== | ==Save Email== | ||
<gallery widths=300 heights=100> | |||
File:Output Save.png | |||
</gallery> | |||
'''1. Save & Add New''' - save current email - loads empty page to add another. | '''1. Save & Add New''' - save current email - loads empty page to add another. | ||
| Line 78: | Line 94: | ||
==Text Message Settings== | ==Text Message Settings== | ||
<gallery widths=300> | |||
File:Text Settings.png | |||
</gallery> | |||
'''1. Output ID''' - assigned by VT3000 software. | '''1. Output ID''' - assigned by VT3000 software. | ||
| Line 90: | Line 110: | ||
==Saving Text Message== | ==Saving Text Message== | ||
<gallery widths=300 heights=100> | |||
File:Output Save.png | |||
</gallery> | |||
'''1. Save & Add New''' - save current cell phone - loads empty page to add another. | '''1. Save & Add New''' - save current cell phone - loads empty page to add another. | ||
| Line 104: | Line 128: | ||
==Radio Channel Settings== | ==Radio Channel Settings== | ||
<gallery widths=300> | |||
File:Radio Settings.png | |||
</gallery> | |||
'''1. Output ID''' - assigned by VT3000 software. | '''1. Output ID''' - assigned by VT3000 software. | ||
| Line 118: | Line 146: | ||
==Save Radio Channel== | ==Save Radio Channel== | ||
<gallery widths=300 heights=100> | |||
File:Output Save.png | |||
</gallery> | |||
| Line 131: | Line 162: | ||
==Phone Number Settings== | ==Phone Number Settings== | ||
<gallery widths=300> | |||
File:Phone Settings.png | |||
</gallery> | |||
'''1. Output ID''' - assigned by VT3000 software. | '''1. Output ID''' - assigned by VT3000 software. | ||
| Line 148: | Line 183: | ||
==Save Phone Number== | ==Save Phone Number== | ||
<gallery widths=300 heights=100> | |||
File:Output Save.png | |||
</gallery> | |||
'''1. Save & Add New''' - save current phone - loads empty page to add another. | '''1. Save & Add New''' - save current phone - loads empty page to add another. | ||
| Line 162: | Line 201: | ||
==Group Settings== | ==Group Settings== | ||
<gallery widths=600 heights=300> | |||
File:OutGroup1.png | |||
</gallery> | |||
'''1. Output ID''' - assigned by VT3000 software. | '''1. Output ID''' - assigned by VT3000 software. | ||
| Line 177: | Line 219: | ||
==Save Group== | ==Save Group== | ||
<gallery widths=300 heights=100> | |||
File:Output Save.png | |||
</gallery> | |||
'''1. Save & Add New''' - save current group - loads empty page to add another. | '''1. Save & Add New''' - save current group - loads empty page to add another. | ||
| Line 192: | Line 238: | ||
==Availability Settings== | ==Availability Settings== | ||
<gallery widths=250 heights=200> | |||
File:Avail Settings.png | |||
</gallery> | |||
'''1. Not Available''' - system will not activate the output at anytime. | '''1. Not Available''' - system will not activate the output at anytime. | ||
Revision as of 15:49, 10 August 2018
Outputs
Any device the VT3000 system has access to notify when an alarm/call is made from a device/module is considered an Output. All outputs must be setup before it can be added to a route. Outputs are limited to Pagers, Emails, Text Messages, Radio Channels, Phone Numbers and Output Groups.
Basic Functionality
On-Site Pager
Use this type of output if the system has a paging transmitter attached and installed. VersaGold pagers are required, the user will need the Cap Code of each pager – a Cap Code is a 7-digit number found on a sticker placed on the back side of a VersaGold pager. If there is no sticker attached to the pagers use VT3000 - Program a Pager - Capcode to access or program the Cap Code.
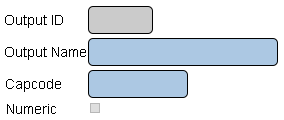
Pager Settings
1. Output ID - assigned by VT3000 software.
2. Output Name - enter a name for the pager.
3. Cap Code - enter 7 digit Cap Code for the pager.
4. Numeric - select to only send numbers - no characters.
Save Pager
1. Save & Add New - save current pager - loads empty page to add another.
2. Save & Exit - save the current pager - return to Outputs page.
3. Discard & Exit - delete the current pager - return to Outputs page.
Email Address
Use this type of output if the system has been set up to send emails. If you are not sure about email being setup, use VT3000 - Setup - Email Server (SMTP) to check and/or setup email.
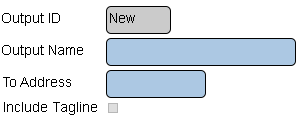
Email Settings
1. Output ID - assigned by VT3000 software.
2. Output Name - enter name recepient.
3. To Address - enter the email address.
4. Include Tagline - select to show date & time on email.
Save Email
1. Save & Add New - save current email - loads empty page to add another.
2. Save & Exit - save the current email - return to Outputs page.
3. Discard & Exit - delete the current email - return to Outputs page.
Text Message
Use this type of output if the system has been set up to send emails. If you are not sure about email being setup, use VT3000 - Setup - Email Server (SMTP) to check and/or setup email. In order to setup the cell phone to receive messages, you will need the phone number (area code + number) and the service provider.
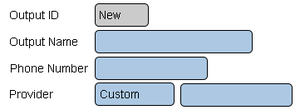
Text Message Settings
1. Output ID - assigned by VT3000 software.
2. Output Name - enter name of recepient.
3. Phone Number - enter phone number with area code.
4. Provider - select service provider or use custom.
Saving Text Message
1. Save & Add New - save current cell phone - loads empty page to add another.
2. Save & Exit - save the current cell phone - return to Outputs page.
3. Discard & Exit - delete the current cell phone - return to Outputs page.
Radio Channel
Use this type of output if the system has a Radio Module connected and functioning on the VersaCall system. Only the channel number is needed to setup this type of output.
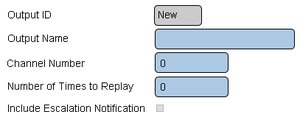
Radio Channel Settings
1. Output ID - assigned by VT3000 software.
2. Output Name - enter a name for the channel.
3. Channel Number - enter the radio channel number.
4. Number of Times to Replay - enter number for times message is to be repeated.
5. Include Escalation Notification - select to broadcast escalation messages.
Save Radio Channel
2. Save & Exit - save the current channel - return to Outputs page.
3. Discard & Exit - delete the current channel - return to Outputs page.
Phone Number
Use this type of output if the system has a Phone Modem connected and functioning on the VersaCall system. The modem is connected to the system by USB. To setup this type of output you will need to know if the number is an Extension, PA System or Standard Phone Number.
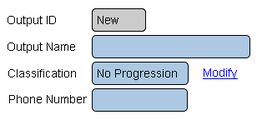
Phone Number Settings
1. Output ID - assigned by VT3000 software.
2. Output Name - enter a name for the phone.
3. Classification - select an option for the phone.
    a. No Progression - for custom phone types.
    b. Office Extension - using a direct line to call an ext.
    c. PA System - using a PA system for calls.
    d. Standard - using normal calling method.
4. Phone Number - enter area code & phone number.
Save Phone Number
1. Save & Add New - save current phone - loads empty page to add another.
2. Save & Exit - save the current phone - return to Outputs page.
3. Discard & Exit - delete the current phone - return to Outputs page.
Output Group
Use this type of output when you want to group multiple outputs. This feature also allows the user to setup a different availability time for the group rather than the individual output.
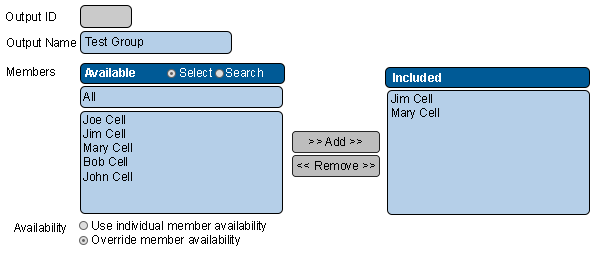
Group Settings
1. Output ID - assigned by VT3000 software.
2. Output Name - enter a name for the group.
3. Members - select output - select the Add button.
4. Availability - there are 2 options.
    a. Use individual member availability - use the ouputs current availability.
    b. Override member availability - ignore the outputs current availability - set up a new availability for the group.
Save Group
1. Save & Add New - save current group - loads empty page to add another.
2. Save & Exit - save the current group - return to Outputs page.
3. Discard & Exit - delete the current group - return to Outputs page.
Output Availability
All output devices have an Availability selection. This is used to tell the system when the specific output can be activated.
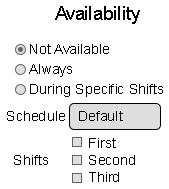
Availability Settings
1. Not Available - system will not activate the output at anytime.
2. Always - system will activate the output at all times without regard to day or time.
3. During Specific Shifts - system will activate the output based on schedule & shifts selected.
Step by Step Guides
Add a Cell Phone (Text Message)
Create a Print Out of Output(s)


