Difference between revisions of "VT3000 - Setup - Device Monitoring"
Jump to navigation
Jump to search
SupportAdmin (talk | contribs) |
SupportAdmin (talk | contribs) |
||
| Line 1: | Line 1: | ||
{|style="margin:left;" | {|style="margin:left;" | ||
|valign="top" | | |valign="top" | | ||
{|class="wikitable" style="background:#eaf3ff;" | {|class="wikitable" style="background:#eaf3ff; width:800px;" | ||
|- | |- | ||
!style="text-align: left;"|<big>'''Overview'''</big> | !style="text-align: left;"|<big>'''Overview'''</big> | ||
| Line 10: | Line 10: | ||
{|style="margin:left;" | {|style="margin:left;" | ||
|valign="top" | | |valign="top" | | ||
{|class="wikitable mw-collapsible mw-collapsed" style="background:#eaf3ff; width: 800px;" | {|class="wikitable mw-collapsible mw-collapsed" style="background:#eaf3ff; width:800px;" | ||
!style="text-align: left;"|<big>'''Requirements'''</big> | !style="text-align: left;"|<big>'''Requirements'''</big> | ||
|- | |- | ||
| Line 22: | Line 22: | ||
|} | |} | ||
|} | |} | ||
<br> | |||
=Instructions= | =<big>'''Instructions'''</big>= | ||
<br> | |||
'''1.''' Open the VT3000 web interface - log in | {|style="margin:left; width: 100px; background:#eaf3ff; padding:5px; border:2px solid #000000;" | ||
|- | |||
|<big>'''Step 1.'''</big> | |||
File: | {|style="margin:left; width: 800px; background:#F0F0F0; padding:5px; border:2px solid #000000;" | ||
File: | |valign="top" | | ||
File: | |- | ||
< | |Open the VT3000 web interface – select VT3000 Core Software - log in – select Diagnostics – select Logs. | ||
{|style="margin:left;" | |||
|valign="top" | | |||
'''2.''' Scroll down to the System Monitoring section. | {|class="wikitable" style="background:white; align:center;" | ||
|- | |||
|[[File:3180 1.png|center|93px]] || [[File:3180 2.png|center|93px]] || [[File:3180 3.png|center|93px]] | |||
File:Monitor4.png | |- | ||
< | |style="text-align:center" | '''Administration''' ||style="text-align:center" | '''System Settings''' ||style="text-align:center" | '''Global''' | ||
|} | |||
|} | |||
'''3.''' Select | |} | ||
|} | |||
<br> | |||
File:Monitor1.png | ---- | ||
<br> | |||
{|style="margin:left; width: 100px; background:#eaf3ff; padding:5px; border:2px solid #000000;" | |||
|- | |||
|<big>'''Step 2.'''</big> | |||
{|style="margin:left; width: 800px; background:#F0F0F0; padding:5px; border:2px solid #000000;" | |||
|valign="top" | | |||
|- | |||
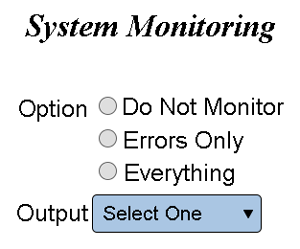
'''4.''' | |Scroll down to the System Monitoring section at the bottom of the page. | ||
{|style="margin:left;" | |||
|valign="top" | | |||
File:Monitor2.png | {|class="wikitable" style="background:white; align:center;" | ||
< | |- | ||
|[[File:Monitor4.png|center|300px]] | |||
|} | |||
'''5.''' Select Save & Exit | |} | ||
|} | |||
|} | |||
File:Radio11.png | <br> | ||
< | ---- | ||
<br> | |||
{|style="margin:left; width: 100px; background:#eaf3ff; padding:5px; border:2px solid #000000;" | |||
'''6.''' A warning message will appear stating that you must restart the | |- | ||
|<big>'''Step 3.'''</big> | |||
{|style="margin:left; width: 800px; background:#F0F0F0; padding:5px; border:2px solid #000000;" | |||
File:Monitor3.png | |valign="top" | | ||
< | |- | ||
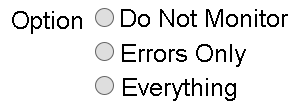
|Select the Monitoring Option that best fits your needs. | |||
{|style="margin:left;" | |||
'''7.''' | |valign="top" | | ||
{|class="wikitable" style="background:white; align:center;" | |||
|- | |||
|[[File:Monitor1.png|center|296px]] | |||
|} | |||
{|class="wikitable" style="background:white; align:center;" | |||
|- | |||
|'''Do Not Monitor''' - this is the default setting, nothing will be monitored. | |||
|- | |||
|'''Errors Only''' - select this option to monitor only errors (Low Battery, Bad SD Card & File Not Received). | |||
|- | |||
|'''Everything''' - select this option to monitor errors and communications between the device & the coordinator. Devices check in with the coordinator every 30 - 45 minutes, if that check in is missed that error will be communicated. | |||
|} | |||
|} | |||
|} | |||
|} | |||
<br> | |||
---- | |||
<br> | |||
{|style="margin:left; width: 100px; background:#eaf3ff; padding:5px; border:2px solid #000000;" | |||
|- | |||
|<big>'''Step 4.'''</big> | |||
{|style="margin:left; width: 800px; background:#F0F0F0; padding:5px; border:2px solid #000000;" | |||
|valign="top" | | |||
|- | |||
|Select the down arrow for the Output field - select an individual Output to communicate or an Output Group to communicate with. | |||
{|style="margin:left;" | |||
|valign="top" | | |||
{|class="wikitable" style="background:white; align:center;" | |||
|- | |||
|[[File:Monitor2.png|center|273px]] | |||
|} | |||
|} | |||
|} | |||
|} | |||
<br> | |||
---- | |||
<br> | |||
{|style="margin:left; width: 100px; background:#eaf3ff; padding:5px; border:2px solid #000000;" | |||
|- | |||
|<big>'''Step 5.'''</big> | |||
{|style="margin:left; width: 800px; background:#F0F0F0; padding:5px; border:2px solid #000000;" | |||
|valign="top" | | |||
|- | |||
|Select the Save & Exit button in the top right corner of the page. | |||
{|style="margin:left;" | |||
|valign="top" | | |||
{|class="wikitable" style="background:white; align:center;" | |||
|- | |||
|[[File:Radio11.png|center|109px]] | |||
|} | |||
|} | |||
|} | |||
|} | |||
<br> | |||
---- | |||
<br> | |||
{|style="margin:left; width: 100px; background:#eaf3ff; padding:5px; border:2px solid #000000;" | |||
|- | |||
|<big>'''Step 6.'''</big> | |||
{|style="margin:left; width: 800px; background:#F0F0F0; padding:5px; border:2px solid #000000;" | |||
|valign="top" | | |||
|- | |||
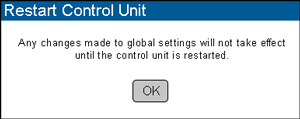
|A warning message will appear stating that you must restart the VT3000 Service - select OK. | |||
{|style="margin:left;" | |||
|valign="top" | | |||
{|class="wikitable" style="background:white; align:center;" | |||
|- | |||
|[[File:Monitor3.png|center|300px]] | |||
|} | |||
|} | |||
|} | |||
|} | |||
<br> | |||
---- | |||
<br> | |||
{|style="margin:left; width: 100px; background:#eaf3ff; padding:5px; border:2px solid #000000;" | |||
|- | |||
|<big>'''Step 7.'''</big> | |||
{|style="margin:left; width: 800px; background:#F0F0F0; padding:5px; border:2px solid #000000;" | |||
|valign="top" | | |||
|- | |||
|The VT3000 service must be restarted [[VT3000 - Restart Service|'''Click Here''']] for instructions. | |||
|} | |||
|} | |||
<br> | |||
---- | ---- | ||
---- | ---- | ||
<br> | |||
{|style="margin: auto; background:#eaf3ff; border:1px solid #2a4b8d" | {|style="margin: auto; background:#eaf3ff; border:1px solid #2a4b8d" | ||
|valign="top" | | |valign="top" | | ||
| Line 125: | Line 209: | ||
</inputbox> | </inputbox> | ||
|} | |} | ||
<br> | |||
[[Category:VT3000 Core Software]] | [[Category:VT3000 Core Software]] | ||
[[Category:Administration]] | [[Category:Administration]] | ||
[[Category:System Settings]] | [[Category:System Settings]] | ||
Revision as of 22:15, 10 December 2021
|
|
Instructions
Step 1.
|
Step 2.
|
Step 3.
|
Step 4.
|
Step 5.
|
Step 6.
|
Step 7.
|


