Difference between revisions of "Installation"
Jump to navigation
Jump to search

SupportAdmin (talk | contribs) |
SupportAdmin (talk | contribs) |
||
| (22 intermediate revisions by the same user not shown) | |||
| Line 1: | Line 1: | ||
= | {|style="background:transparent; color:black" border="0" height="230" align="center" valign="bottom" | ||
|+style="background:transparent| | |||
|-align="center" | |||
| | |||
|[[Image:CallUsBtn.png|Call Now 858-677-6766]] | |||
| | |||
|[[Image:SubmitTckBtn.png|link=https://www.versacall.com/customer-support/service-ticket]] | |||
| | |||
|[[Image:EmailUsBtn.png|link=mailto:[email protected]?Subject=Help%20Needed%20Wiki&body=Type%20Message%20Here]] | |||
|} | |||
<BR> | |||
<div style="box-shadow: 0 0 10px 0 #b1d5ee inset; border-radius:5px; padding:10px; padding-left:20px; background:#ebf4fa;"> | |||
<span style="color:#00719e; font-family: Helvetica; font-size:150%; font-variant: small-caps; padding-left:20px;">'''General Information'''</span> | |||
<BR> | |||
< | :This page is designed to help you get your VersaCall system installed properly. There are 3 sections that will cover different aspects of the installation. You only need to open the guides that apply to the equipment you received/purchased. | ||
<BR> | |||
</div> | |||
<BR> | |||
<div style="box-shadow: 0 0 10px 0 #b1d5ee inset; border-radius:5px; padding:10px; padding-left:20px; background:#ebf4fa;"> | |||
<span style="color:#00719e; font-family: Helvetica; font-size:150%; font-variant: small-caps; padding-left:20px;">'''IT Information'''</span> | |||
::<span style="font-size:120%; line-height: 3.5em; background:white; border:thin solid #90A4AE; border-radius:5px; padding:5px">[[VT3000_-_IT_Considerations|'''System Architecture Overview''']]</span> | |||
::<span style="font-size:120%; line-height: 3.5em; background:white; border:thin solid #90A4AE; border-radius:5px; padding:5px">[[VT3000_-_Minimum_Requirements|'''Minimum Computer/Server Requirements''']]</span> | |||
</div> | |||
<BR> | |||
<div style="box-shadow: 0 0 10px 0 #b1d5ee inset; border-radius:5px; padding:10px; padding-left:20px; background:#ebf4fa;"> | |||
<span style="color:#00719e; font-family: Helvetica; font-size:150%; font-variant: small-caps; padding-left:20px;">'''Computer/Server'''</span> | |||
<BR> | |||
:If you received a Computer or Server from VersaCall in your order, click on the appropriate link below for installation instructions. | |||
= | :If your IT Department or Facility is providing the Computer or Server, skip to the bottom of this section for links related to Pre-Requisites and Software Installation. | ||
<BR> | |||
:<span style="color:#90A4AE; font-size:130%">'''VersaCall Provided ___________________________________'''</span> | |||
< | :[[File:Computer-All-Parts.png|500px|link=Installation]] | ||
::<span style="font-size:120%; line-height: 3.5em; background:white; border:thin solid #90A4AE; border-radius:5px; padding:5px"> [[VT3000 - Install Standard PC|'''Installation Instructions''']]</span> | |||
<BR> | |||
:<span style="color:#90A4AE; font-size:130%">'''IT/Facility Provided _________________________________'''</span> | |||
::<span style="font-size:120%; line-height: 3.5em; background:white; border:thin solid #90A4AE; border-radius:5px; padding:5px"> [[VT3000 - Install - Pre-Requisites|'''Step 1''' - Install/Setup all Pre Installation Settings & Features.]]</span> | |||
::<span style="font-size:120%; line-height: 3.5em; background:white; border:thin solid #90A4AE; border-radius:5px; padding:5px">[[VT3000 - Install - SQL Server 2017|'''Step 2A''' - Install SQL Server Express.]]</span> | |||
::<span style="font-size:120%; line-height: 3.5em; background:white; border:thin solid #90A4AE; border-radius:5px; padding:5px">[[VT3000 - Install - Existing SQL Server Instance|'''Step 2B''' - Use an existing SQL Server Instance.]]</span> | |||
::<span style="font-size:120%; line-height: 3.5em; background:white; border:thin solid #90A4AE; border-radius:5px; padding:5px">[[VT3000 - Install VersaCall Software|'''Step 3''' - Install the VersaCall (VT3000) Software.]]</span> | |||
</div> | |||
<BR> | |||
<div style="box-shadow: 0 0 10px 0 #b1d5ee inset; border-radius:5px; padding:10px; padding-left:20px; background:#ebf4fa;"> | |||
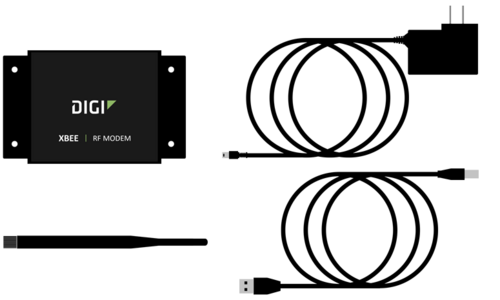
<span style="color:#00719e; font-family: Helvetica; font-size:150%; font-variant: small-caps; padding-left:20px;">'''Coordinator'''</span> | |||
<BR> | |||
:<span style="color:#90A4AE; font-size:130%">'''USB __________________________________________________'''</span> | |||
:[[File:USB-Coor-All-Parts.png|500px]] | |||
= | ::<span style="font-size:120%; line-height: 3.5em; background:white; border:thin solid #90A4AE; border-radius:5px; padding:5px">[[VT3000 - Install Coordinator - USB|'''Install Hardware''']]</span> | ||
::<span style="font-size:120%; line-height: 3.5em; background:white; border:thin solid #90A4AE; border-radius:5px; padding:5px">[[VT3000 - Replace Coordinator - USB|'''Install Replacement Hardware''']]</span> | |||
<BR> | |||
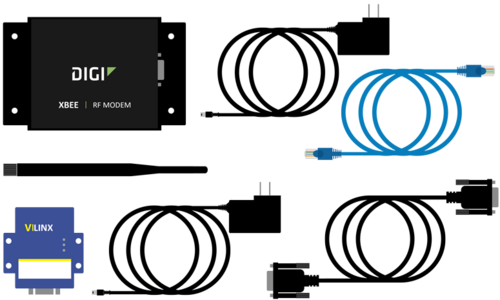
:<span style="color:#90A4AE; font-size:130%">'''Remote - Real Port - Ethernet ________________________'''</span> | |||
:[[File:Real-Coor-All-Parts.png|500px]] | |||
< | ::<span style="font-size:120%; line-height: 3.5em; background:white; border:thin solid #90A4AE; border-radius:5px; padding:5px">[[VT3000 - Install Coordinator - Real-Port - Same Subnet|'''Install Hardware - Same Subnet''']]</span> | ||
::<span style="font-size:120%; line-height: 3.5em; background:white; border:thin solid #90A4AE; border-radius:5px; padding:5px">[[VT3000 - Install Coordinator - Real-Port - Different Subnet|'''Install Hardware - Different Subnets''']]</span> | |||
<BR> | |||
:<span style="color:#90A4AE; font-size:130%">'''Remote - Serial RS-232 - Ethernet ____________________'''</span> | |||
:[[File:RS232-Coor-All-Parts.png|500px]] | |||
::<span style="font-size:120%; line-height: 3.5em; background:white; border:thin solid #90A4AE; border-radius:5px; padding:5px">[[VT3000 - Install Coordinator - Remote - Same Subnet|'''Install Hardware - Same Subnet''']]</span> | |||
::<span style="font-size:120%; line-height: 3.5em; background:white; border:thin solid #90A4AE; border-radius:5px; padding:5px">[[VT3000 - Install Coordinator - Remote - Different Subnet|'''Install Hardware - Different Subnets''']]</span> | |||
</div> | |||
<BR> | |||
<div style="box-shadow: 0 0 10px 0 #b1d5ee inset; border-radius:5px; padding:10px; padding-left:20px; background:#ebf4fa;"> | |||
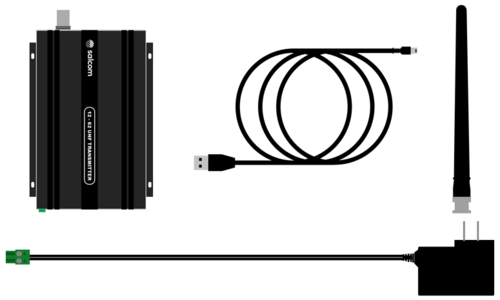
<span style="color:#00719e; font-family: Helvetica; font-size:150%; font-variant: small-caps; padding-left:20px;">'''Paging Transmitter'''</span> | |||
<BR> | |||
:<span style="color:#90A4AE; font-size:130%">'''Model 12-62 - USB ____________________________________'''</span> | |||
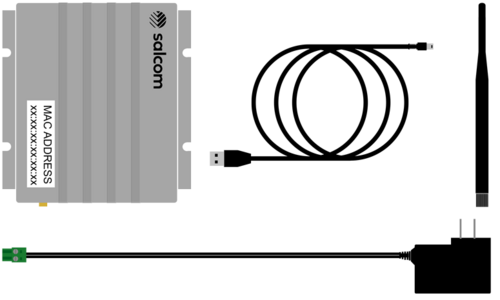
:[[File:1262-USB-All-Parts.png|500px]] | |||
::<span style="font-size:120%; line-height: 3.5em; background:white; border:thin solid #90A4AE; border-radius:5px; padding:5px">[[VT3000_-_Install_Paging_Transmitter_-_USB|'''Install Hardware''']]</span> | |||
= | ::<span style="font-size:120%; line-height: 3.5em; background:white; border:thin solid #90A4AE; border-radius:5px; padding:5px">[[VT3000 - Replace Paging Transmitter - USB|'''Install Replacement Hardware''']]</span> | ||
<BR> | |||
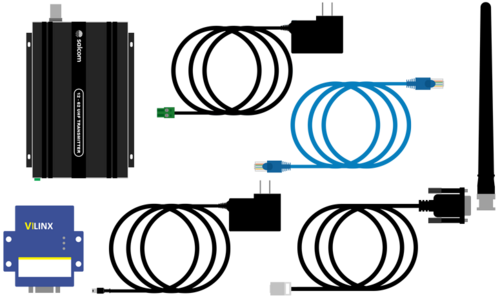
:<span style="color:#90A4AE; font-size:130%">'''Model 12-62 - Ethernet _______________________________'''</span> | |||
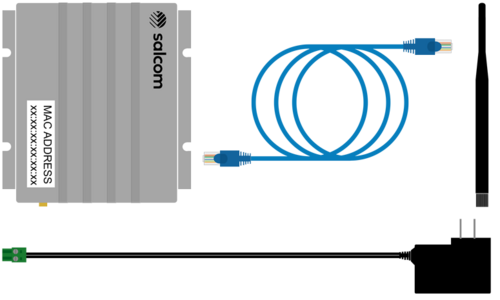
< | :[[File:1262-Remote-All-Parts.png|500px]] | ||
::<span style="font-size:120%; line-height: 3.5em; background:white; border:thin solid #90A4AE; border-radius:5px; padding:5px">[[VT3000_-_Install_Paging_Transmitter_-_Remote_-_Same_Subnet|'''Install Hardware - Same Subnet''']]</span> | |||
::<span style="font-size:120%; line-height: 3.5em; background:white; border:thin solid #90A4AE; border-radius:5px; padding:5px">[[VT3000_-_Install_Paging_Transmitter_-_Remote_-_Different_Subnet|'''Install Hardware - Different Subnet''']]</span> | |||
<BR> | |||
:<span style="color:#90A4AE; font-size:130%">'''Model 20-62 - USB ____________________________________'''</span> | |||
:[[File:2062-USB-Parts.png|500px]] | |||
::<span style="font-size:120%; line-height: 3.5em; background:white; border:thin solid #90A4AE; border-radius:5px; padding:5px">[[VT3000 - Install 2062 Paging Transmitter - USB|'''Install Hardware''']]</span> | |||
<BR> | |||
:<span style="color:#90A4AE; font-size:130%">'''Model 20-62 - Ethernet _______________________________'''</span> | |||
:[[File:2062-All-Parts.png|500px]] | |||
= | ::<span style="font-size:120%; line-height: 3.5em; background:white; border:thin solid #90A4AE; border-radius:5px; padding:5px">[[VT3000 - Install 2062 Paging Transmitter - Remote - Ethernet Connected|'''Install Hardware''']]</span> | ||
</div> | |||
<BR> | |||
< | <div style="box-shadow: 0 0 10px 0 #b1d5ee inset; border-radius:5px; padding:10px; padding-left:20px; background:#ebf4fa;"> | ||
<span style="color:#00719e; font-family: Helvetica; font-size:150%; font-variant: small-caps; padding-left:20px;">'''Phone Modem'''</span> | |||
</ | :[[File:Modem-All-Parts.png|500px]] | ||
::<span style="font-size:120%; line-height: 3.5em; background:white; border:thin solid #90A4AE; border-radius:5px; padding:5px">[[VT3000 - Install Phone Modem|'''Install Hardware - VersaCall Provided Computer''']]</span> | |||
::<span style="font-size:120%; line-height: 3.5em; background:white; border:thin solid #90A4AE; border-radius:5px; padding:5px">[[VT3000 - Install Modem - NEW VersaCall Provided Computer|'''Install Instructions - IT Provided Computer''']]</span> | |||
</div> | |||
<BR> | |||
<div style="box-shadow: 0 0 10px 0 #b1d5ee inset; border-radius:5px; padding:10px; padding-left:20px; background:#ebf4fa;"> | |||
<span style="color:#00719e; font-family: Helvetica; font-size:150%; font-variant: small-caps; padding-left:20px;">'''2-Way Radio'''</span> | |||
:[[File:Radio-All-Parts.png|500px]] | |||
::<span style="font-size:120%; line-height: 3.5em; background:white; border:thin solid #90A4AE; border-radius:5px; padding:5px">[[VT3000 - Install 2-Way Radio Module|'''Install Hardware''']]</span> | |||
::<span style="font-size:120%; line-height: 3.5em; background:white; border:thin solid #90A4AE; border-radius:5px; padding:5px">[[VT3000 - Radio Install Troubleshooting|'''Troubleshooting''']]</span> | |||
= | </div> | ||
<BR> | |||
<div style="box-shadow: 0 0 10px 0 #b1d5ee inset; border-radius:5px; padding:10px; padding-left:20px; background:#ebf4fa;"> | |||
< | <span style="color:#00719e; font-family: Helvetica; font-size:150%; font-variant: small-caps; padding-left:20px;">'''Android Device'''</span> | ||
File: | :[[File:Mini-PC-All-Parts.png|500px]] | ||
::<span style="font-size:120%; line-height: 3.5em; background:white; border:thin solid #90A4AE; border-radius:5px; padding:5px">[[VT3000 - Install Android HDMI Mini PC|'''Install Hardware''']]</span> | |||
</div> | |||
<BR> | |||
<div style="box-shadow: 0 0 10px 0 #b1d5ee inset; border-radius:5px; padding:10px; padding-left:20px; background:#ebf4fa;"> | |||
<span style="color:#00719e; font-family: Helvetica; font-size:150%; font-variant: small-caps; padding-left:20px;">'''Call Station'''</span> | |||
<BR> | |||
:<span style="color:#90A4AE; font-size:130%">'''Battery Powered'''</span> | |||
[[File:CS-Battery-All-Parts.png|500px]] | |||
::<span style="font-size:120%; line-height: 3.5em; background:white; border:thin solid #90A4AE; border-radius:5px; padding:5px">[[VT3000_-_Install_Call_Station_-_Battery|'''Install Hardware''']]</span> | |||
= | ---- | ||
:<span style="color:#90A4AE; font-size:130%">'''Powered (110VAC)'''</span> | |||
:[[File:CS-Power-All-Parts.png|500px]] | |||
::<span style="font-size:120%; line-height: 3.5em; background:white; border:thin solid #90A4AE; border-radius:5px; padding:5px">[[VT3000_-_Install_Call_Station_-_Powered|'''Install Hardware''']]</span> | |||
File: | </div> | ||
<BR> | |||
<div style="box-shadow: 0 0 10px 0 #b1d5ee inset; border-radius:5px; padding:10px; padding-left:20px; background:#ebf4fa;"> | |||
<span style="color:#00719e; font-family: Helvetica; font-size:150%; font-variant: small-caps; padding-left:20px;">'''Bsc'''</span> | |||
:[[File:BSC-All-Parts.png|500px]] | |||
::<span style="font-size:120%; line-height: 3.5em; background:white; border:thin solid #90A4AE; border-radius:5px; padding:5px">[[VT3000 - Install BSC with IO|'''Install Hardware''']]</span> | |||
</div> | |||
<BR> | |||
== | <div style="box-shadow: 0 0 10px 0 #b1d5ee inset; border-radius:5px; padding:10px; padding-left:20px; background:#ebf4fa;"> | ||
<span style="color:#00719e; font-family: Helvetica; font-size:150%; font-variant: small-caps; padding-left:20px;">'''Psm'''</span> | |||
:[[File:PSM-All-Parts.png|500px]] | |||
::<span style="font-size:120%; line-height: 3.5em; background:white; border:thin solid #90A4AE; border-radius:5px; padding:5px">[[VT3000_-_Install_PSM_with_IO|'''Install Hardware''']]</span> | |||
File: | </div> | ||
<BR> | |||
<div style="box-shadow: 0 0 10px 0 #b1d5ee inset; border-radius:5px; padding:10px; padding-left:20px; background:#ebf4fa;"> | |||
<span style="color:#00719e; font-family: Helvetica; font-size:150%; font-variant: small-caps; padding-left:20px;">'''Repeater'''</span> | |||
:[[File:Repeater-All-Parts.png|500px]] | |||
::<span style="font-size:120%; line-height: 3.5em; background:white; border:thin solid #90A4AE; border-radius:5px; padding:5px">[[VT3000_-_Install_a_Repeater|'''Install Hardware''']]</span> | |||
</div> | |||
<BR> | |||
= | <div style="box-shadow: 0 0 10px 0 #b1d5ee inset; border-radius:5px; padding:10px; padding-left:20px; background:#ebf4fa;"> | ||
<span style="color:#00719e; font-family: Helvetica; font-size:150%; font-variant: small-caps; padding-left:20px;">'''Audio Module'''</span> | |||
:[[File:Wireless-Audio.png|500px]] | |||
< | ::<span style="font-size:120%; line-height: 3.5em; background:white; border:thin solid #90A4AE; border-radius:5px; padding:5px">[[VT3000_-_Install_Wireless_Tone_Audio_Module|'''Install Hardware''']]</span> | ||
</div> | |||
<BR> | |||
<div style="box-shadow: 0 0 10px 0 #b1d5ee inset; border-radius:5px; padding:10px; padding-left:20px; background:#ebf4fa;"> | |||
<span style="color:#00719e; font-family: Helvetica; font-size:150%; font-variant: small-caps; padding-left:20px;">'''Light Stack'''</span> | |||
:[[File:WCM-All-Parts.png|500px]] | |||
::<span style="font-size:120%; line-height: 3.5em; background:white; border:thin solid #90A4AE; border-radius:5px; padding:5px">[[VT3000_-_Install_Wireless_Light_Module|'''Install Hardware''']]</span> | |||
</div> | |||
== | <BR> | ||
<div style="box-shadow: 0 0 10px 0 #b1d5ee inset; border-radius:5px; padding:10px; padding-left:20px; background:#ebf4fa;"> | |||
<span style="color:#00719e; font-family: Helvetica; font-size:150%; font-variant: small-caps; padding-left:10px;">'''Keyword Search'''</span> | |||
< | {|style="margin:auto;" | ||
{|class="wikitable" style="align:center; width:600px;" | |||
|- | |||
!<span style="color:#0054a6; font-size:120%"><big>Type Subject or Key Word to Query Archives</big></span> | |||
|- | |||
|<inputbox>type=search</inputbox> | |||
|} | |||
|} | |||
</div> | |||
<br> | |||
[[File:VC Footer.png|center|link=Main Page]] | |||
{|style="background:transparent; color:black" border="0" height="200" align="center" valign="bottom" cellpadding=10px cellspacing=10px | |||
|+style="background:transparent| | |||
|-align="center" | |||
File: | | | ||
< | |[[File:LinkedIn.png|Follow Us On LinkedIn|link=https://www.linkedin.com/company/versacall/]] | ||
| | |||
|[[File:BlogIcon.png|View our Blog|link=https://www.versacall.com/blog/]] | |||
|} | |||
=''' | |||
= | |||
= | |||
Latest revision as of 16:40, 9 November 2023

|

|

|
General Information
- This page is designed to help you get your VersaCall system installed properly. There are 3 sections that will cover different aspects of the installation. You only need to open the guides that apply to the equipment you received/purchased.
IT Information
Computer/Server
- If you received a Computer or Server from VersaCall in your order, click on the appropriate link below for installation instructions.
- If your IT Department or Facility is providing the Computer or Server, skip to the bottom of this section for links related to Pre-Requisites and Software Installation.
- VersaCall Provided ___________________________________

- IT/Facility Provided _________________________________
Coordinator
- USB __________________________________________________

- Remote - Real Port - Ethernet ________________________


- Remote - Serial RS-232 - Ethernet ____________________

Paging Transmitter
- Model 12-62 - USB ____________________________________

- Model 12-62 - Ethernet _______________________________

- Model 20-62 - USB ____________________________________

- Model 20-62 - Ethernet _______________________________

Phone Modem

2-Way Radio

Android Device


Bsc

Psm

Repeater

Audio Module

Light Stack

Keyword Search
| Type Subject or Key Word to Query Archives |
|---|

|